
Black-eyed peas have been a staple in Southern cuisine for generations. They’re not just delicious but also packed with protein, fiber, and essential nutrients. Traditionally, cooking black-eyed peas required hours of soaking and simmering, but thanks to the Instant Pot, you can enjoy them in under an hour—no soaking required!
In this guide, you’ll learn how to make flavorful, perfectly textured black-eyed peas in the Instant Pot, along with seasoning tips, cooking hacks, and serving suggestions. Whether you like them vegan, smoky, or spicy, this recipe is customizable and foolproof!
Let’s start with the history and benefits of this humble yet nutritious legume.
What Are Black-Eyed Peas?
A Brief History of Black-Eyed Peas
Black-eyed peas, also known as cowpeas, have been cultivated for over 5,000 years. Originally from West Africa, they were brought to the Americas during the transatlantic trade and quickly became a Southern comfort food staple.
They hold symbolic significance, especially on New Year’s Day, where they’re believed to bring good luck and prosperity when eaten with greens and cornbread.
Nutritional Benefits of Black-Eyed Peas
These small, creamy legumes pack a nutritional punch! Here’s what makes them a healthy addition to your meals:
- High in Fiber: Supports digestion and gut health.
- Rich in Protein: Ideal for vegetarians and vegans.
- Packed with Iron & Folate: Great for energy and blood health.
- Low in Calories: A nutritious, weight-friendly food.
Enjoy them with a holiday classic like our Peach Crisp Recipe with Canned Peaches
Why Use an Instant Pot for Cooking Black-Eyed Peas?
The Instant is a game-changer for cooking black-eyed peas because:
- No Soaking Required: Unlike traditional methods, Instant Pot pressure cooking eliminates the need for overnight soaking.
- Faster Cooking: Instead of hours on the stovetop, you’ll have tender black-eyed peas in under an hour.
- Flavor Retention: The sealed pressure locks in seasonings, creating a richer taste.
- Consistent Texture: No more mushy or undercooked beans—just perfect every time!
Ingredients & Substitutions
Essential Ingredients for Instant Pot Black-Eyed Peas
Making black-eyed peas in the Instant Pot requires a handful of simple ingredients. Here’s what you’ll need:
The Core Ingredients
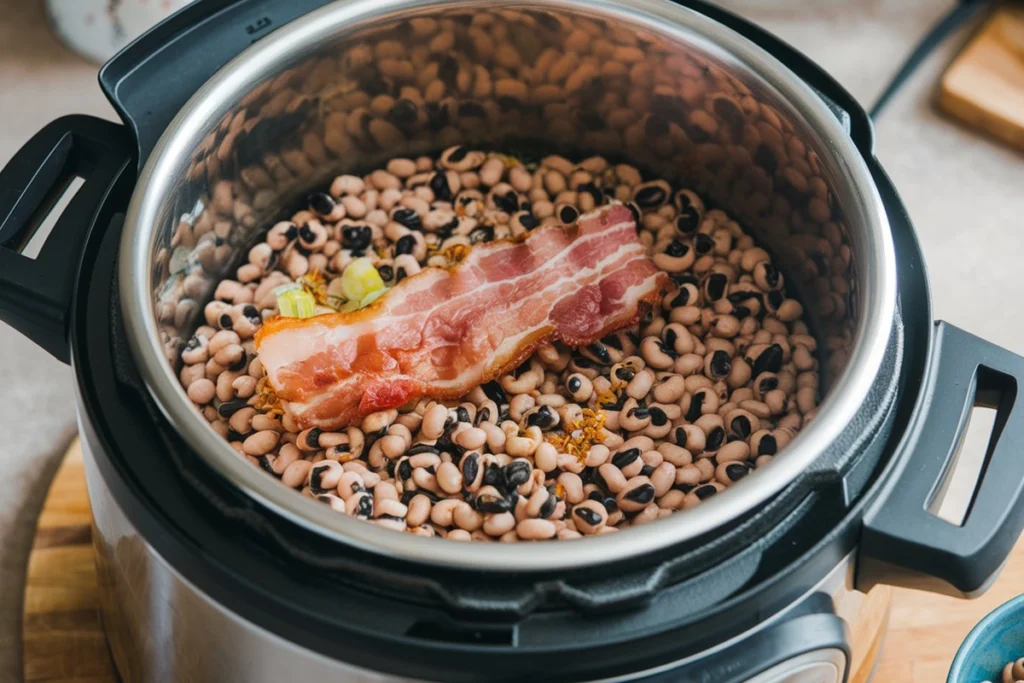
- 1 pound dried black-eyed peas – No need to soak!
- 4 cups broth (chicken or vegetable) – Adds depth to the flavor.
- 1 small onion, diced – Enhances taste and aroma.
- 3 cloves garlic, minced – Essential for a robust, savory profile.
- 1 teaspoon salt – Balances flavors without overpowering.
- ½ teaspoon black pepper – Provides a subtle kick.
- 1 teaspoon smoked paprika – Adds a hint of smokiness.
- 1 bay leaf – Boosts aroma and depth.
Optional Add-Ins for Extra Flavor
- 1 smoked turkey leg or ham hock – Gives the peas a rich, meaty flavor.
- ½ teaspoon cayenne pepper – Perfect if you like a little heat.
- 1 cup diced tomatoes – Adds a slight acidity to balance flavors.
- 1 tablespoon apple cider vinegar – Enhances the overall taste.
Best Ingredient Substitutions
Whether you have dietary restrictions or just want to experiment, these swaps work perfectly:
- For a vegan version – Use vegetable broth and add a splash of liquid smoke for depth.
- Low-sodium alternative – Reduce the salt and opt for homemade broth.
- To make it creamier – Stir in a small amount of coconut milk before serving.
- No broth on hand? Use water, but add extra spices for more flavor.
Step-by-Step Cooking Guide
How to Cook Black-Eyed Peas in the Instant Pot
Cooking black-eyed peas in the Instant Pot is quick and hassle-free. Follow these simple steps to achieve the best results.
Step 1 – Preparing the Black-Eyed Peas
- Rinse and sort through the black-eyed peas to remove any debris or damaged beans.
- Optional: If you prefer soaking, cover them with water and let them sit for 4-6 hours, then drain before cooking.
Step 2 – Sautéing for Extra Flavor
- Set the Instant to ‘Sauté’ mode and heat 1 tablespoon of oil.
- Add diced onion and minced garlic, then stir for 2-3 minutes until fragrant.
- If using smoked meat, add it now to sear slightly before pressure cooking.
Step 3 – Pressure Cooking the Black-Eyed Peas
- Pour in broth or water, then add seasonings and bay leaf.
- Stir well, ensuring all peas are submerged.
- Close the lid, set the valve to ‘Sealing’, and select ‘Pressure Cook’ (or ‘Manual’) on HIGH for 15 minutes.
Step 4 – Releasing Pressure & Final Touches
- Once the timer is up, let the pressure naturally release for 10 minutes before manually releasing any remaining pressure.
- Open the lid carefully, then discard the bay leaf. If using smoked meat, remove it, shred, and stir it back in.
- Taste and adjust seasoning if necessary.
How to Cook Black-Eyed Peas So They Are Not Mushy
The Secret to Perfectly Cooked Black-Eyed Peas
Achieving the right texture depends on cooking time, liquid ratio, and pressure release method. Follow these tips to keep your black-eyed peas firm yet tender.
Control Cooking Time & Pressure
- Stick to 15 minutes on HIGH pressure – Any longer can cause the peas to break down.
- Use natural release for 10 minutes, then quick release any remaining pressure. This gradual depressurization helps prevent overcooking.
Adjust the Liquid Ratio
- Too much liquid? The peas can turn mushy. Use 4 cups of broth per 1 pound of peas for the best consistency.
- Want firmer peas? Reduce liquid slightly and drain excess moisture after cooking.
Stirring & Finishing Tips
- Avoid over-stirring once cooked—this can break the peas apart.
- Add acidic ingredients like tomatoes or vinegar at the end, as they can slow down softening if added too early.
What Should I Season My Black-Eyed Peas With?
Classic Southern Seasonings
Traditional black-eyed peas have deep, smoky flavors that pair well with hearty meals. Common seasonings include:
- Smoked meats – Ham hocks, turkey legs, or bacon for richness.
- Onions & garlic – Essential aromatics for depth.
- Bay leaf & thyme – Adds an earthy, herby touch.
- Salt & black pepper – Simple but crucial for balance.
Vegetarian & Vegan Seasoning Alternatives
For those avoiding meat, these seasonings provide bold flavor without animal products:
- Smoked paprika or liquid smoke – Mimics the depth of smoked meats.
- Vegetable broth – Infuses extra savoriness.
- Cumin & coriander – Introduces warmth and complexity.
- Coconut aminos or soy sauce – Enhances umami notes.
Global Variations for Extra Flavor
Experimenting with different seasoning styles can elevate your black-eyed peas:
- Cajun Style: Add cayenne pepper, celery, and bell peppers.
- Caribbean Twist: Include coconut milk, allspice, and scotch bonnet pepper.
- Indian-Inspired: Use turmeric, ginger, and garam masala.
Serving & Storage Tips
Best Ways to Serve Black-Eyed Peas
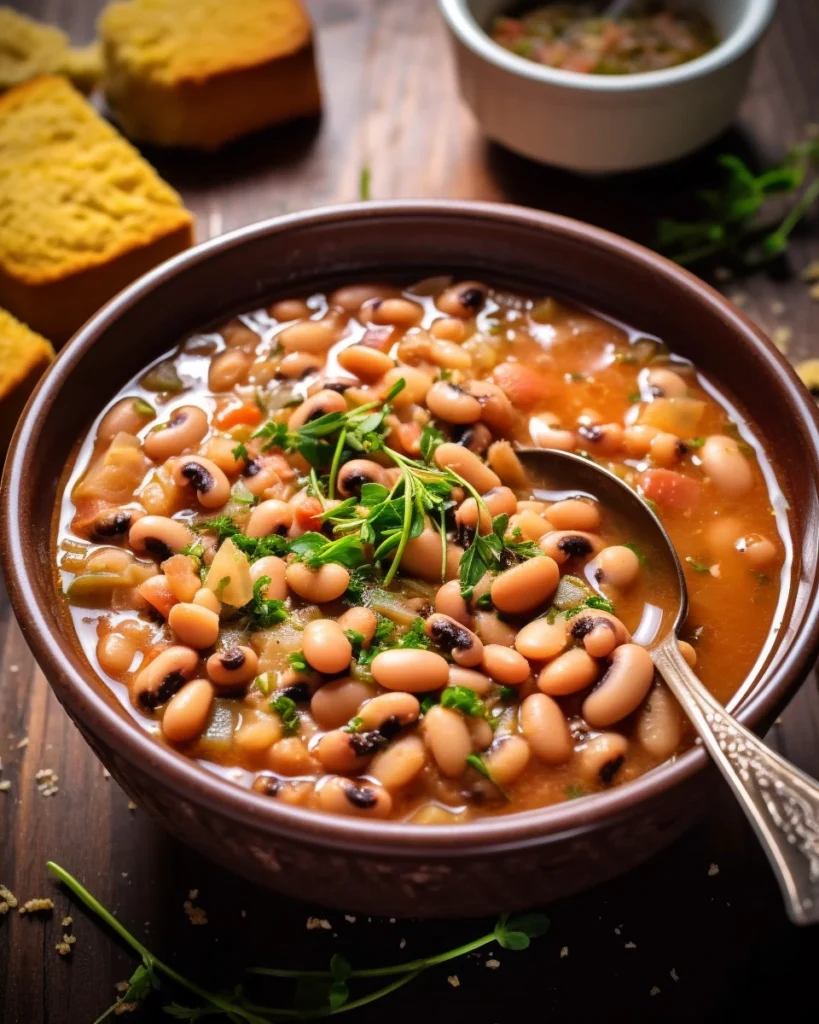
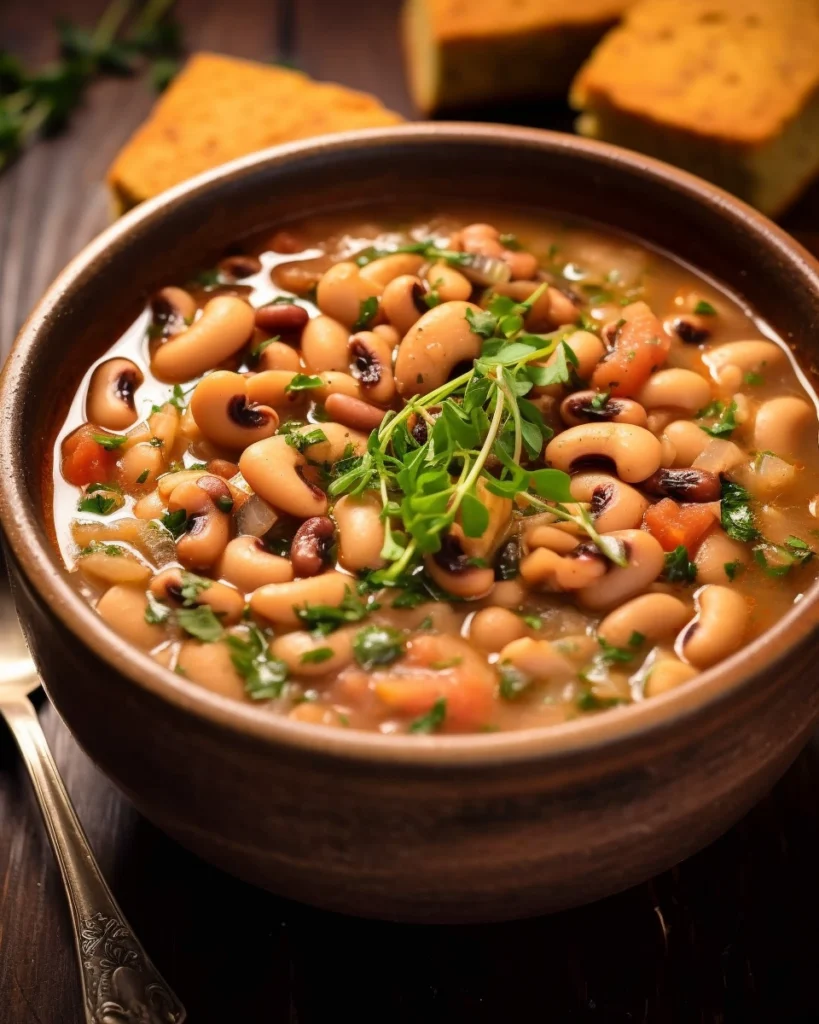
Black-eyed peas are a versatile dish that pairs well with a variety of meals. Here are some classic serving ideas:
Traditional Southern Pairings
- Cornbread: A perfect companion to soak up the flavorful broth.
- Collard Greens: A classic New Year’s tradition believed to bring prosperity.
- Rice: Serve over white or brown rice for a hearty meal.
Creative Ways to Enjoy Leftovers
- Black-Eyed Pea Salad: Toss with diced tomatoes, cucumbers, and vinaigrette.
- Taco Filling: Use in place of meat for a nutritious, plant-based option.
- Soup or Stew Base: Blend into a thicker consistency for a comforting bowl.
Pair these peas with our savory and crispy Broast Chicken Guide for a classic Southern combo
How to Store & Reheat Black-Eyed Peas
Refrigerating for Short-Term Storage
- Allow peas to cool completely before transferring them to an airtight container.
- Store in the fridge for up to 4 days.
Freezing for Long-Term Storage
- Portion into freezer-safe bags or containers.
- Label with the date and freeze for up to 3 months.
- Tip: Freeze in small portions for easy reheating.
Best Ways to Reheat Without Losing Texture
- Stovetop: Heat on medium-low, adding a splash of broth or water to prevent drying out.
- Microwave: Use a microwave-safe dish, covering with a damp paper towel to retain moisture.
- Instant Pot: Reheat using the ‘Sauté’ function for a quick and even warm-up.
Frequently Asked Questions (FAQs)
Do Black-Eyed Peas Have to Be Soaked Before Cooking?
No, soaking is not required when using an Instant Pot! The pressure cooking method softens dried black-eyed peas quickly, eliminating the need for overnight soaking. However, if you prefer a slightly quicker cook time and even texture, a 30-minute soak can help.
How Long Do You Cook Black-Eyed Peas in the Instant Pot?
The ideal cooking time depends on whether the peas are pre-soaked or dry:
- Unsoaked black-eyed peas: Cook for 15 minutes on HIGH pressure, then natural release for 10 minutes.
- Soaked black-eyed peas: Reduce the cooking time to 8 minutes, followed by 10 minutes of natural release.
Can I Cook Black-Eyed Peas Without Meat?
Absolutely! For a vegetarian or vegan version, substitute smoked meats with:
- Smoked paprika or liquid smoke for depth.
- Vegetable broth instead of chicken broth.
- Sautéed mushrooms to add umami richness.
How Do I Store and Reheat Leftover Black-Eyed Peas?
- Refrigeration: Store in an airtight container for up to 4 days.
- Freezing: Freeze in portions for up to 3 months.
- Reheating: Warm on the stovetop with a little broth or in the microwave with a damp paper towel to keep moisture locked in.
Additional FAQs
Can I Make Black-Eyed Peas in a Slow Cooker?
Yes! Cook on LOW for 6-8 hours or HIGH for 3-4 hours. Add seasonings at the start for deep flavor.
How Do I Make Creamy Black-Eyed Peas Without Overcooking?
Mash a portion of the peas before serving and stir well. This thickens the broth while keeping the beans intact.
More Cooking Tips to Avoid Mushy Peas
Extra Expert Tips for Perfect Texture
- Use 3.5 cups of liquid instead of 4 cups if you prefer firmer peas.
- Cook on HIGH for 14 minutes instead of 15 if you want a slightly chewier bite.
- Allow full natural pressure release (15 minutes) for the best texture.
- If you prefer a creamy consistency, mash 1/4 of the cooked peas before serving.
More Seasoning Ideas for Extra Flavor
Global Variations to Try
- Mediterranean: Add oregano, rosemary, and lemon zest.
- Latin-Inspired: Use cumin, chipotle powder, and a dash of lime juice.
- Asian-Inspired: Try soy sauce, ginger, and a sprinkle of sesame seeds.
Conclusion & Final Thoughts
Cooking Instant Black-Eyed Peas is quick, easy, and packed with flavor. Whether you prefer them smoky, spicy, or seasoned with Southern charm, this recipe offers endless possibilities. Thanks to the Instant Pot, you can skip the soaking step and still achieve perfectly tender peas in under an hour.
By following these step-by-step instructions, seasoning tips, and storage guidelines, you’ll always have delicious black-eyed peas ready to serve. Whether paired with cornbread, rice, or greens, this dish is a true comfort food classic.
What’s Your Favorite Way to Enjoy Black-Eyed Peas
Do you stick with the traditional recipe, or do you like to add your own creative twist? Have you tried making them vegan or extra spicy?
💬 Drop a comment below and share your favorite black-eyed pea variations! We’d love to hear your tips, tricks, and secret ingredients.
Print
Instant Pot Black-Eyed Peas Recipe
Description
Prep Time: 10 minutes | Cook Time: 15 minutes | Total Time: 45 minutes | Servings: 6-8
Ingredients
Essential Ingredients
-
1 pound dried black-eyed peas (no soaking required)
-
4 cups broth (chicken or vegetable)
-
1 small onion, diced
-
3 cloves garlic, minced
-
1 teaspoon salt
-
½ teaspoon black pepper
-
1 teaspoon smoked paprika
-
1 bay leaf
Optional Add-Ins
-
1 smoked turkey leg or ham hock (for richer flavor)
-
½ teaspoon cayenne pepper (for a spicy kick)
-
1 cup diced tomatoes
-
1 tablespoon apple cider vinegar
-
1 sprig fresh thyme
Instructions
Step 1 – Prepare the Black-Eyed Peas
-
Rinse and sort the black-eyed peas to remove any debris or damaged beans.
Step 2 – Sauté for Extra Flavor
-
Set the Instant Pot to ‘Sauté’ mode and heat 1 tablespoon of oil.
-
Add diced onion and minced garlic, cooking for 2-3 minutes until fragrant.
-
If using smoked meat, sear it lightly in the pot before proceeding.
Step 3 – Pressure Cook the Black-Eyed Peas
-
Pour in broth, then add seasonings and bay leaf.
-
Stir well, ensuring all peas are submerged.
-
Close the lid, set the valve to ‘Sealing’, and select ‘Pressure Cook’ on HIGH for 15 minutes.
Step 4 – Release Pressure & Final Touches
-
Once done, let the pressure naturally release for 10 minutes, then quick-release any remaining pressure.
-
Open the lid carefully, discard the bay leaf, and shred the smoked meat (if used) before stirring it back in.
-
Taste and adjust seasoning as needed.
Notes
✔️ For a thicker consistency: Mash ¼ of the cooked peas before serving. ✔️ For firmer peas: Use only 3.5 cups of liquid and reduce cooking time to 14 minutes. ✔️ Storage: Refrigerate leftovers for up to 4 days or freeze for up to 3 months. ✔️ Reheating: Add a splash of broth or water when reheating on the stovetop or microwave. ✔️ Serving Suggestions: Pair with cornbread, collard greens, or rice for a complete meal.


Can you make this with fresh black eyed peas?