Ever come home after a long day and wish dinner would magically appear? If so, you’re going to love these slow cooker ground beef recipes that practically cook themselves. With minimal prep and maximum flavor, these hearty meals are budget-friendly, kid-approved, and perfect for meal prepping. Plus, they cater to various dietary needs, including gluten-free and dairy-free options.
Using a slow cooker transforms simple ingredients into something comforting and deeply flavorful with barely any effort. It’s like having a personal chef working in your kitchen all day while you conquer your to-do list. Ground beef is a fantastic protein base—affordable, versatile, and easy to cook—which makes it ideal for slow cooker magic.
Whether you’re cooking for your family or prepping lunches for the week, these slow cooker ground beef recipes will become your go-to solutions.
Brown the Beef: In a skillet over medium heat, cook ground beef until no longer pink. Drain excess grease.
Layer Ingredients: Add beef, onion, garlic, bell pepper, tomatoes, tomato sauce, spices, and broth into the slow cooker.
Cook: Set the slow cooker to LOW for 6-8 hours or HIGH for 3-4 hours.
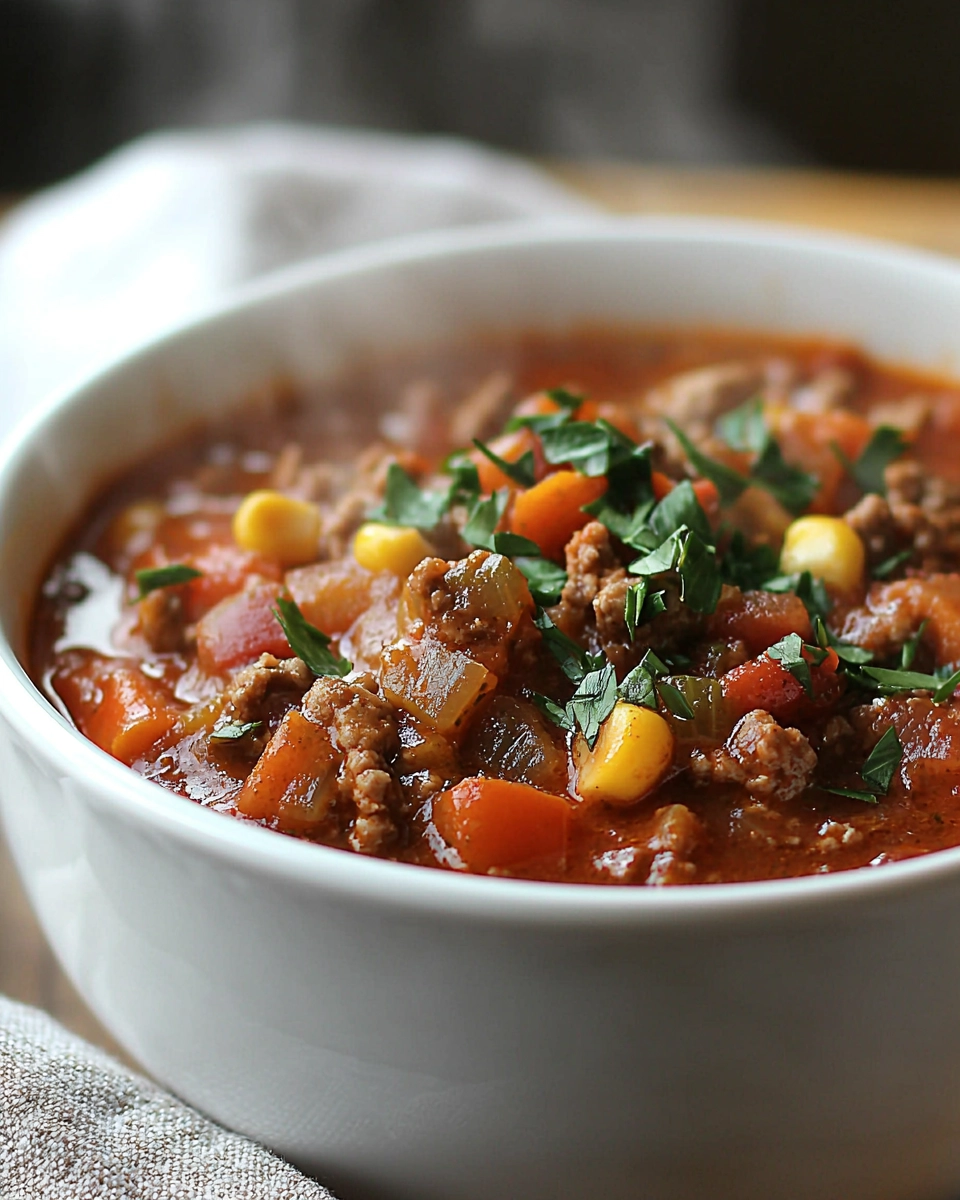
Add Extras: 30 minutes before serving, stir in corn and beans.
Final Touch: If using, sprinkle cheese on top and cover for the last 10 minutes to melt.
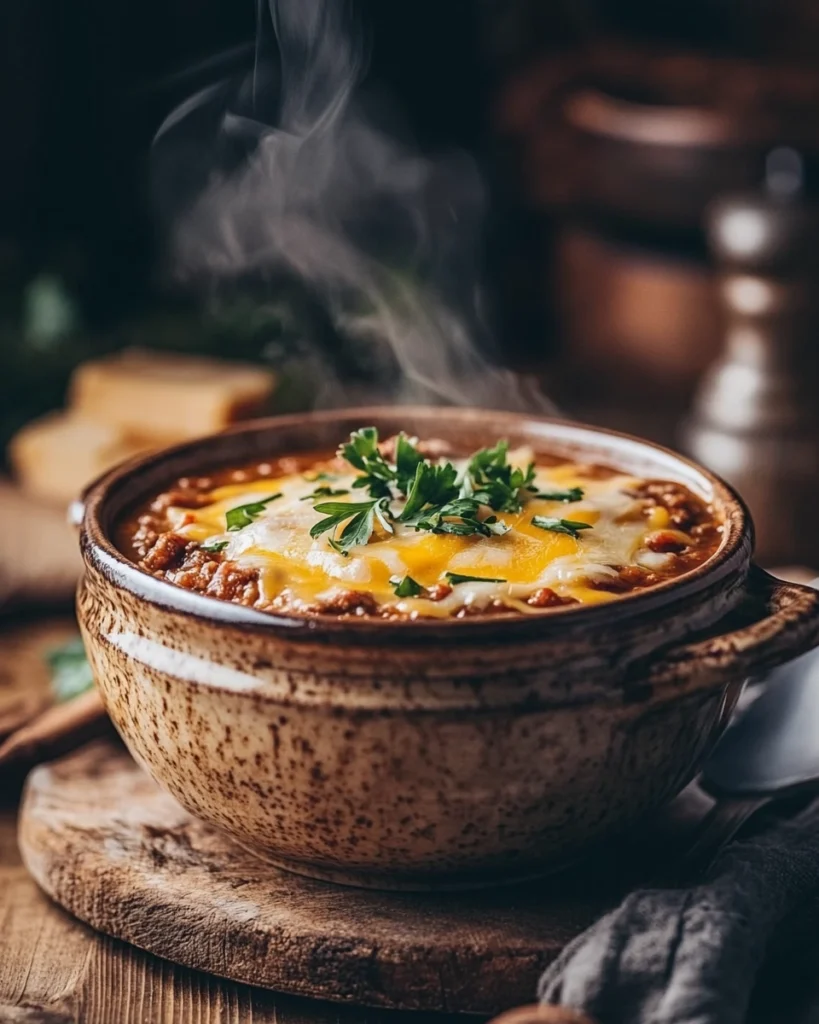
Serve: Scoop into bowls and garnish with fresh cilantro or a dollop of sour cream.
This method works like a charm for weekday dinners. With these slow cooker ground beef recipes, you can prep the night before, store everything in the fridge, and just hit “start” before work.
Helpful Tips
Don’t skip browning: It boosts flavor and prevents excess grease.
Layer smart: Always place denser ingredients at the bottom to ensure even cooking.
Low and slow: Longer cook times create deeper flavor.
Taste test: Adjust salt and spice levels halfway through cooking.
Make it ahead: Prep ingredients in a freezer bag and dump them straight into the slow cooker when ready.
Avoid overcooking veggies: If you’re adding softer veggies like zucchini, add them in the last hour.
Recipe Variations
Keto-Friendly: Omit beans and corn; add zucchini or spinach.
Spicy: Add diced jalapeño or a dash of cayenne.
Tex-Mex: Mix in taco seasoning and top with crushed tortilla chips.
Italian: Use marinara instead of tomato sauce and add Italian herbs.
Asian-Inspired: Use hoisin sauce, soy sauce, and shredded carrots.
Sweet & Savory: Add a dash of cinnamon and raisins for Moroccan flair.
These variations will help you keep your slow cooker ground beef recipes exciting and tailored to your family’s tastes.
Serving Suggestions
Serve over white rice, quinoa, or mashed potatoes.
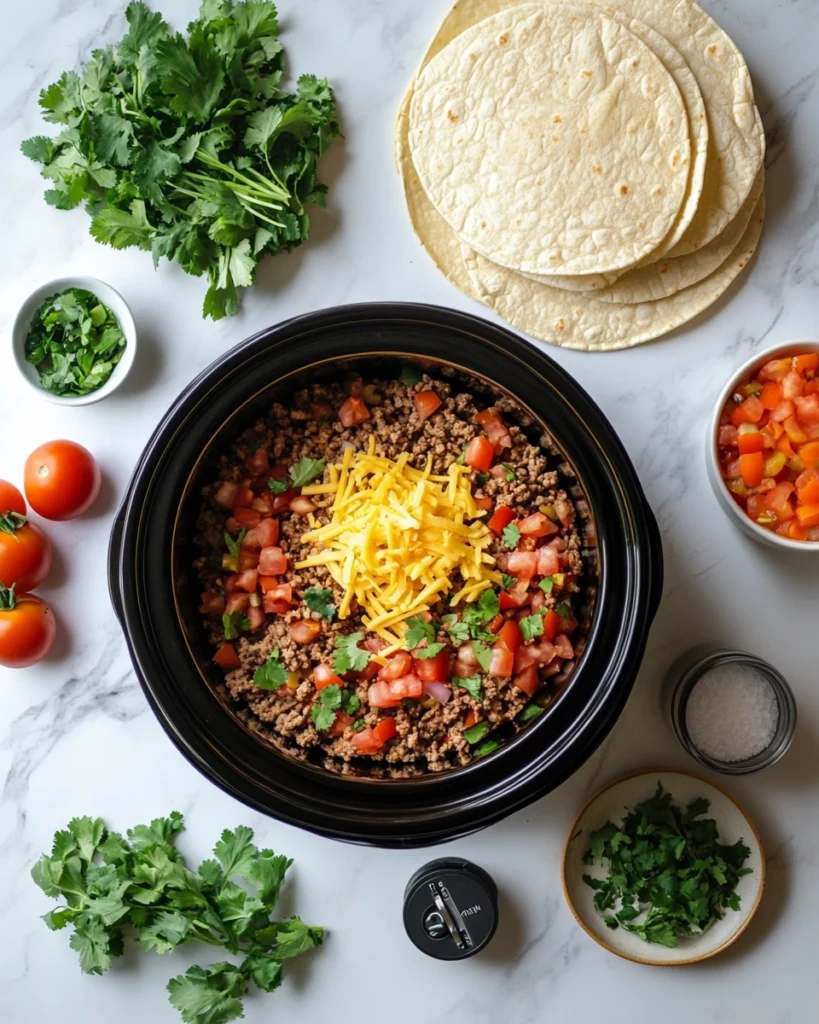
Scoop into taco shells or tortillas for an easy taco night.
Pair with a crisp garden salad or roasted veggies.
Make a hearty burrito bowl with toppings like avocado, pico de gallo, and lime wedges.
Use leftovers in a stuffed bell pepper or zucchini boat.
Fridge: Store in an airtight container for up to 4 days.
Freezer: Freeze portions in freezer-safe bags or containers for up to 3 months.
Reheating: Warm in microwave or stovetop with a splash of broth to retain moisture.
Refresh flavors: Sprinkle fresh herbs or a squeeze of lemon to brighten the dish when reheating.
Nutrition Facts (Per Serving)
Calories: 310
Fat: 16g
Saturated Fat: 7g
Unsaturated Fat: 7g
Trans Fat: 0g
Sugar: 4g
Sodium: 610mg
Carbohydrates: 20g
Fiber: 5g
Protein: 24g
Cholesterol: 60mg
Serving Size: 1.5 cups
Frequently Asked Questions (FAQs)
Can I freeze this? Absolutely! It freezes beautifully. Just cool completely before sealing and freezing.
Can I substitute the beef? Yes, ground turkey or chicken work great for a lighter version.
Is this good for meal prep? 100%! Portion into containers and refrigerate or freeze.
Can I double or halve the recipe? Yes, just ensure your slow cooker can handle the volume.
Do I need to stir during cooking? Not necessary, but a stir halfway through won’t hurt if you’re around.
Can I use this as a freezer meal? Definitely! Combine all uncooked ingredients (except broth and cheese) in a freezer bag. Label and freeze. Thaw overnight and dump into slow cooker with broth.
What sides go well with this? Cornbread, rice, roasted vegetables, or a fresh salad are perfect pairings.
Conclusion
These slow cooker ground beef recipes are the answer to weeknight chaos. Packed with flavor, flexible for any diet, and super easy to make ahead, they deserve a spot in your regular dinner rotation. So grab your slow cooker, toss in those ingredients, and enjoy a no-fuss, all-flavor kind of meal.
There’s nothing quite like coming home to a ready-made dinner that fills your kitchen with mouthwatering aromas. It’s comfort food at its best—simple, satisfying, and perfect for sharing with the people you love.
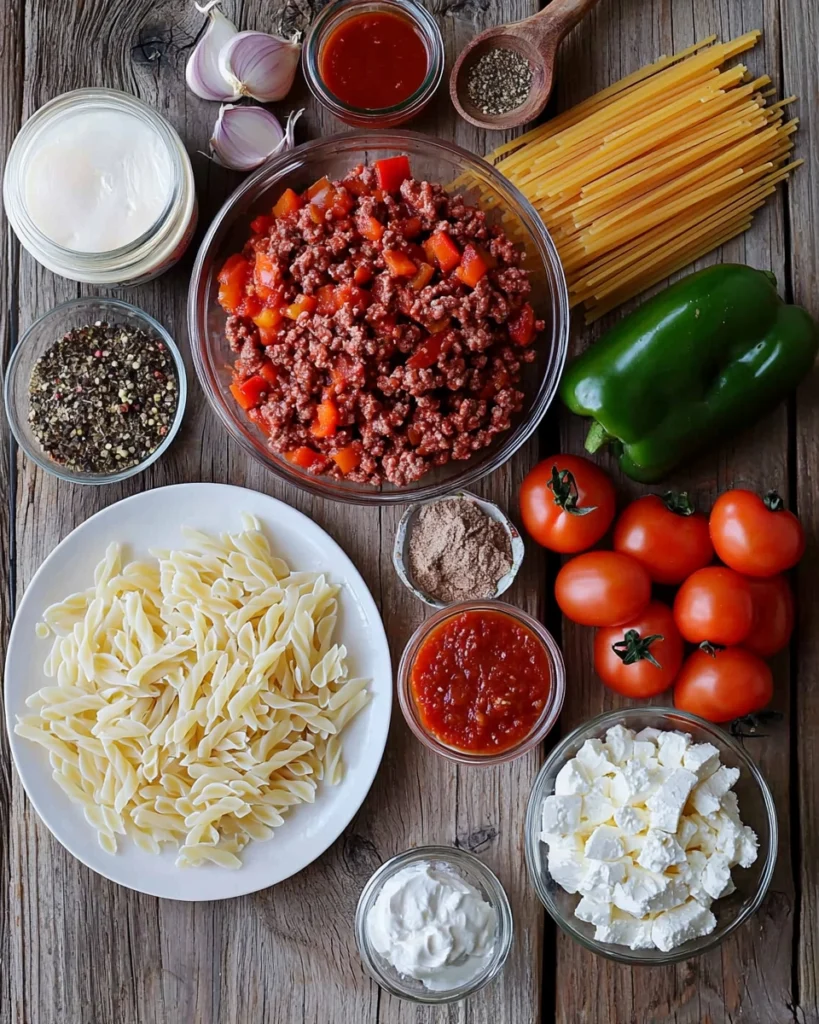
A cozy, one-pot slow cooker ground beef casserole loaded with pasta, veggies, and a creamy tomato-cheese sauce. Perfect for easy weeknights and meal prep.
Ingredients
Scale
1 lb ground beef
1 cup elbow pasta (uncooked)
1 onion, diced
1 bell pepper, diced
1 can (15 oz) diced tomatoes
1 can (8 oz) tomato sauce
1/2 cup beef broth
1 cup shredded cheese
2 oz cream cheese
3 cloves garlic, minced
1 tsp chili powder
1/2 tsp cumin
1/2 tsp paprika
Salt and pepper to taste
Instructions
In a skillet, brown ground beef. Drain excess grease.
Add beef, onion, garlic, bell pepper, diced tomatoes, tomato sauce, broth, and spices to slow cooker.
Cook on LOW for 6 hours or HIGH for 3 hours.
Stir in uncooked pasta, cream cheese, and shredded cheese. Cook on HIGH for 30–40 minutes or until pasta is tender.
Stir well and serve warm.
Notes
Use gluten-free pasta for a GF version.
Add spinach or zucchini during the last 30 minutes for extra veggies.
Store leftovers in the fridge up to 4 days or freeze for 3 months.
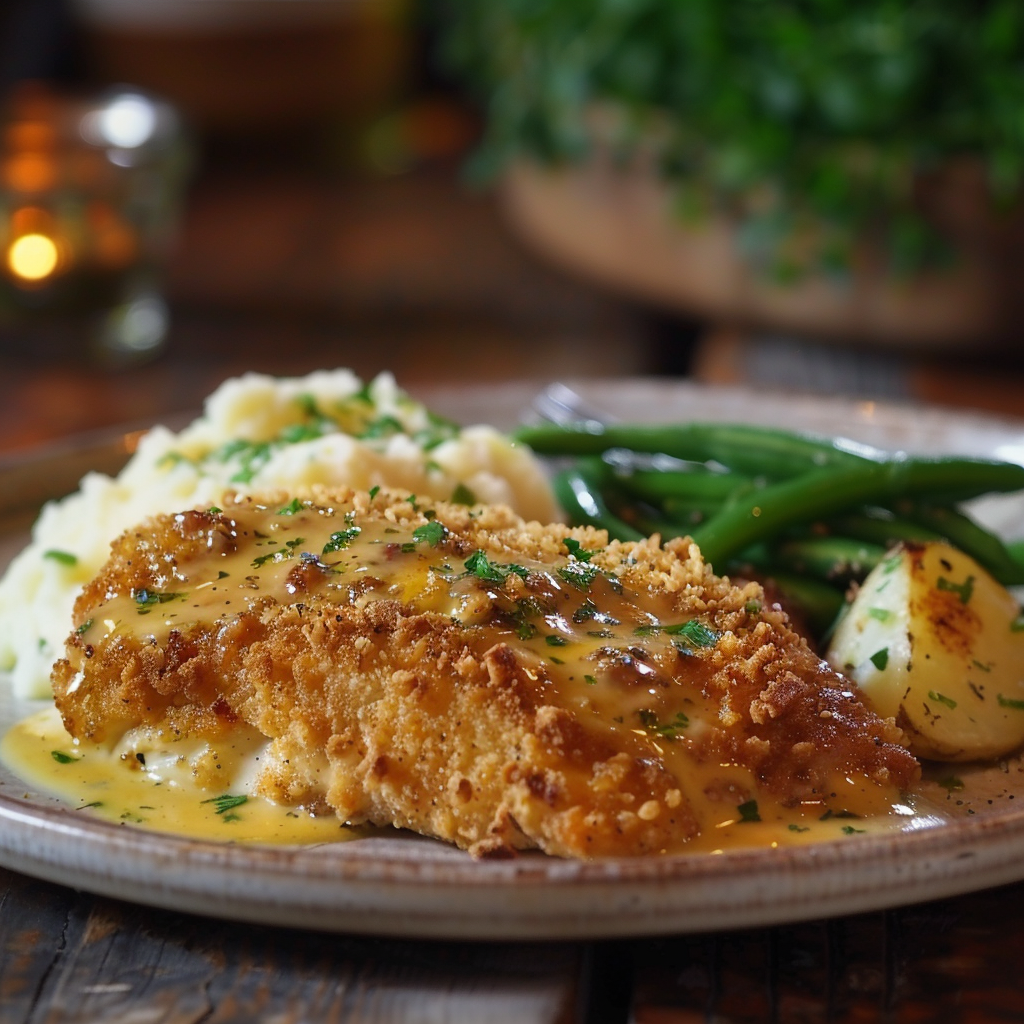
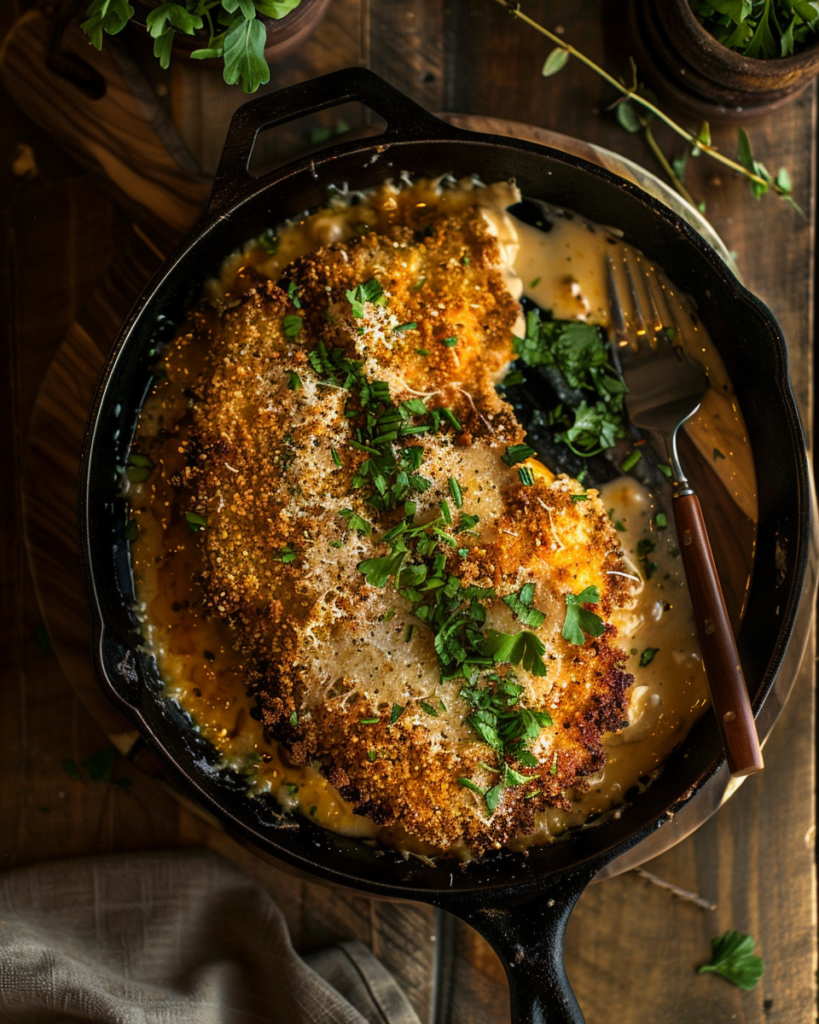
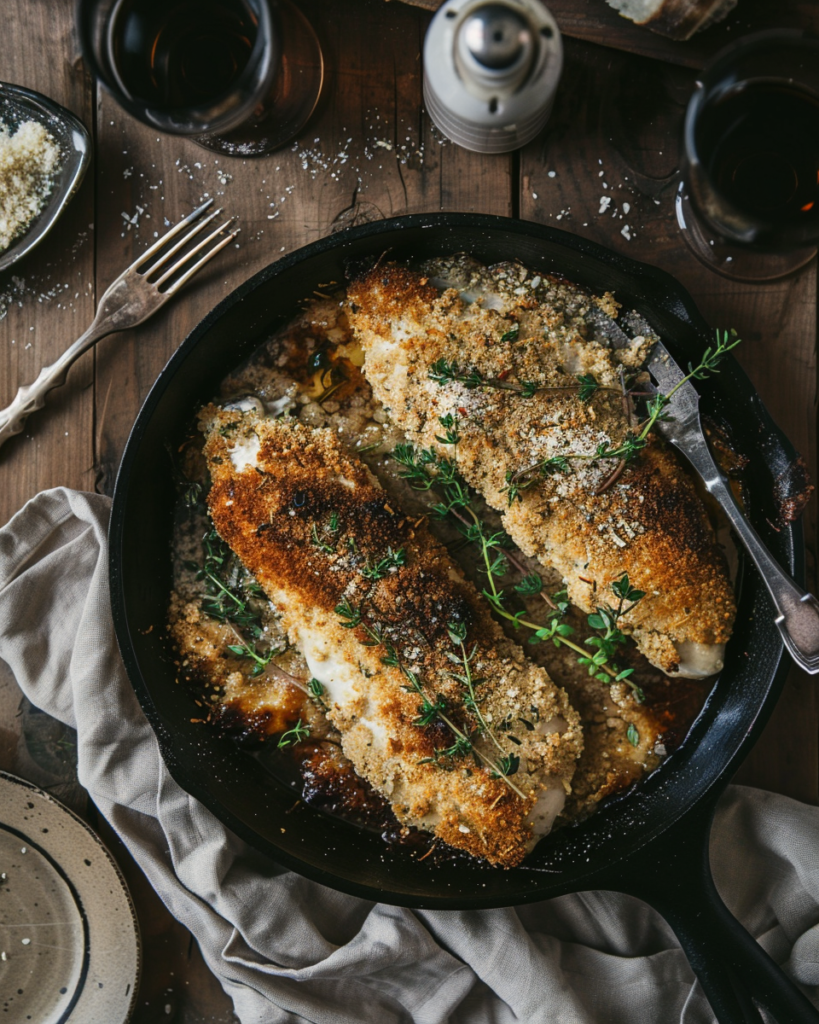
If you’ve ever had Longhorn Steakhouse’s Parmesan Crusted Chicken, you know it’s unforgettable. Now, you can recreate that rich, cheesy, crispy-topped chicken in your own kitchen. This Longhorn Parmesan Crusted Chicken recipe delivers all the satisfaction of the restaurant favorite—without the bill.
Loaded with flavor, texture, and a touch of indulgence, this dish combines juicy grilled chicken with a golden, parmesan-packed crust and a creamy ranch spread. It’s perfect for dinner nights when you want to treat yourself or impress your family.
And if you love hearty dinners with a touch of crunch, you may also enjoy our Baked Italian Sausage as a flavorful oven-based meat dish alternative.
Step-by-Step Instructions for Longhorn Parmesan Crusted Chicken Recipe
Step 1: Prep and Season Chicken
Pound chicken breasts to even thickness (about 1/2 inch). Season both sides with salt and pepper.
Step 2: Sear the Chicken
In a skillet over medium heat, add olive oil. Sear chicken on both sides for 3–4 minutes until golden brown. Do not fully cook—just build color.
Step 3: Bake Until Juicy
Transfer chicken to a baking sheet. Bake at 375°F (190°C) for 15–20 minutes or until internal temp reaches 165°F (75°C).
Step 4: Add Ranch Spread
Remove from oven. Spoon ranch and Parmesan mixture evenly over each chicken breast.
Step 5: Top with Parmesan Crust
In a bowl, mix provolone, Parmesan, panko, and butter. Pile this topping on the chicken over the ranch spread.
Step 6: Broil to Finish
Turn on broiler. Place chicken under the broiler for 2–3 minutes or until topping is golden and bubbly. Watch closely to avoid burning.
Helpful Tips for Perfecting Longhorn Parmesan Crusted Chicken
Flattening the chicken ensures even cooking.
Don’t overcook—use a meat thermometer for accuracy.
For extra crisp, toast the panko crumbs slightly before adding.
Use freshly grated cheese for maximum melt and flavor.
Recipe Variations Inspired by Longhorn Parmesan Crusted Chicken
Low-carb: Skip the panko or replace with almond flour.
Spicy twist: Add red pepper flakes or jalapeños to the crust.
Herb infusion: Mix Italian herbs or fresh basil into the ranch spread.
Cheese swaps: Try mozzarella, cheddar, or a smoky gouda.
Want a different take on chicken? Our readers also love this juicy and crispy Broast Chicken Guide for a fast-food inspired experience at home.
Serving Suggestions for Longhorn Parmesan Crusted Chicken Recipe
Serve with garlic mashed potatoes or roasted veggies.
Pair with a crisp green salad or Caesar salad.
Drizzle extra ranch or a balsamic glaze over top.
Add garlic bread for a steakhouse-style experience.
For a comforting vegetable side, you can’t go wrong with the classic Campbell Soup Green Bean Casserole that’s creamy and crowd-pleasing.
Conservation and Storage Tips
Fridge: Store leftovers in an airtight container for up to 3 days.
Reheat: Bake at 350°F for 10–12 minutes or air fry for 5–6 minutes.
Freezer: Freeze cooked chicken (without broiling step) for up to 2 months.
Nutrition Facts for Longhorn Parmesan Crusted Chicken
Wine and Beverage Pairings for This Chicken Recipe
Pair this dish with a light white wine like Chardonnay or Pinot Grigio to complement the creamy parmesan topping. If you prefer non-alcoholic options, a sparkling water with lemon or a chilled iced tea balances the richness of the cheese.
Make It a Meal: Longhorn Parmesan Crusted Chicken Dinner Ideas
Cooking for a Crowd with This Longhorn Chicken Recipe
This recipe is easily scalable. You can double or triple it for gatherings. Use a large baking dish or multiple trays and prepare the topping in advance. Great for dinner parties, potlucks, or game nights!
Frequently Asked Questions
Can I make this ahead of time? Yes, you can prepare the chicken and toppings, refrigerate, and broil when ready to serve.
Can I use chicken thighs? Yes! Just adjust cooking time as thighs may take longer.
Is this gluten-free? Use gluten-free breadcrumbs and check your ranch dressing to make this dish gluten-free.
Can I grill the chicken instead of baking? Absolutely! Just finish in the oven to melt and broil the topping.
Ingredients for Longhorn Parmesan Crusted Chicken Recipe
For the Chicken:
4 boneless, skinless chicken breasts
Salt and pepper to taste
1 tbsp olive oil or butter (for searing)
For the Ranch Spread:
1/4 cup ranch dressing
1/4 cup grated Parmesan cheese
For the Parmesan Crust:
1/2 cup shredded provolone cheese
1/4 cup shredded Parmesan cheese
1/4 cup panko breadcrumbs
2 tbsp melted butter
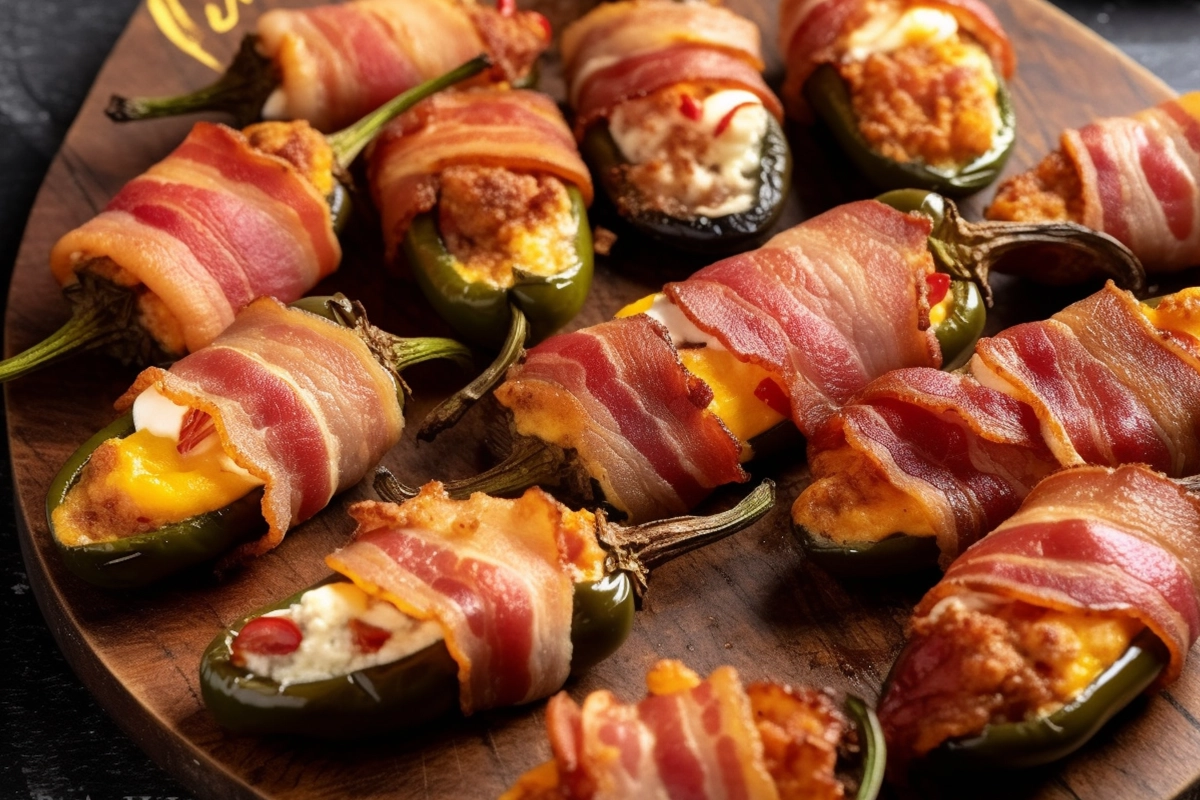
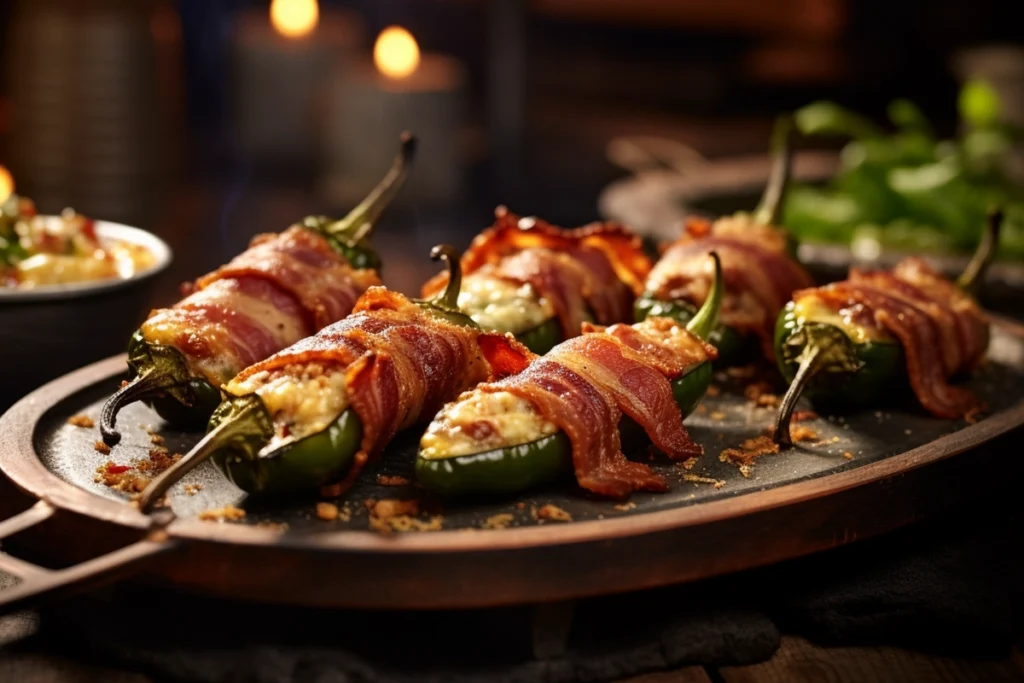
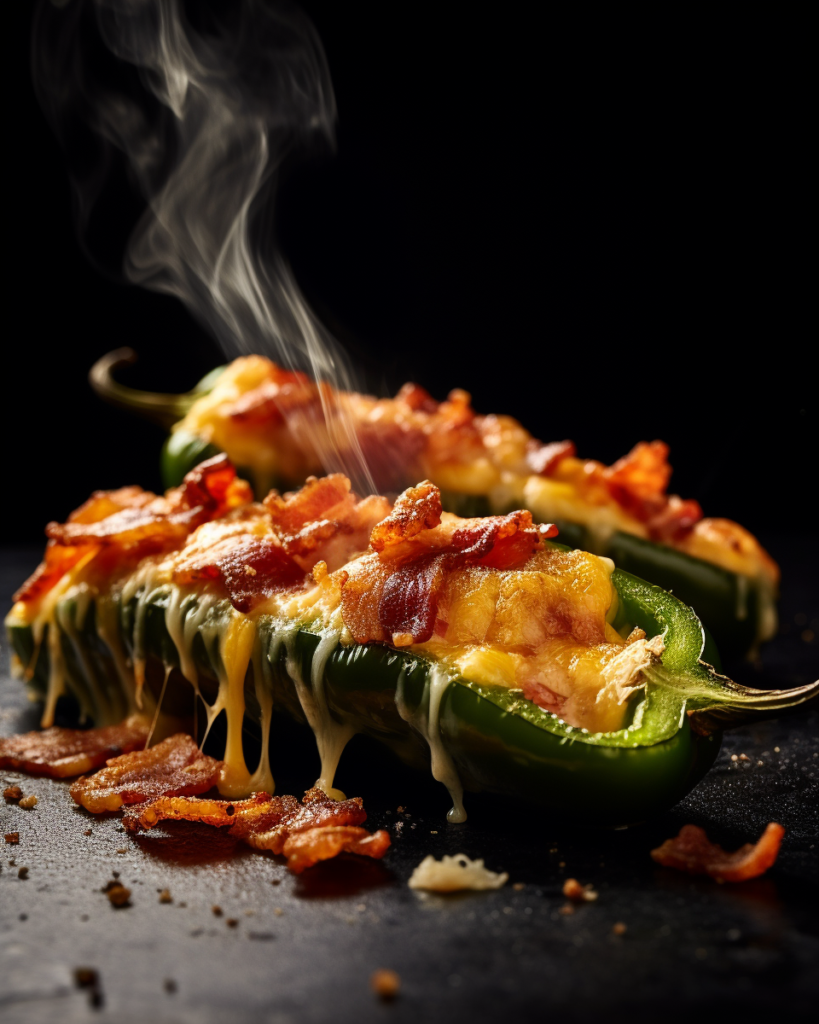
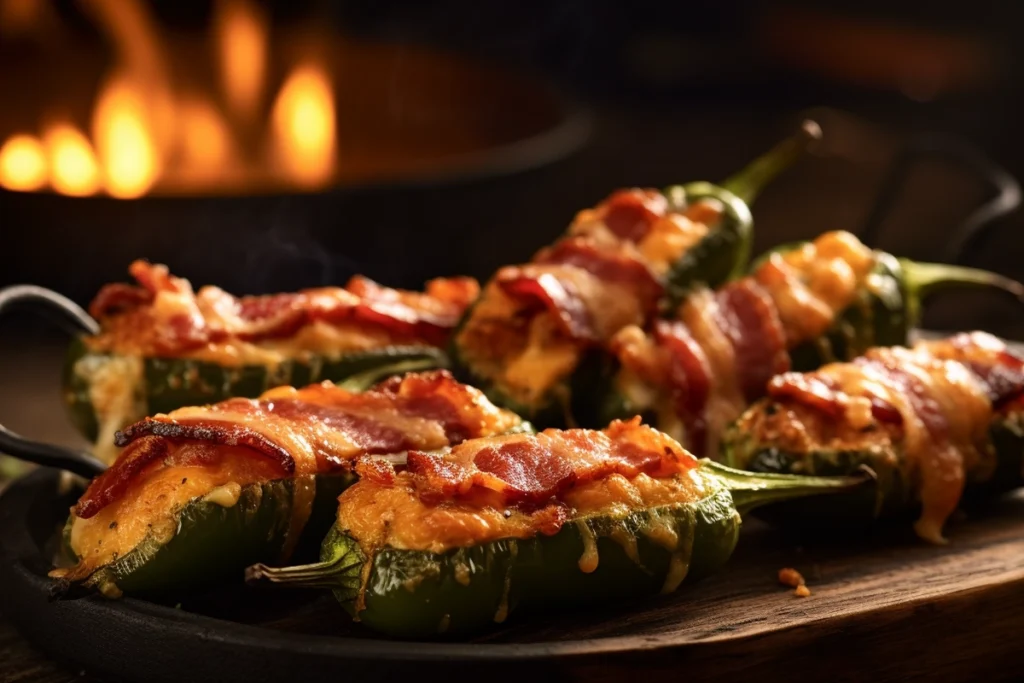
Looking for a spicy starter? Serve this dish alongside these Smoked Jalapeño Poppers for the perfect blend of creamy and spicy.
Equipment for Making This Recipe
Cast iron skillet or frying pan
Baking sheet
Mixing bowls
Tongs or spatula
Oven (broiler function)
Conclusion: Longhorn Parmesan Crusted Chicken at Its Best
This Longhorn Parmesan Crusted Chicken recipe brings all the bold, cheesy flavor of your favorite steakhouse dish straight to your table. It’s indulgent yet simple, impressive yet weeknight-ready. With a crisp, golden crust and juicy center, it’s guaranteed to become a staple in your dinner rotation.
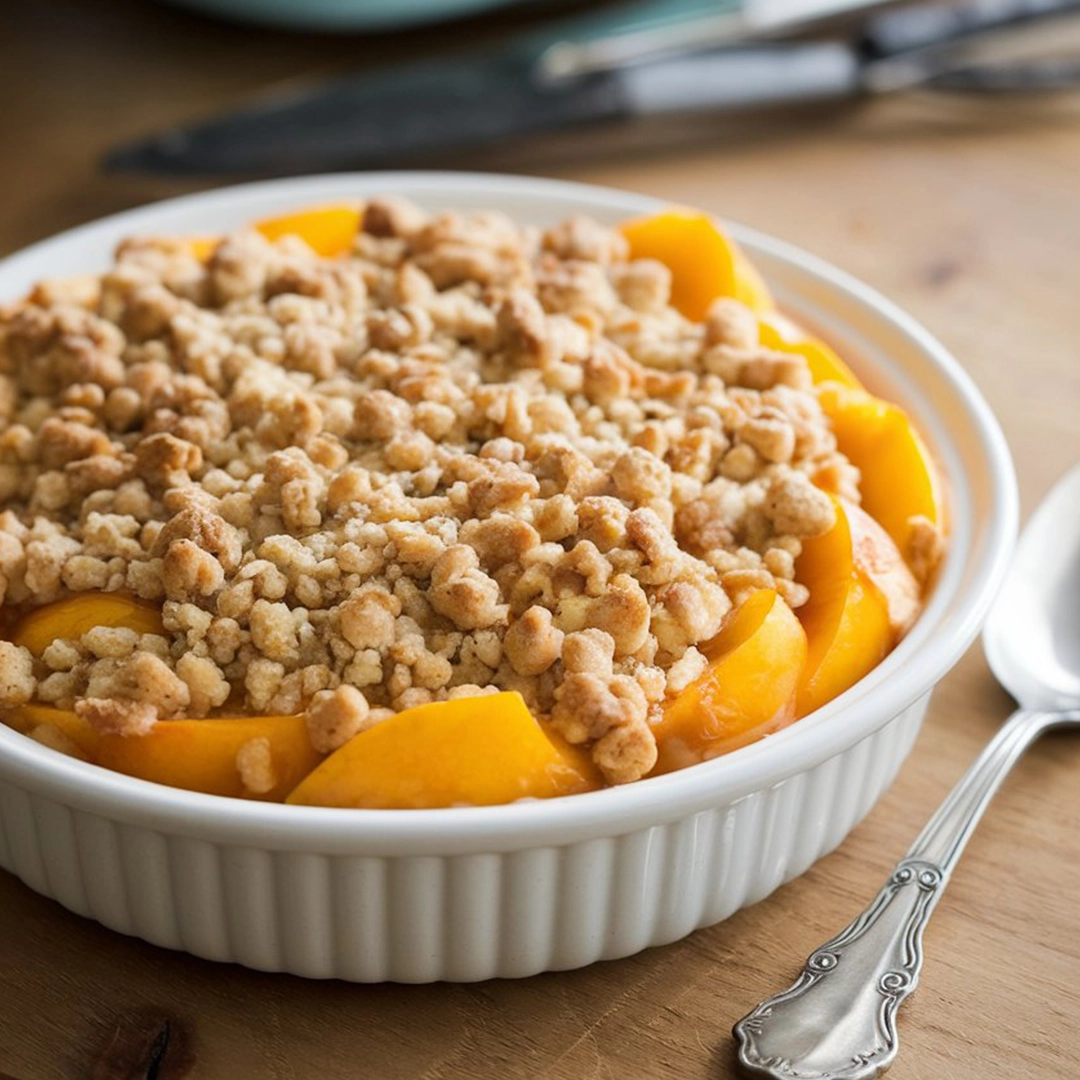
Try it once—and you’ll crave it often. And if you’re looking to end your meal with a sweet, simple treat, check out this Peach Crisp Recipe with Canned Peaches for an easy dessert option!
Juicy chicken breasts topped with creamy ranch, melted provolone, and a crispy parmesan crust—just like Longhorn’s, but made at home!
Ingredients
Scale
For the Chicken:
4 boneless, skinless chicken breasts
Salt and pepper to taste
1 tbsp olive oil or butter (for searing)
For the Ranch Spread:
1/4 cup ranch dressing
1/4 cup grated Parmesan cheese
For the Parmesan Crust:
1/2 cup shredded provolone cheese
1/4 cup shredded Parmesan cheese
1/4 cup panko breadcrumbs
2 tbsp melted butter
Instructions
Sear seasoned chicken breasts in a skillet.
Bake at 375°F for 15–20 minutes.
Top with ranch-parmesan mix and cheesy crust.
Broil 2–3 mins until golden and bubbly.
Notes
Use freshly grated cheese for best flavor. Perfect with salad or mashed potatoes.
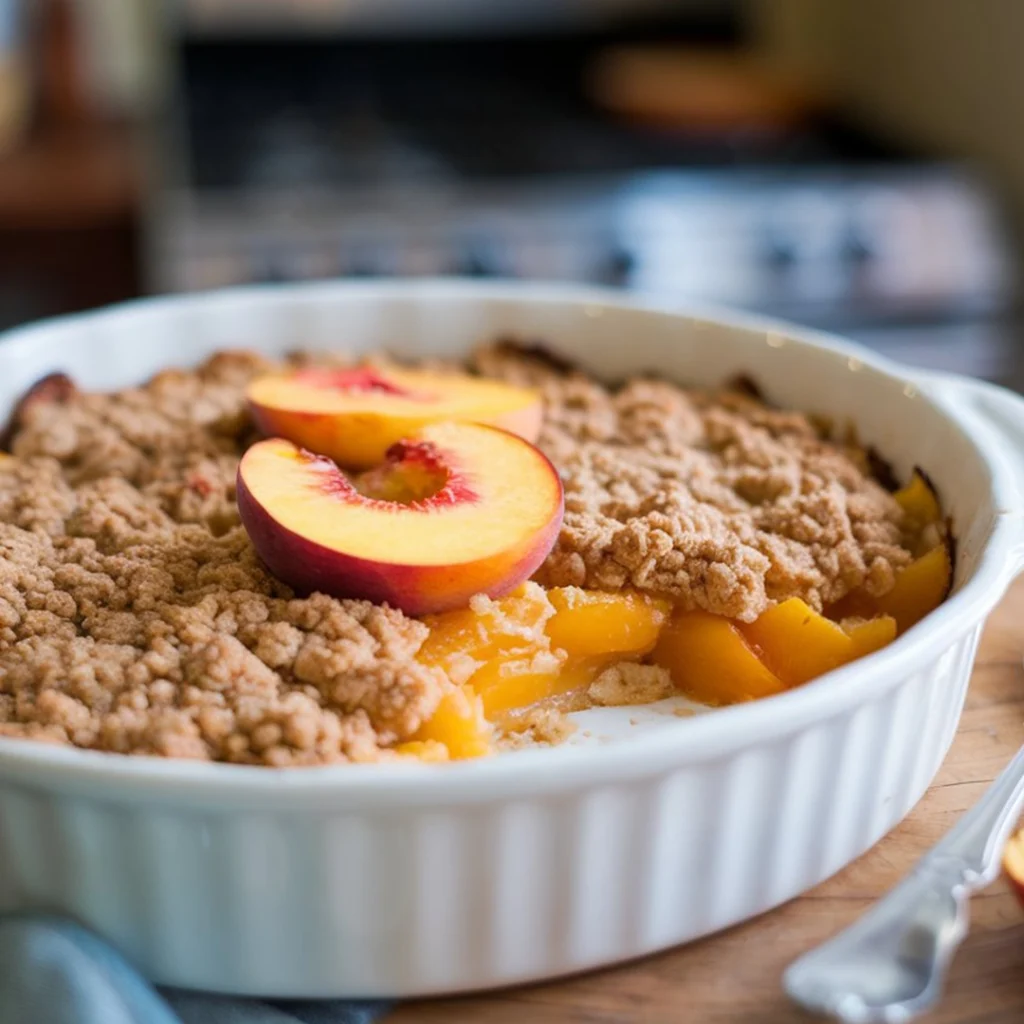
Peach Crisp Recipe with Canned Peaches
by
mohamed barjani
on
March 11, 2025
Nothing beats the warm, golden crunch of a homemade peach crisp recipe with canned peaches! Whether you’re short on time or simply love the convenience of canned fruit, this dessert delivers rich flavors with a perfectly crisp topping. Moreover, it’s ridiculously easy to make—no need to fuss with peeling or slicing fresh peaches!
If you love fruit desserts, check out our Easy Apple Crisp Recipe for another classic treat.
This guide will take you through everything you need to know, from the best ingredients to step-by-step instructions, expert tips, and variations. Let’s get baking!
Ingredients for Peach Crisp
Essential Ingredients for Peach Crisp
The magic of a peach crisp recipe with canned peaches lies in the balance between the sweet, juicy filling and the crumbly, buttery topping. Therefore, here’s what you’ll need:
Peach Filling Ingredients
Canned peaches (2 cans, drained) – Choose sliced or halved peaches in juice, not syrup.
Brown sugar (¼ cup) – Adds deep caramel notes.
Cinnamon (1 tsp) – A must for warmth and spice.
Nutmeg (½ tsp, optional) – Gives a subtle, nutty aroma.
Cornstarch (1 tbsp) – Helps thicken the peach juices.
Vanilla extract (1 tsp) – Enhances the natural peach flavor.
Lemon juice (1 tbsp) – Balances the sweetness with a touch of acidity.
Chopped pecans or almonds (optional, ½ cup) – Adds crunch and nutty depth. For a deeper understanding of the nutritional benefits of peaches, refer to this comprehensive guide.
Step-by-Step Preparation Guide
Preparing the Peach Filling
Step 1 – Drain and Slice the Peaches
Open the canned peaches and drain them completely. However, if they’re in syrup, rinse them lightly under cold water to reduce excess sweetness.
Additionally, slice the peaches into smaller bite-sized pieces if they come in halves.
Preparing the Peach Filling
Step 1 – Drain and Slice the Peaches
Open the canned peaches and drain them completely. If they’re in syrup, rinse them lightly under cold water to reduce excess sweetness.
Slice the peaches into smaller bite-sized pieces if they come in halves.
Step 2 – Mix the Filling Ingredients
In a large mixing bowl, combine:
Drained peaches
Brown sugar
Cinnamon
Nutmeg (if using)
Cornstarch
Vanilla extract
Lemon juice
Gently toss everything together until the peaches are evenly coated in the mixture.
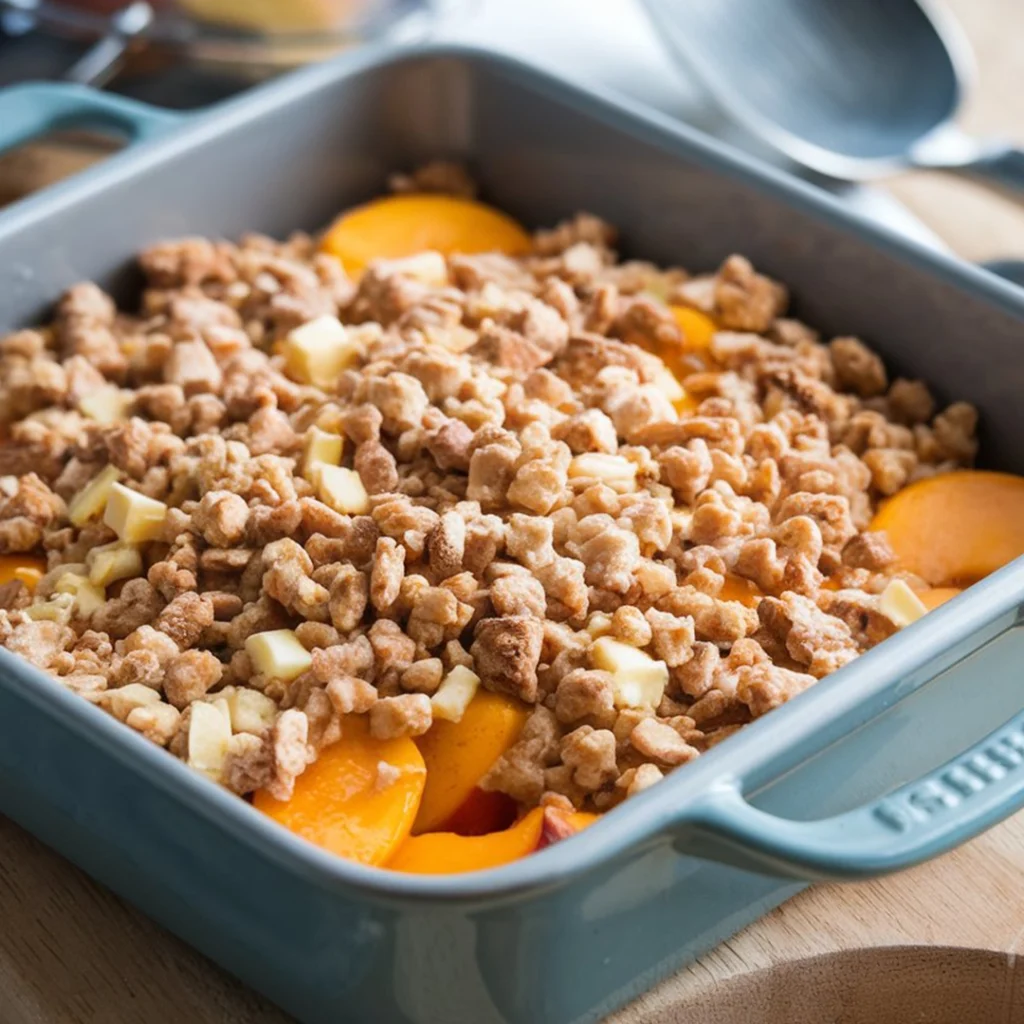
Transfer the peach filling to a greased 9×9-inch baking dish and spread it out evenly.
Then, gently toss everything together until the peaches are evenly coated in the mixture. Afterward, transfer the peach filling to a greased 9×9-inch baking dish and spread it out evenly.
Making the Crisp Topping
Step 3 – Combine the Dry Ingredients
In another mixing bowl, whisk together:
Rolled oats
Flour
Brown sugar
Cinnamon
Salt
Step 4 – Add the Butter and Mix
Next, pour the melted butter over the dry ingredients. Using a fork or your hands, mix everything until the mixture becomes crumbly.
Moreover, if you’re using chopped pecans or almonds, stir them in for added crunch.
Assembling and Baking the Peach Crisp
Step 5 – Layer the Crisp Topping
Evenly sprinkle the crisp topping over the peach filling in the baking dish.
Make sure to cover all the peaches for an even golden-brown crust.
Step 6 – Bake to Perfection
Preheat your oven to 350°F (175°C).
Place the dish on the middle rack and bake for 35-40 minutes.
The crisp is done when the topping is golden brown and the peach filling is bubbling around the edges.
Tips for the Best Peach Crisp
To take your peach recipe with canned peaches to the next level, here are some pro tips for enhancing flavor, texture, and crunch!
Choosing the Right Peaches
What Type of Canned Peaches to Use?
Always go for canned peaches in 100% juice instead of heavy syrup to keep the dessert balanced and not overly sweet.
If you only have syrup-packed peaches, rinse them under cold water before using.
Fresh peaches: If using fresh, peel and slice them, then add 2 tablespoons of sugar to mimic the sweetness of canned peaches.
Frozen peaches: Thaw completely and drain any excess moisture before using. For more on the health benefits of peaches, visit this health benefits overview.
Enhancing Flavor
Secret Ingredients for a Flavor Boost
Lemon zest (½ tsp): Adds a subtle brightness to balance the sweetness.
Vanilla bean paste instead of extract: Intensifies the peachy aroma.
A pinch of cardamom (¼ tsp): Gives a warm, floral undertone.
Adjusting Sweetness Levels
If your peaches are already sweet, reduce brown sugar in the filling by 1-2 tablespoons.
Want it sweeter? Add a drizzle of honey over the peaches before baking.
Achieving the Perfect Crisp Topping
Using the Right Oats
Old-fashioned rolled oats: Best for a hearty, chewy crisp.
Quick oats: Creates a finer, softer topping.
Avoid steel-cut oats, as they won’t soften properly.
Getting a Crunchy Texture
Use chilled butter instead of melted butter for a chunkier, crispier topping.
Add ½ cup of chopped pecans or almonds for an extra crunch.
For extra crispiness, bake for 5 more minutes at 375°F (190°C).
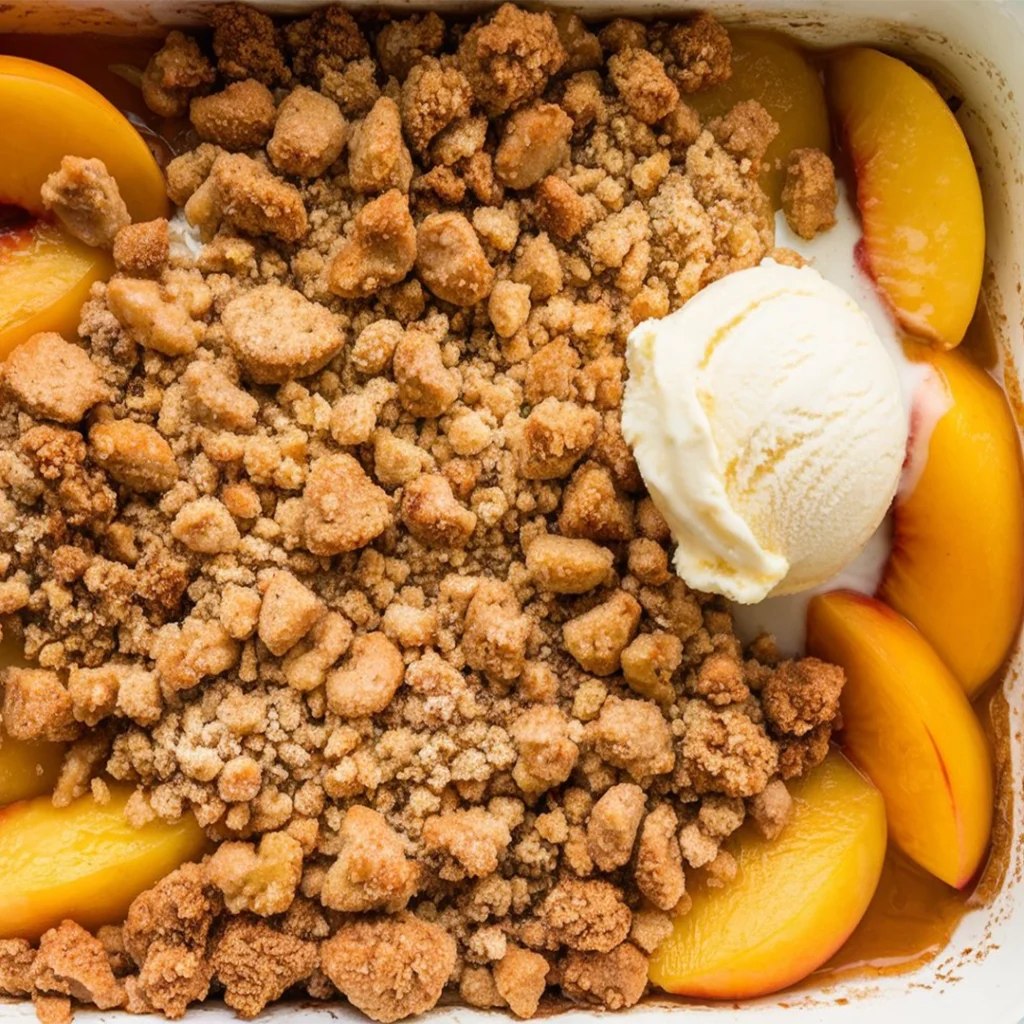
Serving Suggestions
Once your golden, bubbling peach crisp is out of the oven, in other words, it’s time to serve it up! To make it even better, here are some great topping ideas:
Can you use canned peaches instead of fresh peaches?
Flavor & Texture Differences
Canned peaches are softer and sweeter, making them ideal for baked desserts.
Fresh peaches have a firmer texture and may need extra sugar to match the sweetness of canned peaches.
✅ If using fresh peaches, peel and slice them, then sprinkle with sugar and let sit for 10 minutes to release juices.
Can you use canned peaches for a crumble?
Peach Crisp vs. Peach Crumble
A crisp contains oats in the topping for added texture.
A crumble has a softer, streusel-like topping without oats.
✅ Yes, canned peaches work great for both! Simply adjust the topping ingredients depending on your preference.
Nutritional Information
Understanding the nutritional breakdown helps you enjoy peach crisp while keeping track of calories and macronutrients. Here’s what you need to know per 1 serving (based on 8 servings).
Peaches are low in calories and rich in vitamins A and C. A medium peach provides about 50 calories. Verywell Fit+1Wikipédia+1
Calories and Macronutrients
Estimated Nutrition Per Serving
Calories: ~280 kcal
Carbohydrates: 45g
Sugar: 28g
Protein: 3g
Fat: 10g
Saturated Fat: 5g
Fiber: 3g
✅ These values may vary depending on ingredients used, such as sugar levels or butter quantity.
Making a Healthier Peach Crisp
Lower-Sugar Option
Use canned peaches in juice instead of syrup.
Reduce brown sugar in the filling & topping by half.
Add extra cinnamon and vanilla for flavor without extra sugar.
Lower-Calorie & Low-Fat Adaptation
Swap butter for coconut oil or a light butter alternative.
Use whole wheat flour instead of all-purpose flour.
Replace half of the oats with crushed nuts for added protein.
Storage and Reheating Instructions
If you have leftovers (which isn’t always the case because it’s so good! ), here’s how to store and reheat your peach crisp properly.
How to Store Peach Crisp
Storing at Room Temperature
If you plan to eat it within 24 hours, cover the baking dish with foil or plastic wrap and keep it at room temperature.
Refrigeration for Longer Freshness
For up to 4 days: Store the peach crisp in an airtight container in the refrigerator.
The crisp topping may soften in the fridge, but we’ll fix that when reheating!
Freezing Peach Crisp
Can you freeze peach crisp? Absolutely!
How to freeze:
Let the crisp cool completely.
Wrap the baking dish tightly with plastic wrap and aluminum foil.
Freeze for up to 3 months.
How to Reheat Peach Crisp
Reheating in the Oven (Best Method)
For the crispiest topping:
Preheat oven to 350°F (175°C).
Bake uncovered for 15 minutes or until warmed through.
If needed, broil for 1-2 minutes to crisp up the topping.
Quick Reheating in the Microwave
Place a portion on a microwave-safe plate.
Heat for 30-60 seconds.
The topping may be softer than oven-baked reheating.
Reheating from Frozen
No need to thaw! Bake straight from the freezer at 350°F (175°C) for 25-30 minutes until hot and bubbly.
Variations and Substitutions
Want to customize your peach crisp? Here are some delicious variations and diet-friendly substitutions to match your preferences.
Sprinkle 2 tbsp of sugar over them and let sit for 10 minutes to release juices.
How to Use Frozen Peaches
Thaw completely and drain excess liquid before mixing with sugar and spices.
Making a Gluten-Free Peach Crisp
Gluten-Free Ingredient Swaps
Use almond flour or oat flour instead of all-purpose flour.
Make sure your oats are certified gluten-free.
✅ This keeps the crisp crunchy while making it 100% gluten-free!
Vegan Peach Crisp Alternative
How to Replace Butter in the Topping
Use coconut oil or a vegan butter substitute instead of regular butter.
The result? A crunchy, dairy-free peach crisp!
✅ Still just as delicious, without the dairy!
Fun Flavor Variations
Adding Extra Fruits
Peach & Blueberry Crisp: Mix in ½ cup of fresh or frozen blueberries.
Peach & Raspberry Crisp: Add ½ cup of raspberries for a tart twist.
Spicing It Up
Add ½ tsp of ginger for a warm, spicy flavor.
Sprinkle a pinch of cloves or allspice for extra depth.
Pairing Suggestions
To make your peach even more enjoyable, here are the best beverage pairings and complementary desserts to serve alongside it.
Beverage Pairings
Drinks That Complement Peach Crisp
Herbal Teas: Chamomile or cinnamon tea enhances the warm spices.
Iced Coffee: The bitterness balances the sweetness of the crisp.
Milk: A classic option for a cozy dessert experience.
Dessert Wines That Work Well
Moscato: A light, sweet wine that complements the peach flavors.
Riesling: Slightly tart, adding balance to the dessert’s sweetness.
Complementary Desserts
Light Desserts to Serve Alongside
Vanilla Bean Pudding: Creamy and smooth, a perfect contrast to the crisp.
Lemon Sorbet: A refreshing option that cleanses the palate.
Other Baked Desserts That Pair Well
Apple Crisp: Serve a duo of crisps for variety.
Shortbread Cookies: A buttery, crumbly contrast to the juicy peaches.
Reader Testimonials and Reviews
Nothing beats hearing from people who’ve tried and loved this recipe! Here are some real experiences and popular modifications shared by home bakers.
Success Stories from Home Bakers
What Readers Are Saying
“This peach was so easy to make! I loved how the canned peaches made it quick and simple.” – Sarah T.
“Perfect balance of sweetness and crunch. My family devoured it in minutes!” – Jake P.
“Added some pecans for extra crunch, and it was a game-changer!” – Emily R.
Popular Modifications
Reader-Favorite Tweaks
Extra Crunchy Topping: Some readers doubled the oat mixture for more crispiness.
Less Sugar: A few swapped brown sugar for honey or maple syrup.
Gluten-Free Swap: Almond flour and gluten-free oats worked perfectly for those avoiding gluten.
Final Thoughts: Why This Peach Crisp Recipe with Canned Peaches is a Must-Try
✔️ Super easy – No peeling, slicing, or fuss. ✔️ Crunchy oat topping – Perfectly crisp & golden. ✔️ Customizable – Make it gluten-free, vegan, or extra spiced!
Ultimately, this peach crisp recipe with canned peaches is the perfect balance of sweet, juicy fruit and crispy, buttery topping. Thus, it’s a go-to dessert for any occasion. Whether you stick to the classic recipe or try one of the variations, you’re guaranteed a delicious treat every time!
Now it’s your turn! What’s your favorite way to make peach crisp? Do you prefer it with nuts, extra cinnamon, or maybe a scoop of ice cream? Drop a comment below and let’s talk all things peach crisp!
Tried this recipe? Leave a comment below and share your favorite twist!
Conclusion
This peach recipe with canned peaches is the perfect balance of sweet, juicy fruit and crispy, buttery topping. It’s quick, easy, and packed with flavor, making it a go-to dessert for any occasion. Whether you stick to the classic recipe or try one of the variations, you’re guaranteed a delicious treat every time!
Takeaways from This Recipe:
Canned peaches make it easy & convenient. The oat topping adds the perfect crunch. Customizable with different flavors & diet-friendly swaps.
Now it’s your turn! What’s your favorite way to make peach crisp? Do you prefer it with nuts, extra cinnamon, or maybe a scoop of ice cream? Drop a comment below and let’s talk all things peach crisp!
Broast Chicken
by
zlata
on
March 1, 2025
Introduction
Crispy on the outside, juicy on the inside—broast chicken is a favorite among fried chicken lovers. But what makes it different from the regular deep-fried version? Broasting is a unique cooking method that combines pressure frying with deep frying, resulting in a deliciously crispy texture while keeping the meat tender and flavorful.
This article dives deep into what makes broast chicken special, how it’s prepared, and how it differs from traditional fried chicken. If you’ve ever wondered whether KFC serves broasted chicken or how you can make it at home, you’re in the right place!
The Broasting Process Explained
Combining Pressure Cooking and Deep Frying
Broasting is a specialized cooking technique that combines pressure cooking and deep frying. Unlike traditional frying, where chicken is submerged in hot oil, broasting involves a pressure fryer, which locks in moisture while creating a crispy outer layer.
Here’s how it works:
The chicken is first marinated with a blend of spices to enhance flavor.
It’s then coated with a seasoned flour mixture, creating a crunchy exterior.
The coated chicken is placed in a pressure fryer, which cooks it at high pressure and temperature.
The result? A golden, crispy coating while keeping the inside tender and juicy.
Benefits of Broasting
Compared to regular fried chicken, broasting offers several advantages:
✅ Less oil absorption – Pressure frying reduces oil penetration, making it a healthier alternative. ✅ Faster cooking time – The high-pressure environment speeds up cooking without drying out the meat. ✅ Consistent texture – The process ensures even cooking, giving you a crispy crust and juicy inside.
Many restaurants and fast-food chains use broasting to maintain consistency in flavor and texture, making it a popular choice worldwide.
Broast Chicken vs. Fried Chicken
Key Differences in Cooking Methods
While both broasting and frying involve hot oil, the main difference lies in the cooking process.
Fried Chicken: Chicken pieces are fully submerged in hot oil and cooked in an open fryer. This method creates a crispy exterior but can lead to excess oil absorption.
Broast Chicken: Uses a pressure fryer, sealing in moisture while ensuring a crispy texture. The pressurized environment speeds up cooking while reducing oil penetration.
Taste and Texture Comparison
The cooking technique significantly affects the final taste and texture of the chicken.
Feature
Broast Chicken
Fried Chicken
Crunchiness
Crispy, but not greasy
Extra crispy but can be greasy
Moisture
Juicy and tender inside
Can dry out if overcooked
Flavor Absorption
Deeply infused flavors from pressure cooking
Mostly on the outer layer
Oil Content
Less oil due to pressure frying
More oil absorbed into the meat
Nutritional Differences
For those watching their diet, chicken is often a better choice than traditional fried chicken.
Since broasting uses less oil, it generally has fewer calories and less fat compared to deep-fried chicken.
The pressurized cooking process reduces oil absorption, making it slightly healthier than open-fried alternatives.
However, the nutritional difference depends on factors like the type of oil used and portion sizes.
How to Make Broast Chicken at Home
Nothing beats the satisfaction of making restaurant-quality broast chicken in your own kitchen. While broasting traditionally requires a pressure fryer, there are alternative methods for home cooks to achieve similar results.
Essential Equipment Needed
To make authentic chicken, you’ll need some key tools:
✔️ Pressure Fryer – The best way to achieve authentic broasting results. It locks in moisture while crisping the coating. ✔️ Deep Fryer or Heavy-Duty Pot – If you don’t have a pressure fryer, a deep fryer or Dutch oven can work, though the results may vary. ✔️ Thermometer – Ensures precise oil temperature for optimal frying. ✔️ Marination Bowl – Helps coat the chicken evenly with seasonings.
💡 Tip: If you don’t have a pressure fryer, use a deep fryer with a lid to retain some moisture while cooking.
Ingredients for Crispy Broast Chicken
For the Marinade:
1 kg chicken (cut into pieces)
1 cup buttermilk (for extra tenderness)
2 teaspoons salt
1 teaspoon black pepper
1 teaspoon red chili powder
1 teaspoon garlic powder
1 teaspoon onion powder
1 teaspoon paprika
1 tablespoon lemon juice
For the Coating:
2 cups all-purpose flour
½ cup cornstarch (for extra crispiness)
1 teaspoon baking powder
1 teaspoon salt
1 teaspoon black pepper
1 teaspoon white pepper
1 teaspoon red chili powder
1 teaspoon dried oregano
1 teaspoon thyme
For Frying:
1 liter cooking oil (vegetable or canola)
Step-by-Step Cooking Instructions
Step 1: Marinate the Chicken
1️⃣ Wash and pat dry the chicken pieces. 2️⃣ In a bowl, mix buttermilk, salt, black pepper, chili powder, garlic powder, onion powder, paprika, and lemon juice. 3️⃣ Add the chicken to the marinade, ensuring each piece is well-coated. 4️⃣ Cover and refrigerate for at least 4 hours (overnight for the best flavor).
💡 Why marinate? Buttermilk helps tenderize the chicken while infusing it with rich flavors.
Step 2: Prepare the Coating
1️⃣ In another bowl, combine flour, cornstarch, baking powder, salt, black pepper, white pepper, chili powder, oregano, and thyme. 2️⃣ Take the marinated chicken and coat each piece thoroughly in the dry mixture. 3️⃣ Let the coated chicken rest for 10-15 minutes to help the flour adhere better.
💡 Cornstarch and baking powder enhance crispiness by creating a light, airy texture.
Step 3: Broast the Chicken
If Using a Pressure Fryer: 1️⃣ Heat the oil to 350°F (175°C) in the pressure fryer. 2️⃣ Carefully place the coated chicken inside, ensuring not to overcrowd the fryer. 3️⃣ Close the lid and cook under pressure for 8-10 minutes until golden brown. 4️⃣ Remove and drain on a wire rack.
💡 Pressure frying reduces oil absorption while cooking the chicken faster.
If Using a Deep Fryer or Heavy Pot: 1️⃣ Heat the oil to 350°F (175°C) in a deep fryer or large pot. 2️⃣ Fry the chicken for 12-15 minutes, flipping occasionally until golden brown and crispy. 3️⃣ Drain on a wire rack to remove excess oil.
Step 4: Serve and Enjoy!
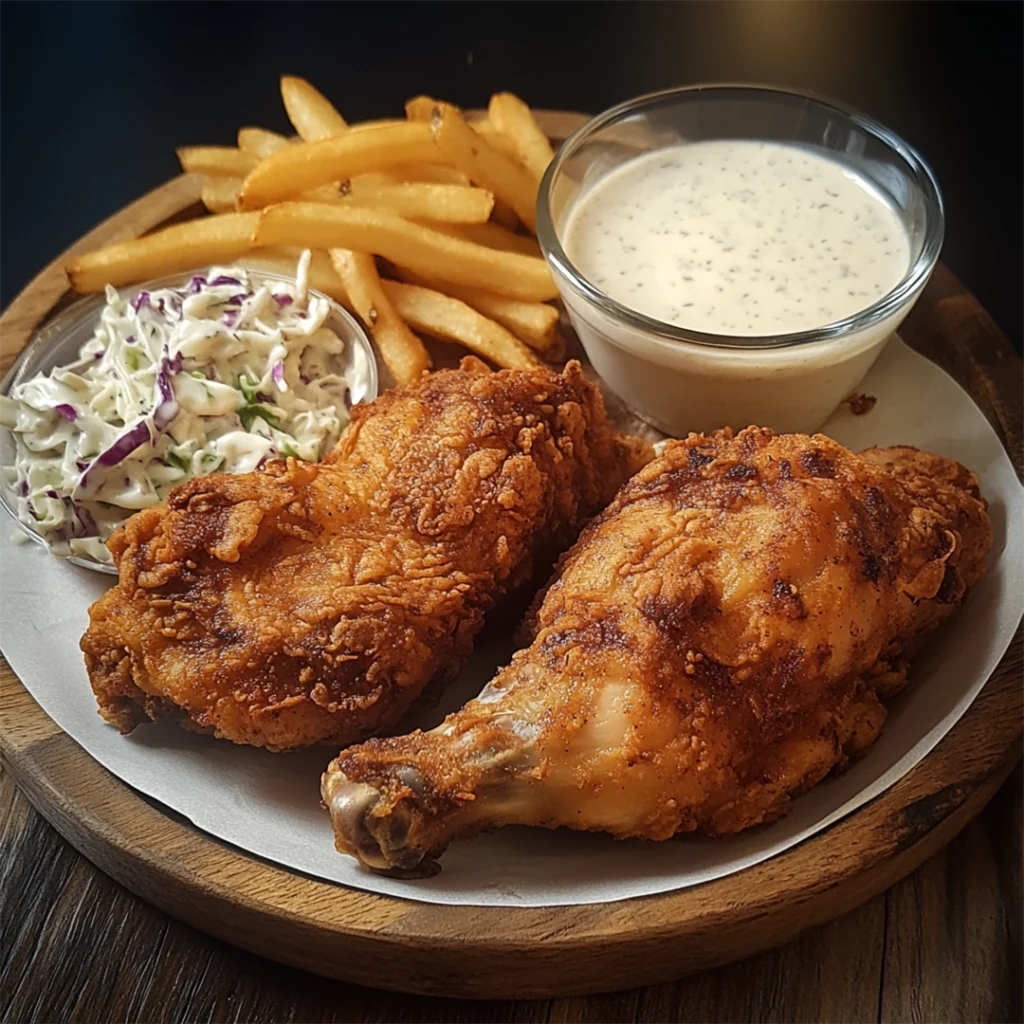
Your homemade chicken is now ready to enjoy! Serve it with:
Fries – A classic side that pairs perfectly with crispy chicken. Coleslaw – Adds a refreshing contrast to the rich flavors. Garlic Bread – Ideal for soaking up any leftover seasoning. Garlic Mayo or Spicy Ketchup – The perfect dips for extra flavor.
Alternative Cooking Methods (Without a Pressure Fryer)
If you don’t have a pressure fryer, here are some ways to get close to the same results:
Oven-Baked Broast Chicken: Coat the chicken and bake at 400°F (200°C) for 35-40 minutes, flipping halfway. Air-Fried Broast Chicken: Preheat to 375°F (190°C) and cook for 20 minutes, flipping once. Spray lightly with oil for crispiness. Shallow Frying Method: Use less oil and cook in a pan over medium heat, covering with a lid to trap moisture.
💡 While these methods may not achieve the exact texture of broasting, they’re great alternatives for a healthier version!
More Details on the Origins of Broast Chicken
The concept of broast chicken originated in the 1950s when L.A.M. Phelan, an American inventor, developed the first pressure fryer under the Broaster Company brand. His goal was to create a cooking method that could produce crispy fried chicken faster while keeping it juicy inside. The result? A game-changing technique that revolutionized fast food!
As the Broaster Company patented its process, restaurants worldwide began adopting pressure frying to offer a quicker, tastier, and less oily version of fried chicken. Today, broast chicken is a global favorite, especially in the Middle East, South Asia, and the United States.
💡 Fun Fact: Although many fast-food chains use pressure fryers, only those licensed by the Broaster Company can legally call their product broast chicken.
Why is Broast Chicken So Popular?
So, what makes broast chicken so irresistible? Let’s break down why people love this dish:
✔ Crispy Yet Light Coating: Unlike traditional deep-fried chicken, broasting doesn’t leave the meat feeling heavy or greasy. The pressure-frying technique creates a perfect crunch without excessive oil absorption.
✔ Moist and Tender Inside: The sealed pressure environment traps moisture, preventing the chicken from drying out. Every bite remains juicy, flavorful, and well-seasoned.
✔ Rich, Infused Flavor: Because the marinade is locked inside during cooking, the spices and seasonings penetrate deeper, resulting in bold and consistent flavors.
✔ Faster Cooking Time: A traditional deep-fryer requires 20+ minutes to cook chicken thoroughly. In contrast, a pressure fryer takes only 8-10 minutes, making broasting a quick and efficient method.
✔ A Healthier Alternative to Fried Chicken: Since the oil does not seep as deeply into the meat, broast chicken is slightly healthier than traditional fried chicken. This makes it a better option for those who love crispy chicken but want to reduce excessive oil intake.
Broast Chicken Around the World: Different Regional Variations
While the basic broasting technique remains the same, different countries add their own twists to make it unique!
Saudi Arabian Broast Chicken – Known for its spicy marinade and garlic sauce, this version is a favorite among fast-food lovers in the Middle East. Served with fries, coleslaw, and pickled veggies, it’s a staple in countries like Saudi Arabia, UAE, and Kuwait.
Pakistani & Indian Broast Chicken – In South Asia, broast chicken is often spicier, with extra chili powder, cumin, and garam masala. It’s usually served with green chutney, paratha (flatbread), and raita (yogurt sauce) for an added flavor punch.
American Broast Chicken – The original version developed by the Broaster Company. It’s commonly served with mashed potatoes, coleslaw, and biscuits in classic American diners.
Turkish Broast Chicken – Features a lighter seasoning mix with hints of sumac and oregano. Often paired with rice, grilled vegetables, and yogurt-based dips.
Filipino Broast Chicken – Known locally as Fried Chicken ala Max’s, this variation uses banana ketchup as a marinade, giving it a sweet and tangy flavor.
💡 Tip: When traveling, always look for local variations of broast chicken! Each region adds a unique flavor twist, making it a must-try dish wherever you go.
How to Achieve the Perfect Crunch in Homemade Broast Chicken
Making broast chicken at home? Here are expert tips to get the perfect crispy-yet-juicy texture:
🔹 Use Cornstarch & Baking Powder: Adding cornstarch to the flour coating lightens the crust, while baking powder creates tiny air pockets that enhance crispiness.
🔹 Double Coating for Extra Crunch: Dip the chicken in the marinade, coat it in the flour mix, then repeat for a thicker, crunchier crust.
🔹 Let the Coating Rest: After dredging the chicken in flour, let it sit for 10-15 minutes before frying. This helps the flour stick better, preventing the coating from falling off during frying.
🔹 Preheat the Oil to the Right Temperature: The ideal frying temperature is 350°F (175°C). If the oil is too hot, the outer crust will burn before the inside cooks. If it’s too cool, the chicken will absorb too much oil, making it greasy.
🔹 Never Overcrowd the Fryer: Fry in small batches! Overcrowding lowers the oil temperature, resulting in soggy, unevenly cooked chicken.
💡 Follow these steps, and your homemade broast chicken will be just as good as the restaurant version!
The Ultimate Broast Chicken Meal: Perfect Side Dishes
Want to serve broast chicken like a pro? Pair it with the right sides for an unforgettable meal!
Crispy French Fries: The classic companion for broast chicken! Opt for seasoned or curly fries for extra flavor. Coleslaw: A creamy, tangy side that balances out the richness of the chicken. Garlic Butter Bread: Adds a savory touch and soaks up all the delicious juices. Spiced Rice or Pilaf: A great alternative to fries, especially in Middle Eastern and South Asian cuisine. Garlic Mayo or Spicy Ketchup: The perfect dipping sauces to enhance the chicken’s flavor.
💡 Mix and match these sides to create the perfect broast chicken meal!
Final Thoughts: Why You Should Try Broast Chicken
chicken offers everything you love about fried chicken—but even better! Its crispy, golden exterior combined with juicy, flavorful meat makes it a top-tier chicken dish. Plus, with less oil absorption, it’s a healthier alternative to traditional deep-fried chicken.
Whether you’re ordering from a restaurant or making it at home, broast chicken is a must-try for every food lover!
Frequently Asked Questions About Broast Chicken
What is Chicken Broast?
Broast chicken is a pressure-fried chicken that combines the best of deep frying and pressure cooking. It’s different from traditional fried chicken because it’s cooked in a sealed, pressurized fryer, which helps retain moisture while creating a crispy, golden-brown crust.
Unlike standard deep-fried chicken, broasting results in less oil absorption, making the meat juicier and more flavorful without being greasy.
What is the Difference Between Broasted and Fried Chicken?
Both broast chicken and fried chicken involve frying, but the cooking process and results differ:
Feature
Broast Chicken
Fried Chicken
Cooking Method
Pressure frying
Open deep frying
Oil Absorption
Less oil penetrates the chicken
More oil is absorbed
Texture
Crispy but not too greasy
Crunchy but can be oily
Juiciness
Retains more moisture
Can be dry if overcooked
Cooking Time
Faster due to pressure
Takes longer to cook thoroughly
Broasting helps the chicken cook evenly, keeping the inside moist while forming a crunchy, flavorful crust on the outside.
💡 Think of it as the best of both worlds: the juiciness of roasted chicken with the crispiness of fried chicken!
Is KFC Fried or Broasted?
KFC uses a pressure frying technique that is similar to broasting. However, since “Broaster” is a trademarked term, KFC does not use it. Instead, KFC pressure-fries its chicken using proprietary seasoning and methods, making it different from traditional broasted chicken.
💡 So while KFC chicken is not officially “broasted,” its cooking process is very close to broasting!
Why Do They Call It Broasted Chicken?
The term Broasted comes from the Broaster Company, a brand that invented and patented the pressure frying technique in the 1950s. The company developed special Broaster fryers that combined pressure cooking and deep frying into a single process.
Since Broaster is a registered trademark, restaurants that don’t use the official Broaster equipment and ingredients cannot legally call their chicken “broasted.” However, many still refer to pressure-fried chicken as broast chicken because of its unique cooking method.
Can I Make Broasted Chicken Without a Pressure Fryer?
Yes! While using a pressure fryer is the best way to get authentic broast chicken, there are alternative methods:
Deep Frying + Covering: Use a deep fryer or a heavy pot with a lid to retain some moisture while frying. Oven Baking: Bake coated chicken at 400°F (200°C) for 35-40 minutes, flipping halfway. Air Frying: Cook at 375°F (190°C) for 20 minutes, flipping once. Spray lightly with oil for crispiness.
While these methods won’t give you 100% authentic broasting results, they will still create a crispy and juicy chicken similar to broasting.
Conclusion: Why Broast Chicken Stands Out
chicken isn’t just another type of fried chicken—it’s a unique cooking method that delivers the best of both worlds: a crispy, golden crust with tender and juicy meat inside. By combining pressure cooking with deep frying, broasting locks in flavors while keeping the chicken from absorbing too much oil.
In this guide, we explored:
✅ What makes broast chicken different from regular fried chicken ✅ How the broasting process works and why it’s better ✅ Step-by-step instructions to make broast chicken at home ✅ The best places around the world to enjoy authentic broast chicken
Whether you’re cooking at home or looking for the best broast chicken spot near you, you now have everything you need to enjoy this delicious dish!
Final Takeaways:
Broasting is a healthier and tastier alternative to deep-fried chicken. Using a pressure fryer is the key to getting that signature crispy-yet-juicy texture. You can still make broast-style chicken at home using a deep fryer, air fryer, or oven. The best places to try authentic broast chicken include Saudi Arabia, UAE, Pakistan, India, and the USA.
Your Turn!
Have you ever tried broast chicken? If so, where did you have the best one? Let us know in the comments!
Mix buttermilk, salt, black pepper, paprika, garlic powder, onion powder, and lemon juice.
Coat the chicken and refrigerate for 4 hours (overnight for best results).
2️⃣ Prepare the Coating:
In a bowl, mix flour, cornstarch, baking powder, red chili powder, oregano, and thyme.
Dredge each marinated chicken piece in the flour mixture.
Let rest for 10-15 minutes for a crispier crust.
3️⃣ Broast the Chicken: 🔥 Pressure Fryer: Heat oil to 350°F (175°C), cook for 8-10 minutes under pressure. 🔥 Deep Fryer: Heat oil to 350°F (175°C), fry for 12-15 minutes until golden brown.
4️⃣ Drain & Serve:
Place on a wire rack to remove excess oil.
Serve hot with fries, garlic mayo, or coleslaw.
Notes
For extra crunch, double-coat the chicken before frying. ✔ No pressure fryer? Use an air fryer (375°F for 20 minutes) or bake (400°F for 35-40 minutes). ✔ For spicier broast chicken, add 1 tsp cayenne pepper to the flour mix.
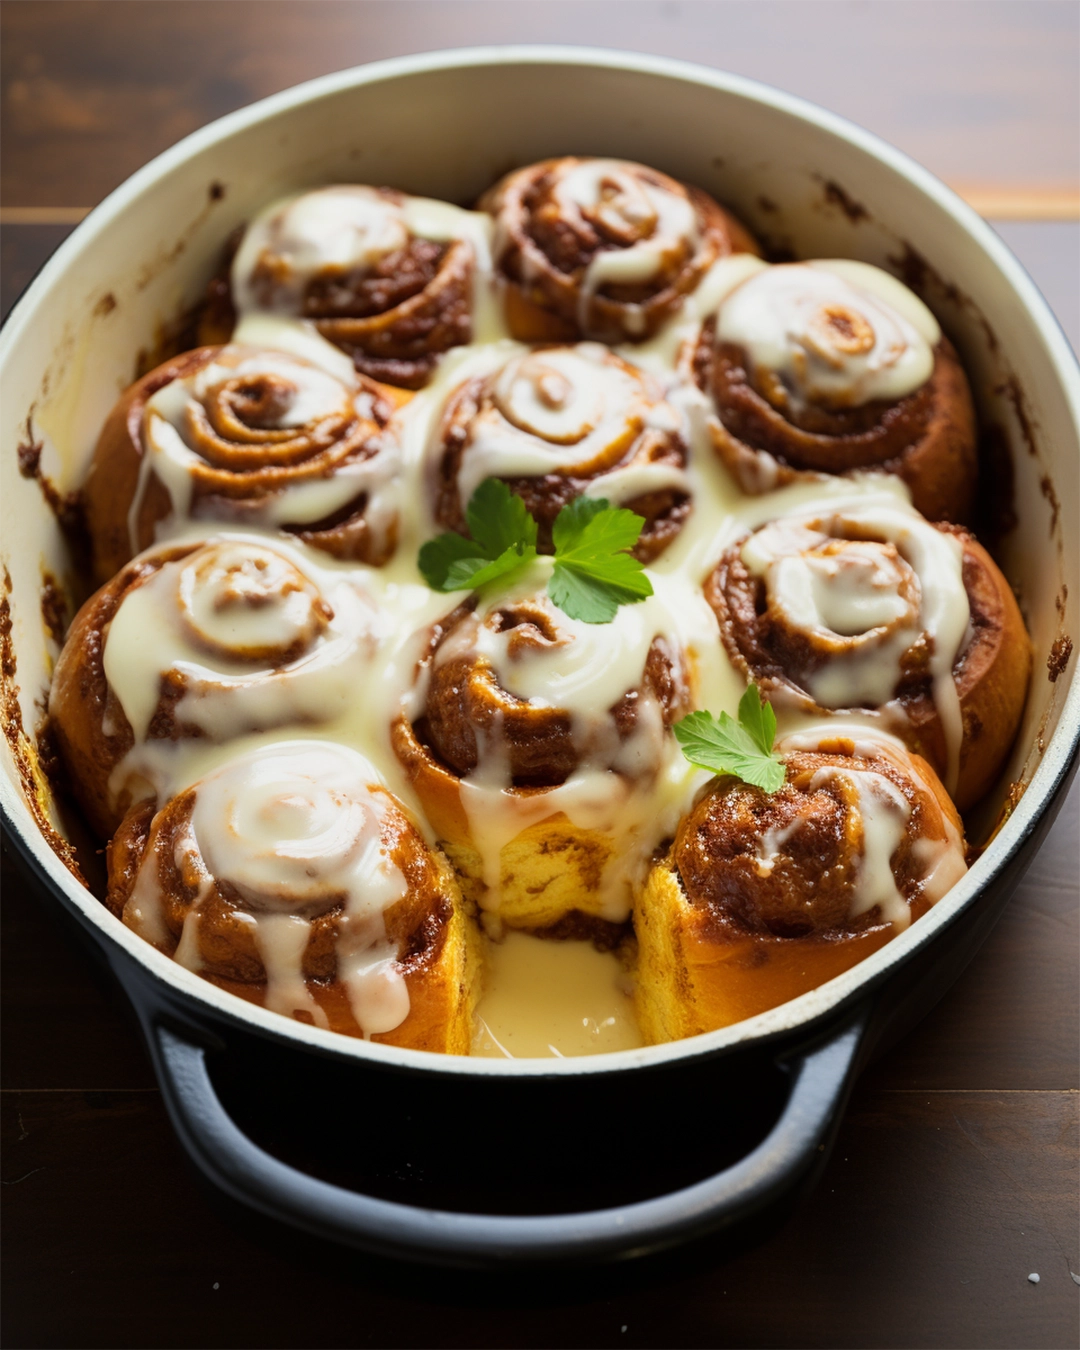
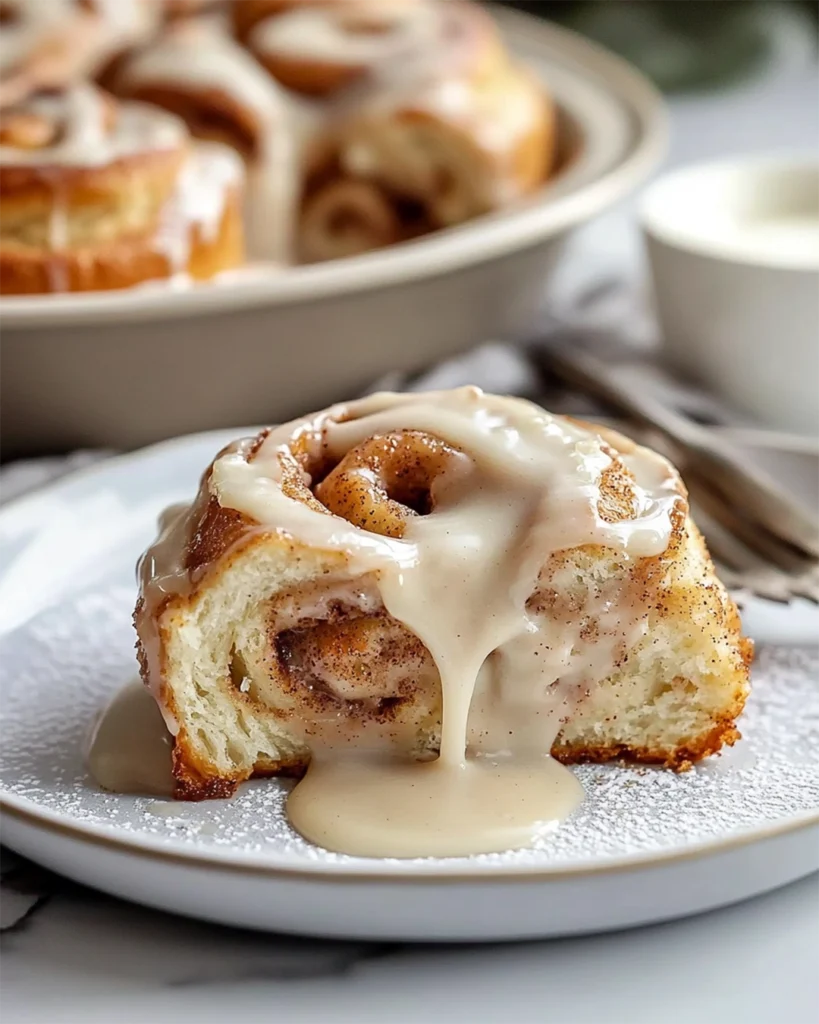
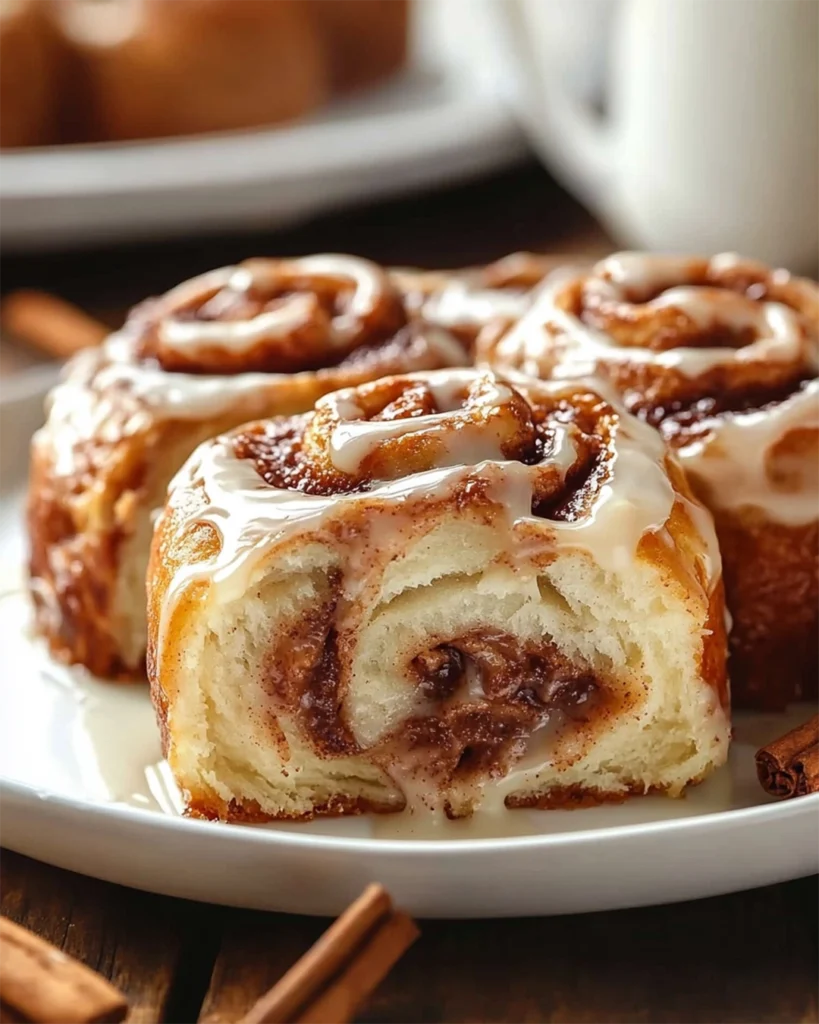
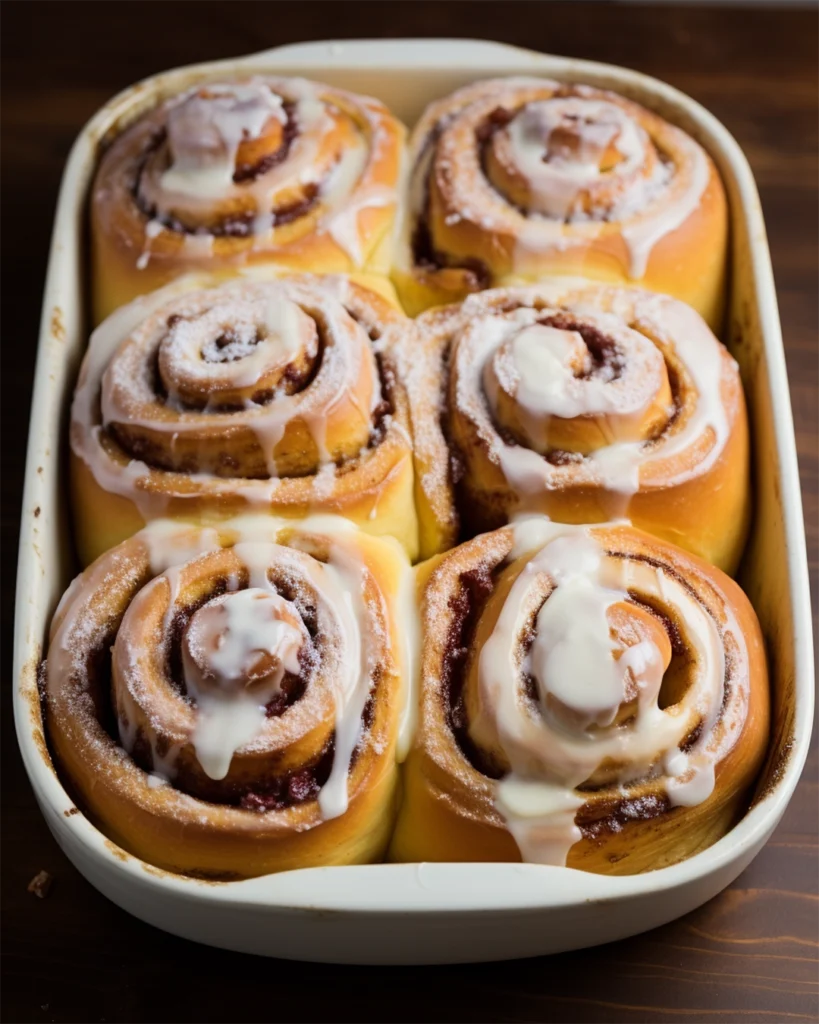
Cinnamon Rolls with Heavy Cream: Soft, Fluffy & Irresistible
by
zlata
on
March 1, 2025
Cinnamon rolls are already a delightful treat, but adding heavy cream before baking takes them to the next level. This simple technique ensures your rolls are soft, fluffy, and oozing with rich flavor, reminiscent of gourmet bakery creations. Whether you’re using store-bought dough or making homemade rolls from scratch, this guide will walk you through the process of creating cinnamon rolls with heavy cream that will impress everyone.
What Does Adding Heavy Cream to Cinnamon Rolls Do?
Pouring heavy cream over cinnamon rolls before baking transforms both their texture and taste. Here’s how this method enhances your cinnamon rolls with heavy cream:
Enhancing Moisture and Softness in Cinnamon Rolls with Heavy Cream
The addition of heavy cream infuses the dough with extra moisture, which results in rolls that are exceptionally soft and tender. Since the cream seeps into the dough during baking, it prevents dryness and ensures each bite is melt-in-your-mouth delicious.
Without heavy cream: Rolls may turn out dry and less palatable.
With heavy cream: Rolls achieve a light, fluffy texture that’s hard to resist.
Baking Tip:To maintain the desired texture, always ensure your oven is preheated properly. Learn more in our Baking Temperature Guide.
The Science Behind Cinnamon Rolls with Heavy Cream
Understanding the chemistry behind this method can help you perfect your baking technique.
Steam Generation: Since heavy cream contains water, it turns into steam during baking, which aids in leavening and contributes to a light, airy crumb.
Fat Integration: The fats from the cream enrich the dough, which leads to a tender, moist texture.
Caramelization Process: As the sugars in the cream and filling bake together, they create a delightfully sticky bottom layer.
Instructions for Making Cinnamon Rolls with Heavy Cream:
1️⃣ Preheat the oven to 350°F (175°C) so it reaches the right temperature. 2️⃣ While the oven heats up, arrange the cinnamon rolls in a greased baking dish. 3️⃣ Next, pour heavy cream over the rolls, allowing it to soak in for extra moisture. As a result, they will bake up softer and richer. 4️⃣ Then, drizzle melted butter and vanilla extract over the top for a richer taste. This step enhances both texture and flavor. 5️⃣ For added flavor, sprinkle a little extra cinnamon before baking. Not only does this boost taste, but it also creates a wonderful aroma. 6️⃣ Cover with foil and bake for 20 minutes to keep them soft. After that, remove the foil and bake for another 10-15 minutes until golden brown. Because of this, the rolls will have a perfect balance of softness and slight crispness. 7️⃣ Once done, let the rolls cool for 5 minutes, then drizzle them with icing for the perfect finish. This final step adds extra sweetness and completes the dish.
If Using Store-Bought Cinnamon Rolls:
1️⃣ Preheat the oven to 350°F (175°C). 2️⃣ Arrange the cinnamon rolls in a buttered baking dish. 3️⃣ Pour heavy cream evenly over the rolls. 4️⃣ Mix melted butter with vanilla extract and drizzle over the rolls. 5️⃣ Sprinkle a little extra cinnamon on top for added flavor.
If Making Homemade Dough:
1️⃣ Prepare the dough:
Mix flour, sugar, yeast, and salt in a bowl.
Add warm milk, melted butter, and egg. Knead until smooth.
Cover and let the dough rise for 1 hour (until doubled in size).
2️⃣ Make the filling:
Mix brown sugar and cinnamon.
Roll out the dough into a rectangle and spread softened butter.
Sprinkle the cinnamon-sugar mix evenly.
3️⃣ Roll and cut:
Roll up the dough tightly and cut into 1-inch slices.
Arrange rolls in a greased baking dish.
4️⃣ Pour heavy cream:
Let the rolls sit for 15 minutes, then pour the heavy cream over them.
Variations to Try
Now that you’ve mastered the classic version, let’s get creative! Whether you’re looking for a homemade twist, new flavors, or a dairy-free alternative, these variations will take your cinnamon heavy cream to the next level.
Homemade Cinnamon Rolls with Heavy Cream
Want to go fully homemade? Here’s a slight tweak to the traditional recipe:
Use buttermilk instead of regular milk in the dough for extra tang and fluffiness.
Let the dough rise overnight in the fridge for a deeper flavor.
Brush the tops with melted butter after baking for a shiny, golden finish.
Pro Tip: If making rolls from scratch, double the cinnamon filling for an extra gooey center!
If you want to level up your cinnamon rolls, try these flavor-packed variations:
Nutty Cinnamon Rolls
Sprinkle chopped pecans, walnuts, or almonds over the filling before rolling the dough.
Fruity Cinnamon Rolls
Add diced apples or raisins to the filling for a sweet, tart contrast.
Chocolate Cinnamon Rolls
Spread a thin layer of Nutella or melted chocolate over the dough before adding cinnamon sugar.
Pro Tip: Drizzle caramel sauce over warm rolls for an indulgent touch!
Vegan and Dairy-Free Alternatives
Want to make cinnamon rolls without dairy? No problem!
Replace heavy cream with full-fat coconut milk for a creamy texture.
Use vegan butter or margarine instead of regular butter.
Swap milk with almond, oat, or soy milk in the dough.
Make a vegan icing using powdered sugar + plant-based milk.
Pro Tip: Add maple syrup to the icing for extra sweetness!
Common Mistakes to Avoid When Preparing Cinnamon Rolls
Even with the best recipe, small mistakes can ruin your cinnamon rolls. To ensure they turn out perfectly soft, fluffy, and gooey, you need to avoid these common pitfalls. Fortunately, most of these issues have simple fixes, so let’s dive right in!
Overbaking or Underbaking
Getting the baking time right is crucial for achieving that perfect texture.
Overbaked Rolls:
Become dry and tough rather than soft and gooey.
This usually happens when the oven temperature is too high or the rolls are left in for too long.
Fix:
First, check the rolls at the 20-minute mark. If they are browning too quickly, cover them loosely with foil.
Second, use a thermometer to ensure the center rolls reach 190°F (88°C) before removing them from the oven.
Underbaked Rolls:
Often result in a raw, doughy center that feels uncooked.
Typically, this happens when the rolls are placed too close together, preventing heat from circulating properly.
Fix:
To avoid this, make sure the rolls are spaced slightly apart in the pan so they bake evenly.
Also, always bake at 350°F (175°C)—not lower, not higher. This ensures even cooking without burning the tops.
Incorrect Dough Consistency
If making homemade cinnamon rolls, the dough must have the right balance of moisture and elasticity. Otherwise, the texture will be off.
Too Dry Dough:
Leads to tough, dense rolls that lack softness.
Most of the time, this happens when too much flour is added.
Fix:
First, use a kitchen scale to measure the flour correctly. Adding too much can ruin the dough.
Second, if the dough feels too stiff, add 1-2 tablespoons of warm milk to loosen it up.
Too Sticky Dough:
Makes rolling and shaping difficult.
This issue often comes from too much liquid or not enough kneading.
Fix:
To fix this, knead the dough for at least 5-7 minutes until it becomes smooth and elastic.
If it remains sticky, sprinkle in a small amount of flour—but don’t overdo it! Adding too much can make the rolls dense.
Skipping the Cream Soak
The heavy cream soak is what makes these cinnamon rolls soft, fluffy, and bakery-quality. If you skip this step, you’ll miss out on the magic!
Forgetting the Cream:
Without the heavy cream, the rolls dry out quickly and lose their gooey texture.
Fix:
Always pour ½ cup of heavy cream over the rolls before baking.
If you want an even richer texture, let them sit for 10-15 minutes after adding the cream before placing them in the oven.
Bonus Tip: If you prefer extra gooey cinnamon rolls, add a little more heavy cream halfway through baking. This keeps the center soft while allowing the edges to get lightly crispy.
Frequently Asked Questions About Cinnamon Rolls with Heavy Cream
heavy cream have taken the baking world by storm! But, naturally, people have questions about how it works. Below, we’ll tackle the most common FAQs so you can bake with confidence.
What Does Adding Heavy Cream to Cinnamon Rolls Do?
Learn more about how heavy cream affects baking from King Arthur Baking.
Short Answer: It makes them softer, richer, and gooier!
Adding heavy cream before baking allows the dough to soak up moisture, resulting in ultra-soft, pillowy cinnamon rolls. As the rolls bake, the cream thickens and combines with the cinnamon-sugar filling, creating a rich caramel-like sauce at the bottom.
Bonus Tip: If you love extra gooey rolls, use ¾ cup of cream instead of ½ cup!
How Can I Make My Cinnamon Rolls More Moist?
Short Answer: Heavy cream is the key, but other factors help too.
If your cinnamon rolls turn out dry, try these fixes:
Use heavy cream before baking to keep them moist.
Don’t overbake—check for doneness at 20 minutes.
Brush with melted butter after baking for extra softness.
Store properly—keep leftovers in an airtight container to prevent drying out.
Pro Tip: Reheat cinnamon rolls by covering them with a damp paper towel and microwaving for 10-15 seconds. This restores moisture!
How Much Heavy Cream Should I Use on Cinnamon Rolls?
Short Answer: Typically, ½ cup per batch of cinnamon rolls.
Step-by-Step Recipe: Making Cinnamon Rolls with Heavy Cream
Pan Size – If using a 9×13-inch pan, ½ cup is perfect.
Personal Preference – For an extra creamy texture, use ¾ cup.
Store-Bought vs. Homemade Rolls – Homemade dough absorbs more liquid, so you may need a little extra.
Pro Tip: If using canned cinnamon rolls, pour just enough cream to cover the bottom of the pan. Too much can make the rolls overly soggy.
What Are Common Mistakes Made When Preparing Cinnamon Rolls?
Short Answer: The most common mistakes include:
Skipping the heavy cream soak – This step is crucial for soft, gooey rolls. Overbaking – Always check for doneness early to prevent dryness. Using too much flour – Too much flour creates dense, tough dough. Not spacing rolls properly – Crowding them prevents even baking.
Conclusion & Takeaways
Cinnamon are already a beloved treat, but adding heavy cream takes them to the next level! This simple trick ensures soft, fluffy, and gooey cinnamon rolls that taste just like they came from a bakery. Whether you’re using store-bought dough or making homemade rolls, this method guarantees a moist, rich texture with minimal effort.
Key Takeaways:
✅ Heavy cream keeps cinnamon rolls moist and prevents them from drying out. ✅ Pour the cream before baking to allow the rolls to soak up moisture. ✅ Avoid common mistakes, like overbaking or using too much flour. ✅ Try different variations, such as adding nuts, fruit, or even chocolate! ✅ Reheat cinnamon rolls with a damp paper towel to restore softness.
1 can refrigerated cinnamon rolls (or homemade dough)
½ cupheavy cream
2 tbspmelted butter
1 tspvanilla extract (optional)
½ tspground cinnamon (optional)
Icing (included with store-bought rolls or homemade)
Instructions
1️⃣ Preheat oven to 350°F (175°C). 2️⃣ Arrange cinnamon rolls in a greased baking dish. 3️⃣ Pour heavy cream over the rolls, allowing it to soak in. 4️⃣ Drizzle melted butter and vanilla extract over the top. 5️⃣ Sprinkle extra cinnamon for enhanced flavor. 6️⃣ Bake for 20 minutes, then uncover and bake another 10-15 minutes until golden brown. 7️⃣ Let cool for 5 minutes, then drizzle with icing.
Notes
✅ For extra gooey rolls, use ¾ cup of heavy cream instead of ½ cup. ✅ Homemade dough? Let it rise for 1 hour before baking. ✅ Store leftovers in an airtight container and reheat in the microwave for 10-15 seconds with a damp paper towel.
Baked Italian Sausage: A Delicious and Easy Meal Option
by
zlata
on
February 28, 2025
If you’re looking for a simple, flavorful, and hassle-free meal, baked Italian sausage is an excellent choice. While many people prefer grilling or pan-frying their sausages, baking them in the oven is a healthier and more convenient alternative. Not only does it ensure even cooking, but it also reduces mess and requires minimal effort.
Additionally, baking allows you to prepare side dishes simultaneously, making it perfect for meal prepping or feeding a crowd. But what makes Italian sausages so special? Let’s find out!
For more quick dinner ideas, check out our Dinner Recipes.
For more information on the nutritional value of Italian sausages, visit USDA FoodData Central.
Want more oven-baked recipes?For a unique twist, try our Pistachio Pesto Recipe as a topping for your sausages.
Baking ensures even cooking, prevents excessive grease splatters, and allows for hands-free meal preparation. Whether you’re making a simple dinner, meal prepping, or feeding a crowd, this method is perfect for creating juicy, perfectly cooked Italian sausages with minimal effort.
In this guide, we’ll cover: ✅ Step-by-step instructions for baking Italian sausages ✅ Cooking times and temperatures for perfect results ✅ The best seasonings, pairings, and variations ✅ FAQs on baking vs. pan frying and foil-wrapped methods
Let’s start with an overview of what makes Italian sausages unique!
Understanding Italian Sausages
Types of Italian Sausages
Italian sausages come in several varieties, each offering unique flavors:
Sweet Italian Sausage: Mild seasoning without heat, ideal for various dishes.
Hot Italian Sausage: Spiced with red pepper flakes for a fiery kick.
Mild Italian Sausage: Balanced flavors with pronounced garlic and herbs.
For a historical overview of Italian sausage making, check out Italy Magazine.
Types of Italian Sausages
There are three main types of Italian sausages:
Sweet Italian Sausage – Made with mild spices and no heat.
Hot Italian Sausage – Includes crushed red pepper flakes for a spicy kick.
Mild Italian Sausage – Similar to sweet but with a stronger garlic and herb flavor.
Pork or a pork-beef blend (some versions use turkey or chicken).
Fennel seeds for a slightly sweet, licorice-like flavor.
Garlic, black pepper, and paprika for seasoning.
Natural or synthetic casings to hold the sausage shape.
Whether you choose sweet, mild, or hot, baking Italian sausage is a foolproof way to bring out its natural flavors while keeping it juicy and delicious!
Benefits of Baking Italian Sausages
Health Benefits of Oven-Baked Italian Sausages
Less Oil Required: Baking eliminates the need for additional oil, making it a healthier option.
Drains Excess Fat: Sausages naturally release fat during baking, resulting in leaner links.handrecipes.com
Even Cooking: The oven provides consistent heat, ensuring sausages are thoroughly cooked.
When cooking with Italian sausages, you’ll typically find three main varieties, each with a distinct flavor profile:
Sweet Italian Sausage – Mild and well-balanced, making it perfect for any dish.
Hot Italian Sausage – Spiced with red pepper flakes, this version adds a fiery kick.
Mild Italian Sausage – Contains a stronger garlic and herb flavor without the heat.
Since these sausages come in different flavors, you can easily find one that suits your taste preferences. Want to explore more about Italian cuisine? Visit Serious Eats’ Italian Recipes for inspiration!
Convenience and Ease
Hands-Free Cooking – Once in the oven, you don’t have to monitor them constantly like you would with pan frying.
Less Mess – No oil splatters or stovetop cleanup, making baking a cleaner alternative.
Great for Large Batches – Easily cook multiple sausages at once, perfect for meal prep or feeding a crowd.
While pan-frying can give sausages a crispy, browned exterior, baking provides a juicy, evenly cooked texture without requiring constant attention.
Next, let’s dive into the step-by-step process for baking Italian sausages to perfection!
How to Bake Italian Sausages
How to Bake Italian Sausages
Step-by-Step Guide to Baking Italian Sausage in the Oven
Preparing the Sausages: If frozen, thaw sausages overnight in the refrigerator. Keeping them whole retains moisture; piercing can cause drying.
Setting Up the Oven: Preheat to 400°F (204°C). Line a baking sheet with parchment paper or foil for easy cleanup. Using a wire rack allows fat to drain and promotes even cooking.
Baking the Sausages: Place sausages on the baking sheet with space between them. Bake for 20-25 minutes, flipping halfway through. Ensure an internal temperature of 160°F (71°C) for pork or 165°F (74°C) for poultry.
Enhancing Flavor with Vegetables & Seasonings
Best Vegetables to Bake with Italian Sausages
Pairing sausages with vegetables creates a complete and flavorful meal. Consider adding:
Bell Peppers & Onions: A classic combination that caramelizes beautifully.handrecipes.com
Potatoes & Sweet Potatoes: Hearty options that roast well alongside sausages.
✅ Preheat oven to 350°F (180°C). ✅ Wrap sausages with onions, peppers, and herbs in foil. ✅ Bake for 25-30 minutes, flipping once. ✅ Open foil carefully and check internal temperature.
Cooking sausages in foil packets locks in moisture and infuses flavors:
Preparation: Preheat oven to 350°F (180°C). Place sausages on a large piece of foil with chopped onions, bell peppers, or tomatoes. Season with olive oil, garlic powder, and Italian herbs.
Cooking: Seal the foil packet and bake for 25-30 minutes, flipping once halfway through. Ensure sausages reach the appropriate internal temperature.
Baking vs. Pan-Frying Italian Sausages
Pan-Frying: Provides a crispy exterior and faster cooking time (10-15 minutes) but requires more attention and can be messier.handrecipes.com
Baking: Offers hands-free cooking, less mess, and even heat distribution but takes longer (20-25 minutes).
Step-by-Step Guide for Foil-Wrapped Sausages
1️⃣ Preheat oven to 180°C (350°F). 2️⃣ Place sausages on a large piece of foil. Add chopped onions, bell peppers, or tomatoes for extra flavor. 3️⃣ Season with olive oil, garlic powder, and Italian herbs. 4️⃣ Fold the foil into a sealed packet to trap steam. 5️⃣ Bake for 25-30 minutes, flipping once halfway through. 6️⃣ Carefully open the foil and check that the sausages have reached 160°F (71°C) for pork or 165°F (74°C) for chicken.
Baking vs. Pan Frying: Which is Better?
Both baking and pan-frying have their benefits. Here’s how they compare:
Baking Sausages in the Oven
✔ Hands-free cooking – No need to stand over the stove. ✔ Less mess – No grease splatter. ✔ Even cooking – Perfectly cooked all the way through. ❌ Takes longer – 20-25 minutes vs. 10-15 minutes for pan frying.
Pan-Frying Sausages on the Stovetop
✔ Faster cooking time – Ready in 10-15 minutes. ✔ Crispy exterior – Pan frying gives a golden-brown crust. ❌ Requires more attention – Needs flipping and careful monitoring. ❌ Can be messy – Oil splatters can make cleanup harder.
Serving & Storage Tips
Serving Suggestions – Best Ways to Enjoy Baked Sausages
Delicious Ways to Serve Baked Italian Sausages
Baked sausages are versatile and can be served in various ways:
With Roasted Vegetables: Combine with your favorite roasted veggies for a balanced meal.
In a Sandwich: Slice and serve in a crusty roll with sautéed peppers and onions.
Over Pasta: Chop and mix
Storage & Reheating Tips for Baked Sausage
How to Store Leftover Italian Sausages
Refrigerate: Store in an airtight container for up to 4 days.
Freeze: Wrap in foil and freeze for up to 3 months.
Best Reheating Methods for Italian Sausage
🔥 Oven: Bake at 350°F (175°C) for 10-12 minutes. ⚡ Microwave: Heat on medium power for 1-2 minutes. 🍳 Air Fryer: Set to 350°F (175°C) for 3-5 minutes.
How Long Does It Take to Cook Italian Sausages in the Oven?
At 400°F (204°C):20-25 minutes, flipping halfway.
At 375°F (190°C):25-30 minutes for a slightly slower cook.
At 350°F (175°C) in foil:25-30 minutes, sealing in juices.
How Long to Cook Sausages in the Oven?
Standard cooking time is 20-25 minutes at 400°F (204°C), but time varies based on size and type.
Always check internal temperature (160°F/71°C for pork, 165°F/74°C for chicken or turkey sausages).
Is It Better to Bake or Pan Fry Sausage?
Baking Pros: ✅ Hands-free cooking ✅ Even heat distribution ✅ Less mess and oil splatter
Verdict: If you want convenience and even cooking, baking is the way to go!
How Long to Cook Sausages in the Oven at 180°C (350°F) in Foil?
25-30 minutes is the ideal cooking time for sausages wrapped in foil.
Foil traps steam, keeping sausages extra juicy but less browned.
Expert Tips for the Best Baked Sausages
✅ For Extra Crispiness: Broil sausages for 2-3 minutes at the end of baking. ✅ To Prevent Drying Out: Avoid overbaking and check temperature with a meat thermometer. ✅ For Even Cooking: Flip sausages halfway through and use a wire rack for air circulation. ✅ For More Flavor: Marinate sausages in olive oil, garlic, and Italian herbs before baking.
Wrapping Up – Why This Recipe is a Must-Try
Baking Italian sausages is one of the easiest, healthiest, and most foolproof ways to cook them. Whether you’re preparing a quick weeknight meal or a large family dinner, this method guarantees juicy, flavorful sausages with minimal effort.
By following these step-by-step instructions, flavor-enhancing tips, and storage hacks, you can customize your dish to suit any occasion. Whether served with roasted veggies, in a sandwich, over pasta, or as a party appetizer, baked sausages are always a crowd-pleaser!
Conclusion & Final Thoughts
Enjoy Perfectly Baked Italian Sausages Every Time!
Baking Italian sausages is one of the easiest, healthiest, and most foolproof ways to cook them. Whether you’re preparing a quick weeknight meal or a large family dinner, this method guarantees juicy, flavorful sausages with minimal effort.
By following these step-by-step instructions, flavor-enhancing tips, and storage hacks, you can customize your dish to suit any occasion. Whether served with roasted veggies, in a sandwich, over pasta, or as a party appetizer, baked Italian sausages are always a crowd-pleaser!
What’s Your Favorite Way to Serve Baked Italian Sausages?
Now it’s your turn! Do you enjoy them on a sandwich, in a pasta dish, or as a one-pan meal? Have you ever tried different seasonings or foil-baked versions?
Drop a comment below and share your favorite way to make baked sausages! We’d love to hear your tips and variations.
1 pound (4-6 links) Italian sausage (sweet, mild, or hot)
1 tablespoon olive oil (optional, for extra crispiness)
Optional Add-Ins for Extra Flavor
1 bell pepper, sliced
1 onion, sliced
2 cloves garlic, minced
½ teaspoon Italian seasoning
¼ teaspoon red pepper flakes (for heat)
½ teaspoon smoked paprika (for a deeper smoky flavor)
½ cup cherry tomatoes (adds sweetness when roasted)
Instructions
Step 1 – Preparing the Sausages
If frozen, thaw sausages overnight in the refrigerator.
Keep sausages whole to retain juiciness. Pricking them can cause them to dry out.
Step 2 – Setting Up the Oven
Preheat oven to 400°F (204°C).
Line a baking sheet with parchment paper or foil for easy cleanup.
(Optional) Place a wire rack over the baking sheet to allow air circulation.
Step 3 – Baking the Sausages
Place sausages on the prepared baking sheet, leaving space between each.
(Optional) Toss sliced onions, bell peppers, and cherry tomatoes with olive oil, Italian seasoning, and red pepper flakes. Spread around the sausages.
Bake for 20-25 minutes, flipping them halfway through.
Check the internal temperature using a meat thermometer:
Pork sausages: 160°F (71°C)
Chicken or turkey sausages: 165°F (74°C)
(Optional) For a crispy finish, broil for 2-3 minutes at the end.
Notes
✔️ How Long Does It Take to Cook Italian Sausages in the Oven?
At 400°F (204°C):20-25 minutes
At 375°F (190°C):25-30 minutes
At 350°F (175°C) in foil:25-30 minutes
✔️ Is It Better to Bake or Pan Fry Sausage?
Baking Pros: Even cooking, hands-free, less mess.
Pan-Frying Pros: Faster cook time, crispier texture.
✔️ How Long to Cook Sausages in the Oven at 180°C (350°F) in Foil?
25-30 minutes, sealing in juices and flavors.
Wrap sausages individually or in small packets with vegetables for added moisture.
✔️ Storage & Reheating:
Refrigerate: Store in an airtight container for up to 4 days.
Freeze: Wrap individually and store for up to 3 months.
Reheat in the oven: Bake at 350°F (175°C) for 10-12 minutes.
Reheat in an air fryer: Heat at 350°F for 3-5 minutes for a crispy texture.
✔️ Serving Suggestions:
Serve with roasted potatoes, pasta, or in a sandwich.
Slice and toss into pasta sauces, salads, or soups.
Use as a pizza topping or in breakfast scrambles.
Pair with a side of garlic bread and marinara sauce for an Italian-inspired meal.
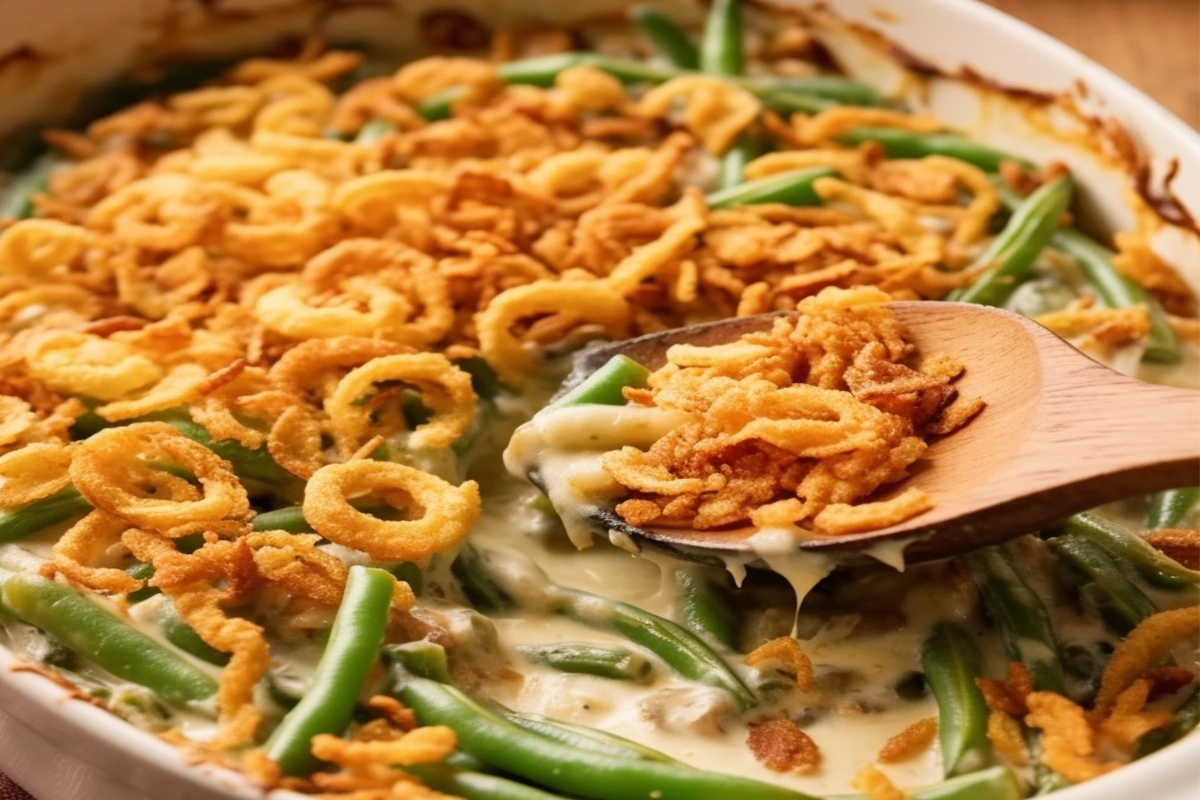
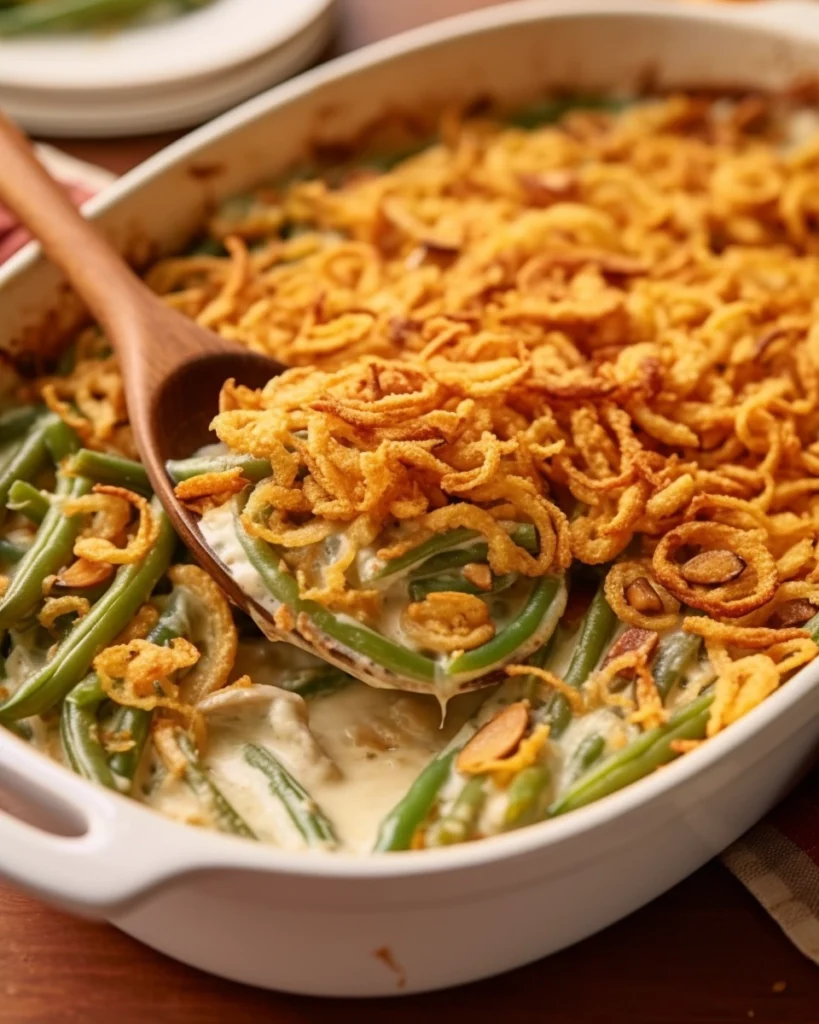
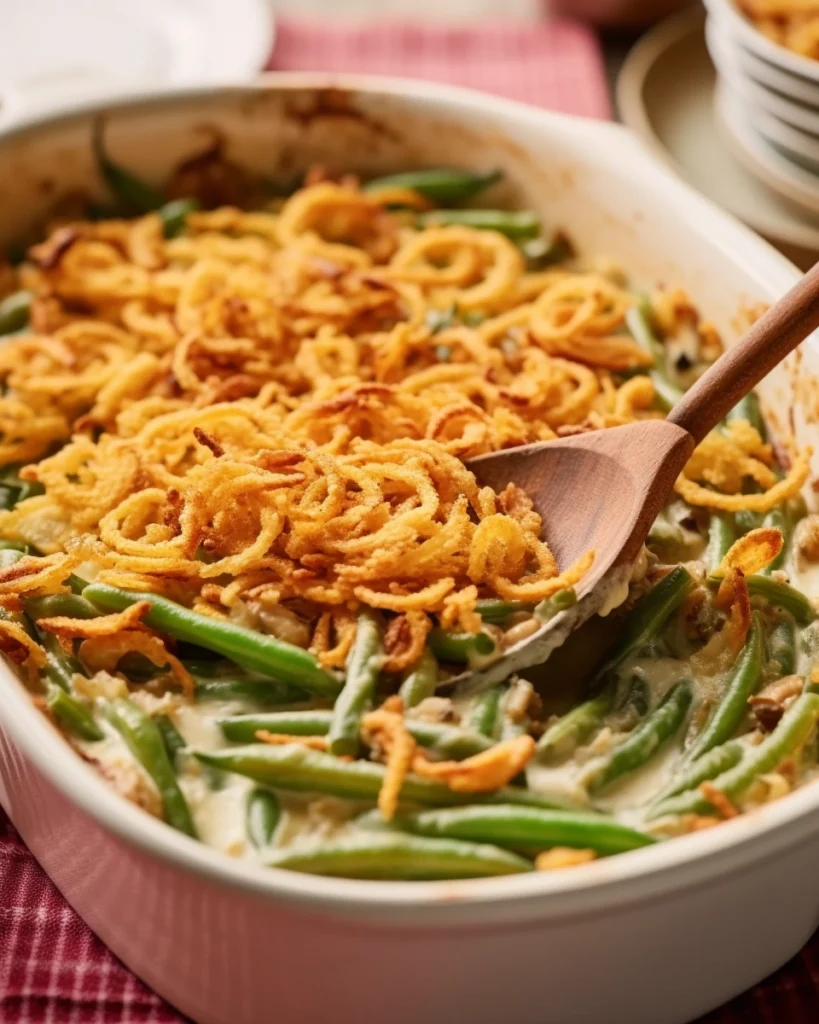
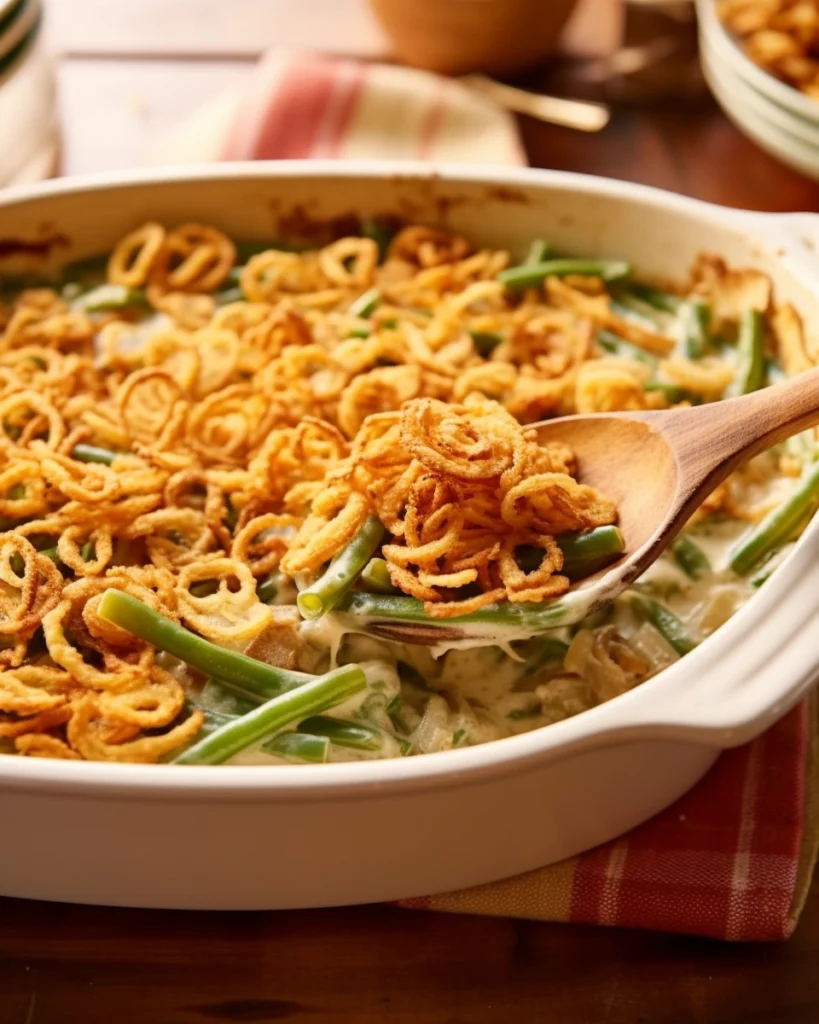
Campbell Soup Green Bean Casserole Recipe
by
zlata
on
February 22, 2025
Green bean casserole is a timeless holiday classic, bringing comfort and nostalgia to every festive table. Originally developed in the 1950s by Campbell’s Test Kitchen, this dish quickly became a Thanksgiving and Christmas essential. Its creamy texture, crispy onion topping, and savory flavors make it an all-time favorite.
In this guide, we’ll show you how to make the perfect Campbell Soup Green Bean Casserole, whether you’re a beginner or an experienced cook. You’ll learn step-by-step instructions, ingredient swaps, storage tips, and expert tricks to make this dish irresistible.
Now, let’s start with the history behind this legendary casserole!
Introduction & History
H2: The Story Behind the Classic Green Bean Casserole
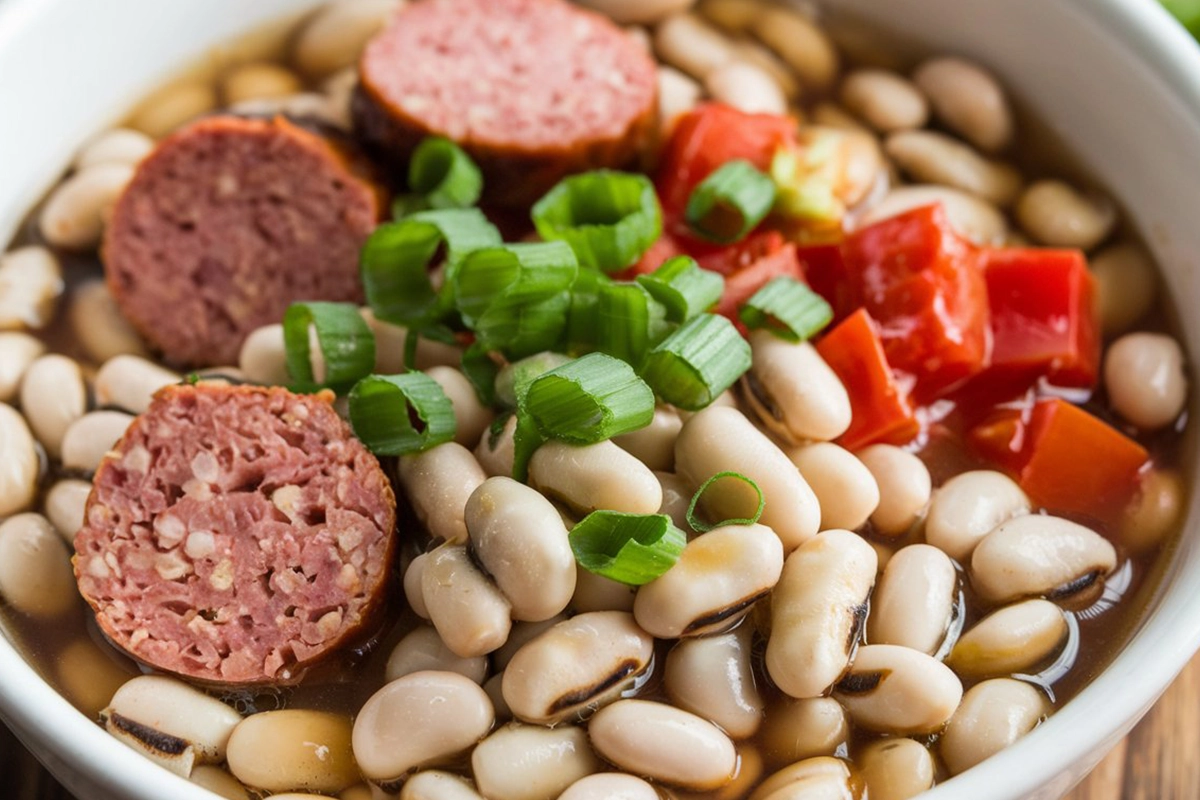
Black-eyed peas, mac and cheese, and stuffing all have their place in holiday meals, but green bean casserole stands out. It’s the perfect blend of creamy, crunchy, and savory, making it a staple at Thanksgiving and beyond.
Who Invented Green Bean Casserole?
Back in 1955, Dorcas Reilly, a home economist at Campbell’s Soup Company, set out to create a simple, affordable side dish using ingredients most American households already had. She combined green beans, cream of mushroom soup, and crispy fried onions, unknowingly crafting a dish that would stand the test of time.
Today, Campbell’s estimates that over 20 million families serve green bean casserole every Thanksgiving.
Why is Campbell Soup Green Bean Casserole So Popular?
Several factors make this dish a household favorite:
✅ Easy to Make: Requires only five simple ingredients. ✅ Quick Preparation: Ready in under 30 minutes. ✅ Crowd-Pleasing Flavor: The perfect balance of savory and crunchy. ✅ Ideal for Gatherings: Serves a large number of people effortlessly.
With its rich history and simple preparation, this iconic dish is the ultimate holiday favorite.
Ingredients & Substitutions
Ingredients:
Essential Ingredients
4 cups (or 2 cans) green beans (fresh, frozen, or canned)
1 can (10.5 oz) Campbell’s Cream of Mushroom Soup
½ cup milk
1 teaspoon soy sauce
¼ teaspoon black pepper
1⅓ cups crispy fried onions, divided
Instructions:
Step 1 – Prepare the Green Beans
If using fresh green beans, trim the ends and blanch them in boiling water for 5 minutes, then drain.
If using frozen green beans, thaw and pat them dry with a paper towel.
If using canned green beans, simply drain and rinse them to remove excess sodium.
Step 2 – Mixing Ingredients & Baking
Preheat your oven to 350°F (175°C).
In a large mixing bowl, whisk together:
1 can of Campbell’s Cream of Mushroom Soup
½ cup of milk
1 teaspoon of soy sauce
Black pepper to taste
Stir in 4 cups of green beans and ⅔ cup of crispy fried onions.
Pour the mixture into a 9×13-inch baking dish and spread evenly.
Bake uncovered for 25-30 minutes, or until the mixture is bubbly.
Step 3 – Adding Crispy Toppings
Remove the casserole from the oven.
Sprinkle the remaining ⅔ cup of crispy fried onions evenly over the top.
Bake for 5 more minutes, or until the onions turn golden brown.
Let it rest for 5 minutes before serving.
Notes:
✔️ How Do You Keep Green Bean Casserole from Being Runny?
Drain your green beans completely to prevent excess moisture.
Use full-fat soup and milk for a creamier consistency.
Let it rest before serving to allow the sauce to thicken naturally.
✔️ How Many Cans Are 4 Cups of Green Beans?
1 can (14.5 oz) of green beans = About 1¾ cups of beans (drained).
To get 4 cups of green beans, you’ll need about 2¼ cans.
✔️ Storage & Reheating:
Refrigerate leftovers in an airtight container for up to 3 days.
Freeze in a freezer-safe dish for up to 2 months (without crispy onions).
Reheat in the oven at 350°F for 20 minutes, then add fresh crispy onions on top.
✔️ Serving Suggestions:
Pair with roast turkey, mashed potatoes, stuffing, or glazed carrots for a complete holiday meal.
What Are the Ingredients for Green Bean Casserole?(PAA Question)
This casserole is famous for its simplicity. You only need five basic ingredients to create the classic version:
The Classic 5-Ingredient Recipe
Green Beans (4 cups or 2 cans) – Fresh, frozen, or canned all work.
Campbell’s Cream of Mushroom Soup (1 can) – The signature creamy base.
Soy Sauce (1 teaspoon) – Enhances the savory taste.
Best Substitutes for Each Ingredient
Want to customize the recipe? Try these alternatives:
Green Beans: Swap for broccoli, asparagus, or Brussels sprouts for a twist.
Cream of Mushroom Soup: Use cream of chicken, celery, or homemade béchamel sauce.
Milk: Try almond, oat, or heavy cream for dairy-free or richer options.
Crispy Fried Onions: Use Panko breadcrumbs, crushed crackers, or toasted almonds for crunch.
Soy Sauce: Substitute Worcestershire sauce or coconut aminos for a different flavor profile.
What Soup is Used in Green Bean Casserole?(PAA Question)
Campbell’s Cream of Mushroom Soup is the traditional choice, but some prefer other creamy alternatives.
Why Cream of Mushroom Soup Works Best
Earthy mushroom flavor pairs perfectly with green beans.
Thick texture binds the casserole together.
Campbell’s version is perfectly seasoned for this dish.
Other Soup Options for a Twist
Want to mix things up? Try these options:
Cream of Chicken Soup – Adds a richer, meatier taste.
Cream of Celery Soup – Brings a lighter, slightly herby flavor.
Cheddar Cheese Soup – Creates a cheesy green bean casserole!
Step-by-Step Cooking Guide
How to Make Campbell Soup Green Bean Casserole
This easy-to-follow guide will help you prepare a delicious, creamy, and crispy green bean casserole in just a few steps.
Step 1 – Prepping the Green Beans
Fresh green beans? Trim the ends and blanch them in boiling water for 5 minutes, then drain.
Using frozen green beans? Thaw completely and pat them dry to remove excess moisture.
Canned green beans? Drain and rinse well to reduce sodium content.
Step 2 – Mixing Ingredients & Baking
Preheat oven to 350°F (175°C).
In a large bowl, whisk together:
1 can of Campbell’s Cream of Mushroom Soup
½ cup of milk
1 teaspoon of soy sauce
Black pepper to taste
Stir in 4 cups of green beans and ⅔ cup of crispy fried onions.
Pour the mixture into a 9×13-inch baking dish and spread evenly.
Bake uncovered for 25-30 minutes, or until the mixture is bubbly.
Step 3 – Adding Crispy Toppings
Remove the casserole from the oven.
Sprinkle the remaining ⅔ cup of crispy fried onions evenly over the top.
Bake for 5 more minutes, or until the onions turn golden brown.
Let it rest for 5 minutes before serving.
How Do You Keep Green Bean Casserole from Being Runny?(PAA Questions
A watery casserole is a common issue, but here’s how to prevent it.
The Secret to a Perfectly Thick Sauce
Drain green beans thoroughly – Excess liquid makes the casserole too thin.
Use full-fat soup and milk – This keeps the consistency creamy and rich.
Let the casserole rest for 5-10 minutes before serving to allow thickening.
Tips for Avoiding a Watery Casserole
Don’t overbake – Too much heat can cause the mixture to break down.
Stir in 1 tablespoon of cornstarch if the mixture appears too thin before baking.
Use fresh or frozen green beans instead of canned, as they hold less water.
Serving & Storage Tips
How to Serve Green Bean Casserole for Maximum Flavor
This dish is best enjoyed hot and fresh from the oven, but you can enhance its taste with a few serving tricks.
Best Side Dishes to Pair With
Roast Turkey or Chicken – A holiday classic.
Mashed Potatoes & Gravy – For a comforting meal.
Stuffing or Cornbread – Adds a hearty texture contrast.
Glazed Carrots or Roasted Brussels Sprouts – Brings in a touch of sweetness.
Making It Ahead for Holiday Gatherings
Want to save time on the big day? Here’s how to make this dish ahead without losing flavor:
Assemble the casserole but do not bake it yet.
Cover tightly with plastic wrap or foil and refrigerate for up to 24 hours.
When ready to bake, let it sit at room temperature for 30 minutes before baking as usual.
Add the crispy fried onions only in the last 5 minutes of baking to keep them crunchy.
How to Store & Reheat Leftovers
If you have leftovers, follow these storage and reheating tips to keep them fresh.
Refrigerating for Short-Term Storage
Transfer the casserole to an airtight container.
Store in the fridge for up to 3 days.
Freezing for Long-Term Storage
Place in a freezer-safe dish, cover tightly, and freeze for up to 2 months.
Tip: If freezing, do not add crispy onions until reheating.
The Best Way to Reheat Without Losing Crispiness
Oven (Best Method): Preheat to 350°F (175°C), cover with foil, and bake for 20 minutes. Uncover and bake 5 more minutes to crisp up the topping.
Microwave (Quick Method): Heat in 30-second intervals, stirring occasionally. Add fresh crispy onions on top for texture.
Air Fryer: Heat at 350°F for 5 minutes to re-crisp the topping.
Common Variations & FAQs
Creative Twists on the Classic Recipe
If you want to switch things up, try these unique variations of green bean casserole!
Cheesy Green Bean Casserole
Stir in 1 cup of shredded cheddar cheese to the mixture before baking.
Sprinkle Parmesan cheese on top with the fried onions for extra crispiness.
Vegan & Gluten-Free Alternatives
Vegan Option:
Use dairy-free mushroom soup or make a homemade cashew-based sauce.
Swap regular milk for almond, oat, or soy milk.
Use crispy fried shallots instead of store-bought fried onions.
Gluten-Free Option:
Choose gluten-free cream of mushroom soup.
Use gluten-free fried onions or crushed rice crackers for crunch.
How Many Cans Are 4 Cups of Green Beans?(PAA Question)
Exact Measurements for Perfect Consistency
1 can (14.5 oz) of green beans = About 1 ¾ cups of beans (drained).
To get 4 cups of green beans, you’ll need about 2¼ cans.
If using fresh beans, measure 4 full cups after trimming.
Fresh vs. Canned vs. Frozen Green Beans
Canned: Quick & convenient, but slightly softer in texture.
Frozen: Offers a fresher taste, but needs thawing & draining.
Fresh: Best for a crispier texture but requires blanching.
Reader FAQs & Expert Cooking Tips
Can You Make Green Bean Casserole Without a Casserole Dish?
Yes! If you don’t have a traditional casserole dish, you can use:
A 9×9-inch square baking dish
A cast-iron skillet (adds extra crispiness!)
An oven-safe glass or ceramic dish
How Long Can You Leave Green Bean Casserole Out?
At room temperature: No more than 2 hours.
For food safety, always store leftovers in the fridge as soon as possible.
Conclusion & Final Thoughts
Wrapping Up – Why This Recipe is a Must-Try
The Campbell Soup Bean Casserole is more than just a side dish—it’s a holiday tradition loved by families for generations. With its rich, creamy texture, crispy onion topping, and simple ingredients, it’s the perfect addition to any meal. Whether you’re serving it at Thanksgiving, Christmas, or a Sunday dinner, this dish never fails to impress!
Final Tips for a Perfect Green Bean Casserole
Always drain your green beans well to avoid a watery texture.
For extra flavor, try adding cheese or crispy bacon bits.
Make it ahead of time and store it properly for easy holiday prep.
What’s Your Favorite Twist on Green Bean Casserole?
Now it’s your turn! Do you prefer the classic recipe, or do you like to add a creative twist? Have you ever tried making it with fresh green beans or a different soup base?
💬 Leave a comment below and share your favorite way to make green bean casserole! We’d love to hear your tips and variations.
4 cups (or 2 cans) green beans (fresh, frozen, or canned)
1 can (10.5 oz) Campbell’s Cream of Mushroom Soup
½ cup milk
1 teaspoon soy sauce
¼ teaspoon black pepper
1⅓ cups crispy fried onions, divided
Instructions
Step 1 – Prepare the Green Beans
If using fresh green beans, trim the ends and blanch them in boiling water for 5 minutes, then drain.
If using frozen green beans, thaw and pat them dry with a paper towel.
If using canned green beans, simply drain and rinse them to remove excess sodium.
Step 2 – Mixing Ingredients & Baking
Preheat your oven to 350°F (175°C).
In a large mixing bowl, whisk together:
1 can of Campbell’s Cream of Mushroom Soup
½ cup of milk
1 teaspoon of soy sauce
Black pepper to taste
Stir in 4 cups of green beans and ⅔ cup of crispy fried onions.
Pour the mixture into a 9×13-inch baking dish and spread evenly.
Bake uncovered for 25-30 minutes, or until the mixture is bubbly.
Step 3 – Adding Crispy Toppings
Remove the casserole from the oven.
Sprinkle the remaining ⅔ cup of crispy fried onions evenly over the top.
Bake for 5 more minutes, or until the onions turn golden brown.
Let it rest for 5 minutes before serving.
Notes
✔️ How Do You Keep Green Bean Casserole from Being Runny?
Drain your green beans completely to prevent excess moisture.
Use full-fat soup and milk for a creamier consistency.
Let it rest before serving to allow the sauce to thicken naturally.
✔️ How Many Cans Are 4 Cups of Green Beans?
1 can (14.5 oz) of green beans = About 1¾ cups of beans (drained).
To get 4 cups of green beans, you’ll need about 2¼ cans.
✔️ Storage & Reheating:
Refrigerate leftovers in an airtight container for up to 3 days.
Freeze in a freezer-safe dish for up to 2 months (without crispy onions).
Reheat in the oven at 350°F for 20 minutes, then add fresh crispy onions on top.
✔️ Serving Suggestions:
Pair with roast turkey, mashed potatoes, stuffing, or glazed carrots for a complete holiday meal.
Sausage Balls Without Bisquick Recipe – Easy & Delicious Homemade Alternative
by
zlata
on
February 20, 2025
Introduction
Sausage balls are a classic Southern appetizer that combines savory sausage, melty cheese, and a soft, biscuit-like texture. They’re perfect for breakfast, game day, or holiday gatherings. But what if you don’t have Bisquick on hand or prefer a homemade version without preservatives?
This easy sausage ball recipe replaces Bisquick with simple pantry ingredients like flour, baking powder, and salt. The result? Perfectly tender, cheesy sausage balls with better flavor and texture!
In this guide, you’ll learn: ✔️ How to make homemade sausage balls without Bisquick ✔️ The best flour substitutes for a fluffy, biscuit-like texture ✔️ Expert tips to prevent dry or crumbly sausage balls ✔️ Tasty variations like gluten-free and spicy versions
Let’s get started!
Why Make Sausage Balls Without Bisquick?
Bisquick is a popular shortcut, but making sausage balls without it has some major benefits.
1. No Preservatives & Additives
Bisquick contains hydrogenated oils, stabilizers, and artificial flavors. When you make your own mix, you know exactly what’s in it!
2. Cheaper & More Versatile
Why buy a special mix when you can use flour and basic ingredients you already have? Plus, you can adjust the seasonings to your liking.
3. Better Texture & Flavor
Homemade sausage balls have a fluffier, lighter texture than ones made with Bisquick, which can sometimes be dense or dry.
What is Bisquick?
Bisquick is a pre-mixed baking blend that contains: ✅ Flour (main base) ✅ Baking Powder (leavening) ✅ Salt (for flavor) ✅ Shortening (adds tenderness)
To replace Bisquick, we’ll simply recreate this blend using basic pantry ingredients!
Ingredients for Homemade Sausage Balls (No Bisquick)
You don’t need a store-bought mix to make soft, cheesy, and delicious sausage balls. Instead, we’ll use simple pantry ingredients that create the same fluffy texture as Bisquick.
Flour Alternatives for Sausage Balls
Since Bisquick is primarily flour with leavening agents, we’ll need to recreate that mix using basic ingredients.
Basic Homemade Bisquick Substitute: ✅ 1 cup all-purpose flour (main base) ✅ 1 ½ teaspoons baking powder (helps the dough rise) ✅ ¼ teaspoon salt (enhances flavor)
Pro Tip: If you want a richer texture, mix in 1 tablespoon of melted butter or oil to mimic the shortening found in Bisquick.
Can You Use Regular Flour for Sausage Balls?
Yes! Just make sure to add baking powder and salt to help create the right texture.
Best Sausage Choices
The type of sausage you use will affect the flavor and moisture of your sausage balls.
Best Options: ✅ Pork breakfast sausage – Classic, flavorful, and juicy. ✅ Spicy sausage – Adds a little heat for extra kick! ✅ Turkey sausage – A leaner, lower-fat option. ✅ Plant-based sausage – Great for a vegetarian alternative.
Pro Tip: Use room-temperature sausage for easier mixing!
Cheese Selection for the Best Flavor
Cheese is what gives sausage balls their signature gooey texture and rich taste!
Best Cheese Options: ✅ Sharp cheddar – Bold, classic flavor. ✅ Pepper jack – Adds a spicy twist. ✅ Mozzarella – For an extra melty texture.
Avoid pre-shredded cheese! It contains anti-caking agents that prevent proper melting. Grate fresh cheese for the best results!
Step-by-Step Guide to Making Sausage Balls Without Bisquick
Follow these easy steps to make perfectly fluffy, cheesy, and delicious sausage balls from scratch!
Step 1: Preparing the Dough
The key to soft, tender sausage balls is mixing the ingredients correctly.
In a large mixing bowl, combine: ✅ 2 cups all-purpose flour (or gluten-free alternative) ✅ 1 tablespoon baking powder (helps with fluffiness) ✅ ½ teaspoon salt ✅ 1 pound sausage (room temperature for easy mixing) ✅ 2 cups shredded cheddar cheese ✅ ¼ cup milk (optional for extra moisture)
Mix everything together until it forms a dough-like consistency.
Pro Tip: If the dough is too dry, add a little more milk to help bind the ingredients!
Step 2: Rolling & Shaping the Sausage Balls
Now, it’s time to shape them into bite-sized balls!
How to Roll Perfect Sausage Balls: 1️⃣ Scoop about 1 tablespoon of dough per ball. 2️⃣ Roll it between your palms until smooth. 3️⃣ Place on a baking sheet lined with parchment paper. 4️⃣ Keep them 1 inch apart to allow for even cooking.
Pro Tip: Lightly oil your hands before rolling to prevent the mixture from sticking!
Step 3: Baking the Perfect Sausage Balls
Preheat your oven to 375°F (190°C).
Bake for 18-22 minutes or until: ✅ The tops are golden brown. ✅ The cheese is melted and bubbly. ✅ The inside is fully cooked (165°F internal temp).
Pro Tip: For extra crispy edges, broil for 1-2 minutes at the end!
Tips for Perfect Sausage Balls Without Bisquick
Making sausage balls from scratch is easy, but a few simple mistakes can lead to dry, crumbly, or dense results. Follow these tips to get the best texture and flavor.
1. Preventing Dry or Crumbly Sausage Balls
Use room-temperature sausage to ensure even mixing and better texture.
Add a splash of milk if the dough feels too dry. This helps keep the sausage balls soft and moist.
Avoid overbaking. Check for doneness at 18 minutes to prevent drying out.
2. Getting the Right Cheese-to-Flour Ratio
Use freshly grated cheese instead of pre-shredded cheese, which contains anti-caking agents that prevent melting.
Stick to a 2:1 cheese-to-flour ratio for the best flavor and texture.
For extra gooey sausage balls, add a small handful of mozzarella cheese to the mix.
3. Making Ahead and Freezing for Later
You can prepare the dough ahead of time and refrigerate it for up to 24 hours before baking.
To freeze, place unbaked sausage balls on a baking sheet, freeze until solid, then transfer to an airtight container.
Bake frozen sausage balls directly from the freezer at 375°F, adding 3-5 minutes to the baking time.
Variations & Substitutions
Sausage balls are easy to customize based on dietary needs and flavor preferences. Here are some great alternatives to try.
1. Gluten-Free Sausage Balls
Use gluten-free all-purpose flour in place of regular flour.
Some gluten-free flour blends already contain baking powder, so adjust accordingly.
Almond flour can also work but will create a slightly denser texture.
2. Healthier Sausage Balls
Use turkey or chicken sausage instead of pork to reduce fat content.
Swap regular cheese for low-fat cheese to cut down on calories.
Reduce the amount of flour slightly or replace part of it with oat flour for added fiber.
3. Spicy or Extra-Cheesy Variations
Add cayenne pepper or red pepper flakes to the mixture for a spicier kick.
Use pepper jack cheese instead of cheddar for a naturally spicier flavor.
For extra cheesy sausage balls, mix in a blend of cheddar, mozzarella, and parmesan.
4. Keto and Low-Carb Sausage Balls
Replace regular flour with almond flour or coconut flour to reduce carbs.
Use full-fat cheese and sugar-free sausage to keep it keto-friendly.
Nutritional Information
The nutritional content of sausage balls depends on the ingredients used, but here’s an estimate based on a standard recipe.
Per Serving (2 Sausage Balls):
Nutrient
Amount
Calories
180-220 kcal
Protein
8-10g
Fat
14-16g
Carbohydrates
4-6g
Fiber
0.5-1g
Sugar
<1g
Ways to Adjust Nutrition
To reduce fat, use turkey sausage and low-fat cheese.
For a lower-carb version, substitute almond flour for all-purpose flour.
To increase protein, add an extra ounce of shredded cheese or use leaner sausage.
Frequently Asked Questions (FAQs)
What can I use instead of Bisquick in sausage balls?
You can make a simple substitute using all-purpose flour, baking powder, and salt. A basic replacement for 1 cup of Bisquick is:
1 cup all-purpose flour
1 ½ teaspoons baking powder
¼ teaspoon salt
If you want a richer texture, you can also add 1 tablespoon of melted butter or oil to mimic the shortening in Bisquick.
Can you use regular flour for sausage balls?
Yes, but since Bisquick contains leavening agents, you need to add baking powder and salt to help with texture. Without them, the sausage balls may turn out too dense.
Can you use pancake mix instead of Bisquick for sausage balls?
Some pancake mixes can work, but they often contain added sugar, which may make the sausage balls slightly sweet. If using pancake mix, try to find a low-sugar or unsweetened variety.
How do I keep sausage balls from getting dry?
Use room-temperature sausage to ensure even mixing.
Add a splash of milk if the dough feels dry.
Avoid overbaking—check for doneness at 18 minutes to keep them from drying out.
Can I freeze sausage balls?
Yes, sausage balls can be frozen before or after baking.
Uncooked: Freeze on a baking sheet until firm, then transfer to a freezer bag. Bake straight from frozen, adding a few extra minutes.
Cooked: Cool completely, then freeze in an airtight container. Reheat in the oven at 350°F for 10-12 minutes.
Conclusion
Sausage balls Bisquick are easy to make using simple pantry ingredients. By substituting flour, baking powder, and salt for Bisquick, you can create a homemade version that is just as soft, cheesy, and flavorful.
This recipe allows for flexibility—whether you want a gluten-free, keto-friendly, or spicy variation, there are plenty of ways to customize it to your taste. By following the tips in this guide, you can ensure that your sausage balls turn out moist, tender, and packed with flavor every time.
Key Takeaways
Bisquick can be replaced with all-purpose flour, baking powder, and salt.
Use room-temperature sausage for easier mixing and better texture.
Shred cheese fresh instead of using pre-packaged shredded cheese.
Avoid dry sausage balls by adding a splash of milk if needed.
Make-ahead and freezing options allow for easy meal prep.
What Do You Think?
Have you ever made sausage without Bisquick? What’s your favorite variation? Share your thoughts and tips in the comments below!
A simple, homemade sausage ball recipe using pantry ingredients—no Bisquick needed. Perfect for breakfast, appetizers, or snacks.
Ingredients
Scale
2 cups all-purpose flour
1 tablespoon baking powder
½ teaspoon salt
1 pound pork sausage (regular or spicy)
2 cups shredded sharp cheddar cheese
¼ cup milk (optional, for moisture)
½ teaspoon garlic powder (optional, for extra flavor)
½ teaspoon onion powder (optional)
Instructions
Preheat oven to 375°F (190°C). Line a baking sheet with parchment paper.
Mix dry ingredients: In a large bowl, whisk together the flour, baking powder, and salt.
Add sausage and cheese: Crumble the sausage into the dry mixture. Add the shredded cheese. Mix well using your hands or a stand mixer.
Adjust consistency: If the mixture is too dry, add 1-2 tablespoons of milk until the dough holds together.
Roll into balls: Scoop about 1 tablespoon of the mixture and roll into balls. Place them 1 inch apart on the baking sheet.
Bake for 18-22 minutes, or until golden brown and cooked through.
Serve warm with dipping sauces like ranch or honey mustard.
Notes
For extra moisture, add a splash of milk if the dough feels dry.
Use freshly grated cheese for the best texture—pre-shredded cheese contains anti-caking agents.
To freeze: Place uncooked sausage balls on a baking sheet, freeze until solid, then transfer to a freezer bag. Bake straight from frozen, adding 3-5 minutes to the cooking time.
For keto-friendly sausage balls, substitute almond flour for all-purpose flour.
Smoked Jalapeño Poppers: The Ultimate Spicy & Cheesy Appetizer
by
zlata
on
February 20, 2025
Introduction
Smoked jalapeño poppers are the ultimate crowd-pleaser, combining smoky, spicy, and creamy flavors in one delicious bite. Whether you’re hosting a barbecue, game night, or simply craving a bold appetizer, this recipe is a must-try. Moreover, the combination of smoky bacon, rich cream cheese, and spicy jalapeños makes it irresistible.
In this guide, you’ll learn how to make the best smoked jalapeño, from selecting the perfect ingredients to achieving the ideal balance of heat and smokiness. Whether you prefer them extra spicy or mild and cheesy, we’ve got you covered. Let’s dive in!
What Are Smoked Jalapeño Poppers?
jalapeño Poppers are a delicious appetizer made by stuffing jalapeños with a creamy, cheesy filling and then wrapping them in bacon before smoking them to perfection. This process not only softens the peppers but also infuses them with a deep smoky flavor that enhances their natural spiciness.
The Origin of Jalapeño Poppers
Jalapeño poppers have been a staple in Tex-Mex cuisine for decades. The idea of stuffing peppers with cheese and meat dates back to traditional Mexican cooking, where stuffed chiles (like chiles rellenos) are common. Over time, different cooking methods emerged, and smoking became a game-changer, adding an irresistible smoky depth to the classic recipe.
Traditional vs. Smoked Jalapeño Poppers
Feature
Traditional Poppers
Smoked Poppers
Cooking Method
Deep-fried or baked
Smoked over wood
Texture
Crispy exterior
Soft and infused with smoke
Flavor
Mild and creamy
Deep, smoky, and rich
Spiciness
Varies based on the pepper
Enhanced due to slow cooking
Why You’ll Love Smoked Jalapeño Poppers
Smoky & Spicy: The slow smoking process enhances their natural heat while adding a woodsy aroma.
Creamy & Crunchy: The cheese filling balances out the heat, while bacon gives a satisfying crunch.
Perfect for Any Occasion: Whether it’s game day, a cookout, or a party, they’re always a hit!
Ingredients Needed for Smoked Jalapeño Poppers
The secret to amazing smoked jalapeño poppers lies in choosing the right ingredients. Each component plays a crucial role in balancing heat, creaminess, and smokiness. Let’s break it down.
Choosing the Best Jalapeños
The jalapeños are the star of the show! Picking the right ones makes all the difference.
✅ Size Matters: Medium to large jalapeños work best, as they provide more space for filling and don’t dry out as quickly. ✅ Freshness: Look for firm, glossy, deep green peppers with no wrinkles or soft spots. ✅ Heat Levels: Younger jalapeños (bright green) are milder, while older ones (darker green or red) tend to be spicier.
The Perfect Cheese Filling
The creamy filling is what makes jalapeño poppers irresistible. While cream cheese is the most common base, you can mix in different cheeses for extra flavor.
Best Cheese Options for Filling
Cream Cheese: Classic choice for a smooth, creamy texture. Cheddar Cheese: Adds a sharp, tangy bite. Pepper Jack: Brings a spicy, melty goodness. Goat Cheese: For a rich, slightly tangy twist.
Pro Tip: Mix in some garlic powder, smoked paprika, or crumbled bacon for an extra layer of flavor!
Ingredients
Jalapeño Poppers
Jalapeños (10-12 large) – Fresh, firm, and vibrant green for the best flavor.
Cream cheese (8 oz, softened) – Provides a creamy and tangy contrast to the heat.
Garlic powder (½ tsp) – Enhances the overall savory taste.
Onion powder (½ tsp) – Adds depth to the filling.
Smoked paprika (½ tsp) – Infuses a mild smokiness.
Bacon (10-12 slices, thin-cut) – Wraps around each popper for crispy goodness.
Toothpicks – Secures the bacon around the jalapeños.
Instructions
Step 1 – Prepare the Jalapeños
First, slice the jalapeños lengthwise and remove the seeds and membranes. For less heat, scrape out all the seeds, but if you prefer extra spice, leave a few behind.Learn more about jalapeños and their health benefits here.
Step 2 – Make the Creamy Filling
Meanwhile, in a bowl, mix cream cheese, cheddar cheese, garlic powder, onion powder, and smoked paprika. Then, stir until the ingredients are well combined and smooth.
Step 3 – Fill the Jalapeños
Next, spoon the cheese mixture into each jalapeño half, ensuring they are generously filled but not overflowing.
Step 4 – Wrap with Bacon
Afterward, wrap each stuffed jalapeño with a slice of bacon, securing it with a toothpick. For extra crispiness, slightly stretch the bacon before wrapping.
Step 5 – Smoke the Poppers
Preheat your smoker to 225°F (107°C).
Arrange the jalapeño poppers on the smoker grates, ensuring they have space for even cooking.
Smoke for 60-90 minutes, or until the bacon is crispy and the jalapeños are tender.
For expert smoking techniques, check out this smoking guide.
Step 6 – Serve and Enjoy
Finally, remove the poppers from the smoker and let them cool for a few minutes before serving. For an extra flavor boost, drizzle with ranch or barbecue sauce. Looking for a perfect dip? Pair these poppers with our Homemade Ranch Dressing.
Bacon Selection: Crispy or Chewy?
Wrapping the poppers in bacon gives them that crispy, smoky bite. But not all bacon is the same!
Thin-cut Bacon: Cooks faster and crisps up better. Thick-cut Bacon: Adds a meatier texture but takes longer to cook.
Pro Tip: For crispier bacon, par-cook it slightly before wrapping the poppers!
Extra Flavor Enhancers
Want to take your poppers to the next level? Add some extra ingredients for more depth and texture.
Step-by-Step Guide to Preparing Smoked Jalapeño Poppers
Making smoked poppers is easier than you think—all you need is a bit of prep and patience. Follow this simple step-by-step process to get the best smoky flavor and perfect texture every time.
Step 1: Prepping the Jalapeños
Before anything else, let’s get those jalapeños ready!
Wash & Dry: Rinse the jalapeños under cold water and pat them dry. Slice in Half or Keep Whole:
Halved: Easier to fill and cook faster.
Whole: Can be stuffed from the top but requires extra care when deseeding. Remove Seeds & Membranes: Use a small spoon or knife to scrape out the seeds and white membrane (this is where most of the heat comes from!).
Pro Tip: If you want extra heat, leave some membranes intact!
Step 2: Making the Cheese Filling
Now, let’s prepare the creamy, flavorful filling.
In a mixing bowl, combine: ✅ Softened cream cheese ✅ Shredded cheddar or pepper jack ✅ 1 tsp garlic powder ✅ ½ tsp smoked paprika ✅ Crumbled bacon bits (optional) ✅ Chopped green onions or cilantro for freshness
Mix until smooth—this will make stuffing the peppers much easier.
Step 3: Stuffing the Jalapeños
Now comes the fun part!
Fill each jalapeño with the cheese mixture, but don’t overstuff—leave a little room to prevent it from oozing out.
Step 4: Wrapping with Bacon
Wrap each jalapeño with a slice of bacon, securing it with a toothpick if needed. For extra crispy bacon, stretch it slightly before wrapping. If using thick-cut bacon, consider par-cooking it first to help it crisp up.
Step 5: Smoking the Poppers
Preheat your smoker to 225°F (107°C). Use fruitwood like apple or cherry for a mild, sweet smokiness, or hickory/mesquite for a stronger, BBQ-style flavor. Place the jalapeño poppers on a wire rack or directly on the smoker grates. Smoke for 60-90 minutes, or until the bacon is crispy and the jalapeños are tender.If you love smoked appetizers, try our Smoked Chicken Wings Recipe.
Pro Tip: If your bacon isn’t crisping up, crank the smoker to 375°F (190°C) for the last 10 minutes!
Tips and Tricks for Perfect Smoked Jalapeño Poppers
Getting the best flavor and texture takes more than just following a recipe. Here are pro-level tips to make sure your smoked jalapeño come out crispy, cheesy, and packed with smoky goodness.
1. Controlling the Spice Level
Want milder poppers? Remove all the seeds and inner membranes. Like it hot? Leave some membranes intact or use aged (red) jalapeños. Spicy twist? Add cayenne pepper or hot sauce to the filling!
Pro Tip: If jalapeños are too spicy, soak them in ice water for 30 minutes before stuffing.
2. Preventing Cheese from Oozing Out
Nobody likes losing half their filling while smoking! To keep it inside:
✅ Don’t overfill—leave a little space at the top. ✅ Chill stuffed jalapeños for 10 minutes before wrapping them in bacon. ✅ Use a firmer cheese mix—blend cream cheese with shredded cheese for better consistency.
3. Achieving the Crispiest Bacon
Stretch the bacon slightly before wrapping—it will hold its shape better. Thin-cut bacon crisps faster than thick-cut. Want extra crispy bacon? Finish poppers over high heat (375°F) for 5-10 minutes.
Pro Tip: Lay poppers on a wire rack instead of directly on the smoker grate for better airflow and crispier bacon!
4. Making Ahead and Storing Leftovers
Want to prepare poppers ahead of time? No problem!
Make-Ahead Tips: ✅ Stuff and wrap jalapeños, then store them in the fridge for up to 24 hours before smoking. ✅ Freeze uncooked poppers for up to 3 months—just thaw before smoking!
Reheating Leftovers: ✅ Oven: 375°F for 10-15 minutes. ✅ Air Fryer: 350°F for 5-7 minutes. ✅ Avoid the microwave—it makes them soggy!
Variations of Smoked Jalapeño Poppers
While the classic smoked jalapeño poppers are always a hit, there are plenty of ways to customize them to suit different tastes and dietary needs. Here are some exciting variations to try!
1. Vegetarian Smoked Jalapeño Poppers
Skip the bacon but keep the smoky flavor!
Cheese-Based Options: ✅ Cream cheese + shredded cheddar + green onions ✅ Goat cheese + honey drizzle for a sweet-savory twist ✅ Pepper jack + black beans for a Tex-Mex vibe
Meat-Free Additions: ✅ Crumbled tortilla chips for a crispy topping ✅ Diced mushrooms for an umami punch ✅ Roasted corn for a smoky-sweet crunch
Pro Tip: Use smoked paprika or liquid smoke to enhance that grilled flavor without the bacon!
Extra Add-Ins: Crumbled feta, ricotta, or a pinch of parmesan for an extra flavor boost!
3. Protein-Packed Poppers
Take your poppers to the next level with some added protein!
Meat Additions: ✅ Shredded chicken mixed with BBQ sauce ✅ Chorizo or sausage crumbles for a spicy kick ✅ Pulled pork for a rich, smoky bite
Seafood Twist: ✅ Stuff with cream cheese + lump crab meat for a luxurious flavor ✅ Smoked salmon + dill for a gourmet touch
4. International-Inspired Jalapeño Poppers
Want to mix up the flavors? Try these global twists!
Mexican Style: ✅ Fill with queso fresco + refried beans + cilantro ✅ Top with pico de gallo after smoking
Japanese Fusion: ✅ Cream cheese + chopped sushi-grade tuna + sesame seeds ✅ Top with a drizzle of sriracha mayo
Italian Flavor: ✅ Stuff with ricotta + sun-dried tomatoes + oregano ✅ Wrap in prosciutto instead of bacon
Nutritional Information
jalapeño are packed with flavor, but what about their nutritional value? Whether you’re counting calories or looking for a low-carb snack, here’s what you need to know.
Calories and Macronutrients (Per Serving – 2 Poppers)
Note: These values are estimates and may vary based on ingredients used.
Nutrient
Amount
Calories
~150-200 kcal
Protein
7-10g
Fat
12-15g
Carbohydrates
2-4g
Fiber
~1g
Sugar
<1g
Key Takeaways: ✅ Low-carb & keto-friendly – Great for those on a low-carb or keto diet. ✅ High in protein & fat – The bacon and cheese provide good fats and protein. ✅ Moderate calories – A few poppers can be enjoyed guilt-free, but portion control is key!
How to Make Smoked Jalapeño Poppers Healthier
Want a lighter version? Try these tweaks:
Swap the Bacon: Use turkey bacon or skip it for a lower-fat option. Lighten the Cheese: Mix Greek yogurt with reduced-fat cream cheese. Add More Veggies: Stuff with diced bell peppers, onions, or spinach for added fiber.
Frequently Asked Questions (FAQs)
Here are some of the most common questions people have about smoked jalapeño poppers.
Is Chipotle Just Smoked Jalapeño?
Yes! Chipotle peppers are actually smoked and dried jalapeños. They are typically made from ripe red jalapeños that are slowly smoked until they become shriveled and packed with deep, smoky heat.
Fun Fact: Chipotle peppers are often used in sauces, marinades, and seasonings for an extra smoky kick!
What Is a Smoked Jalapeño Pepper Called?
A jalapeño pepper is called a chipotle. However, depending on how it’s processed, it may be referred to as:
Chipotle Meco: Lighter brown and more intensely smoked Chipotle Morita: Darker red and slightly fruitier in flavor
Both are commonly used in Mexican and Tex-Mex dishes!
Are Smoked Jalapeños Good?
Absolutely! Smoking enhances the natural flavors of jalapeños, giving them a deep, rich, and slightly sweet taste. They become softer, less raw-tasting, and more aromatic, making them perfect for poppers, sauces, or salsas.
Are Jalapeño Poppers Very Spicy?
It depends! The spice level varies based on:
How the jalapeño was grown (some are naturally hotter than others). If the seeds and membranes were removed (this is where most of the heat is!). The ripeness of the pepper (red jalapeños tend to be hotter than green ones).
Pro Tip: If you’re sensitive to spice, soak the sliced jalapeños in ice water for 30 minutes before stuffing them. This helps tone down the heat!
Can I Make Smoked Jalapeño Poppers Without a Smoker?
Yes! If you don’t have a smoker, try these alternative cooking methods:
Oven-Baked: Bake at 375°F (190°C) for 20-25 minutes, then broil for 2-3 minutes for a crispy finish. Grilled: Cook over indirect heat at low temperature for a smoky effect. Air Fryer: Cook at 350°F (175°C) for 12-15 minutes for a quick and crispy alternative.
How Do I Store and Reheat Leftover Poppers?
Got leftovers? Here’s how to store and reheat them properly:
Storage: ✅ Refrigerate poppers in an airtight container for up to 3 days. ✅ Freeze uncooked poppers for up to 3 months—just thaw before cooking.
Reheating: ✅ Oven: 375°F for 10-15 minutes (best method!). ✅ Air Fryer: 350°F for 5-7 minutes. ✅ Avoid the microwave—it makes them soggy!
Conclusion
this Smoked jalapeño are the ultimate smoky, cheesy, and slightly spicy appetizer that’s perfect for any occasion. Whether you’re hosting a backyard BBQ, game night, or just craving a delicious snack, these poppers deliver an unbeatable combination of flavor and texture.
From selecting the best jalapeños, cheeses, and bacon to mastering the smoking process, this guide has given you everything you need to make the perfect batch. Plus, with all the variations and pro tips, you can customize them to suit your taste!
Key Takeaways
Jalapeños vary in spice level, but deseeding them helps control the heat. Cream cheese, cheddar, and pepper jack are top cheese choices for stuffing. Thin-cut bacon crisps better, but thick-cut provides a meatier bite. Smoking at 225°F (107°C) for 60-90 minutes gives the best smoky flavor. Poppers can be made ahead, stored, and reheated without losing flavor. No smoker? Bake, grill, or air fry them as an alternative!
Final Thoughts
Ultimately, these smoked jalapeño are the perfect combination of creamy, smoky, and spicy flavors. Whether you’re making them for a party, game night, or weekend barbecue, they are sure to impress. So, fire up your smoker and enjoy this delicious appetizer today!
Now it’s your turn!
Have you tried making smoked jalapeño poppers before? What’s your favorite filling combination? Drop a comment below and let’s talk poppers!
Instant Pot Black-Eyed Peas Recipe
by
zlata
on
February 17, 2025
Black-eyed peas have been a staple in Southern cuisine for generations. They’re not just delicious but also packed with protein, fiber, and essential nutrients. Traditionally, cooking black-eyed peas required hours of soaking and simmering, but thanks to the Instant Pot, you can enjoy them in under an hour—no soaking required!
In this guide, you’ll learn how to make flavorful, perfectly textured black-eyed peas in the Instant Pot, along with seasoning tips, cooking hacks, and serving suggestions. Whether you like them vegan, smoky, or spicy, this recipe is customizable and foolproof!
Let’s start with the history and benefits of this humble yet nutritious legume.
What Are Black-Eyed Peas?
A Brief History of Black-Eyed Peas
Black-eyed peas, also known as cowpeas, have been cultivated for over 5,000 years. Originally from West Africa, they were brought to the Americas during the transatlantic trade and quickly became a Southern comfort food staple.
They hold symbolic significance, especially on New Year’s Day, where they’re believed to bring good luck and prosperity when eaten with greens and cornbread.
Nutritional Benefits of Black-Eyed Peas
These small, creamy legumes pack a nutritional punch! Here’s what makes them a healthy addition to your meals:
High in Fiber: Supports digestion and gut health.
Rich in Protein: Ideal for vegetarians and vegans.
Packed with Iron & Folate: Great for energy and blood health.
Low in Calories: A nutritious, weight-friendly food.
Why Use an Instant Pot for Cooking Black-Eyed Peas?
The Instant is a game-changer for cooking black-eyed peas because:
No Soaking Required: Unlike traditional methods, Instant Pot pressure cooking eliminates the need for overnight soaking.
Faster Cooking: Instead of hours on the stovetop, you’ll have tender black-eyed peas in under an hour.
Flavor Retention: The sealed pressure locks in seasonings, creating a richer taste.
Consistent Texture: No more mushy or undercooked beans—just perfect every time!
Ingredients & Substitutions
Essential Ingredients for Instant Pot Black-Eyed Peas
Making black-eyed peas in the Instant Pot requires a handful of simple ingredients. Here’s what you’ll need:
The Core Ingredients
1 pound dried black-eyed peas – No need to soak!
4 cups broth (chicken or vegetable) – Adds depth to the flavor.
1 small onion, diced – Enhances taste and aroma.
3 cloves garlic, minced – Essential for a robust, savory profile.
1 teaspoon salt – Balances flavors without overpowering.
½ teaspoon black pepper – Provides a subtle kick.
1 teaspoon smoked paprika – Adds a hint of smokiness.
1 bay leaf – Boosts aroma and depth.
Optional Add-Ins for Extra Flavor
1 smoked turkey leg or ham hock – Gives the peas a rich, meaty flavor.
½ teaspoon cayenne pepper – Perfect if you like a little heat.
1 cup diced tomatoes – Adds a slight acidity to balance flavors.
1 tablespoon apple cider vinegar – Enhances the overall taste.
Best Ingredient Substitutions
Whether you have dietary restrictions or just want to experiment, these swaps work perfectly:
For a vegan version – Use vegetable broth and add a splash of liquid smoke for depth.
Low-sodium alternative – Reduce the salt and opt for homemade broth.
To make it creamier – Stir in a small amount of coconut milk before serving.
No broth on hand? Use water, but add extra spices for more flavor.
Step-by-Step Cooking Guide
How to Cook Black-Eyed Peas in the Instant Pot
Cooking black-eyed peas in the Instant Pot is quick and hassle-free. Follow these simple steps to achieve the best results.
Step 1 – Preparing the Black-Eyed Peas
Rinse and sort through the black-eyed peas to remove any debris or damaged beans.
Optional: If you prefer soaking, cover them with water and let them sit for 4-6 hours, then drain before cooking.
Step 2 – Sautéing for Extra Flavor
Set the Instant to ‘Sauté’ mode and heat 1 tablespoon of oil.
Add diced onion and minced garlic, then stir for 2-3 minutes until fragrant.
If using smoked meat, add it now to sear slightly before pressure cooking.
Step 3 – Pressure Cooking the Black-Eyed Peas
Pour in broth or water, then add seasonings and bay leaf.
Stir well, ensuring all peas are submerged.
Close the lid, set the valve to ‘Sealing’, and select ‘Pressure Cook’ (or ‘Manual’) on HIGH for 15 minutes.
Step 4 – Releasing Pressure & Final Touches
Once the timer is up, let the pressure naturally release for 10 minutes before manually releasing any remaining pressure.
Open the lid carefully, then discard the bay leaf. If using smoked meat, remove it, shred, and stir it back in.
Taste and adjust seasoning if necessary.
How to Cook Black-Eyed Peas So They Are Not Mushy
The Secret to Perfectly Cooked Black-Eyed Peas
Achieving the right texture depends on cooking time, liquid ratio, and pressure release method. Follow these tips to keep your black-eyed peas firm yet tender.
Control Cooking Time & Pressure
Stick to 15 minutes on HIGH pressure – Any longer can cause the peas to break down.
Use natural release for 10 minutes, then quick release any remaining pressure. This gradual depressurization helps prevent overcooking.
Adjust the Liquid Ratio
Too much liquid? The peas can turn mushy. Use 4 cups of broth per 1 pound of peas for the best consistency.
Want firmer peas? Reduce liquid slightly and drain excess moisture after cooking.
Stirring & Finishing Tips
Avoid over-stirring once cooked—this can break the peas apart.
Add acidic ingredients like tomatoes or vinegar at the end, as they can slow down softening if added too early.
What Should I Season My Black-Eyed Peas With?
Classic Southern Seasonings
Traditional black-eyed peas have deep, smoky flavors that pair well with hearty meals. Common seasonings include:
Smoked meats – Ham hocks, turkey legs, or bacon for richness.
Onions & garlic – Essential aromatics for depth.
Bay leaf & thyme – Adds an earthy, herby touch.
Salt & black pepper – Simple but crucial for balance.
Vegetarian & Vegan Seasoning Alternatives
For those avoiding meat, these seasonings provide bold flavor without animal products:
Smoked paprika or liquid smoke – Mimics the depth of smoked meats.
Vegetable broth – Infuses extra savoriness.
Cumin & coriander – Introduces warmth and complexity.
Coconut aminos or soy sauce – Enhances umami notes.
Global Variations for Extra Flavor
Experimenting with different seasoning styles can elevate your black-eyed peas:
Cajun Style: Add cayenne pepper, celery, and bell peppers.
Caribbean Twist: Include coconut milk, allspice, and scotch bonnet pepper.
Indian-Inspired: Use turmeric, ginger, and garam masala.
Serving & Storage Tips
Best Ways to Serve Black-Eyed Peas
Black-eyed peas are a versatile dish that pairs well with a variety of meals. Here are some classic serving ideas:
Traditional Southern Pairings
Cornbread: A perfect companion to soak up the flavorful broth.
Collard Greens: A classic New Year’s tradition believed to bring prosperity.
Rice: Serve over white or brown rice for a hearty meal.
Creative Ways to Enjoy Leftovers
Black-Eyed Pea Salad: Toss with diced tomatoes, cucumbers, and vinaigrette.
Taco Filling: Use in place of meat for a nutritious, plant-based option.
Soup or Stew Base: Blend into a thicker consistency for a comforting bowl.
How to Store & Reheat Black-Eyed Peas
Refrigerating for Short-Term Storage
Allow peas to cool completely before transferring them to an airtight container.
Store in the fridge for up to 4 days.
Freezing for Long-Term Storage
Portion into freezer-safe bags or containers.
Label with the date and freeze for up to 3 months.
Tip: Freeze in small portions for easy reheating.
Best Ways to Reheat Without Losing Texture
Stovetop: Heat on medium-low, adding a splash of broth or water to prevent drying out.
Microwave: Use a microwave-safe dish, covering with a damp paper towel to retain moisture.
Instant Pot: Reheat using the ‘Sauté’ function for a quick and even warm-up.
Frequently Asked Questions (FAQs)
Do Black-Eyed Peas Have to Be Soaked Before Cooking?
No, soaking is not required when using an Instant Pot! The pressure cooking method softens dried black-eyed peas quickly, eliminating the need for overnight soaking. However, if you prefer a slightly quicker cook time and even texture, a 30-minute soak can help.
How Long Do You Cook Black-Eyed Peas in the Instant Pot?
The ideal cooking time depends on whether the peas are pre-soaked or dry:
Unsoaked black-eyed peas: Cook for 15 minutes on HIGH pressure, then natural release for 10 minutes.
Soaked black-eyed peas: Reduce the cooking time to 8 minutes, followed by 10 minutes of natural release.
Can I Cook Black-Eyed Peas Without Meat?
Absolutely! For a vegetarian or vegan version, substitute smoked meats with:
Smoked paprika or liquid smoke for depth.
Vegetable broth instead of chicken broth.
Sautéed mushrooms to add umami richness.
How Do I Store and Reheat Leftover Black-Eyed Peas?
Refrigeration: Store in an airtight container for up to 4 days.
Freezing: Freeze in portions for up to 3 months.
Reheating: Warm on the stovetop with a little broth or in the microwave with a damp paper towel to keep moisture locked in.
Additional FAQs
Can I Make Black-Eyed Peas in a Slow Cooker?
Yes! Cook on LOW for 6-8 hours or HIGH for 3-4 hours. Add seasonings at the start for deep flavor.
How Do I Make Creamy Black-Eyed Peas Without Overcooking?
Mash a portion of the peas before serving and stir well. This thickens the broth while keeping the beans intact.
More Cooking Tips to Avoid Mushy Peas
Extra Expert Tips for Perfect Texture
Use 3.5 cups of liquid instead of 4 cups if you prefer firmer peas.
Cook on HIGH for 14 minutes instead of 15 if you want a slightly chewier bite.
Allow full natural pressure release (15 minutes) for the best texture.
If you prefer a creamy consistency, mash 1/4 of the cooked peas before serving.
More Seasoning Ideas for Extra Flavor
Global Variations to Try
Mediterranean: Add oregano, rosemary, and lemon zest.
Latin-Inspired: Use cumin, chipotle powder, and a dash of lime juice.
Asian-Inspired: Try soy sauce, ginger, and a sprinkle of sesame seeds.
Conclusion & Final Thoughts
Cooking Instant Black-Eyed Peas is quick, easy, and packed with flavor. Whether you prefer them smoky, spicy, or seasoned with Southern charm, this recipe offers endless possibilities. Thanks to the Instant Pot, you can skip the soaking step and still achieve perfectly tender peas in under an hour.
By following these step-by-step instructions, seasoning tips, and storage guidelines, you’ll always have delicious black-eyed peas ready to serve. Whether paired with cornbread, rice, or greens, this dish is a true comfort food classic.
What’s Your Favorite Way to Enjoy Black-Eyed Peas
Do you stick with the traditional recipe, or do you like to add your own creative twist? Have you tried making them vegan or extra spicy?
💬 Drop a comment below and share your favorite black-eyed pea variations! We’d love to hear your tips, tricks, and secret ingredients.
1 pound dried black-eyed peas (no soaking required)
4 cups broth (chicken or vegetable)
1 small onion, diced
3 cloves garlic, minced
1 teaspoon salt
½ teaspoon black pepper
1 teaspoon smoked paprika
1 bay leaf
Optional Add-Ins
1 smoked turkey leg or ham hock (for richer flavor)
½ teaspoon cayenne pepper (for a spicy kick)
1 cup diced tomatoes
1 tablespoon apple cider vinegar
1 sprig fresh thyme
Instructions
Step 1 – Prepare the Black-Eyed Peas
Rinse and sort the black-eyed peas to remove any debris or damaged beans.
Step 2 – Sauté for Extra Flavor
Set the Instant Pot to ‘Sauté’ mode and heat 1 tablespoon of oil.
Add diced onion and minced garlic, cooking for 2-3 minutes until fragrant.
If using smoked meat, sear it lightly in the pot before proceeding.
Step 3 – Pressure Cook the Black-Eyed Peas
Pour in broth, then add seasonings and bay leaf.
Stir well, ensuring all peas are submerged.
Close the lid, set the valve to ‘Sealing’, and select ‘Pressure Cook’ on HIGH for 15 minutes.
Step 4 – Release Pressure & Final Touches
Once done, let the pressure naturally release for 10 minutes, then quick-release any remaining pressure.
Open the lid carefully, discard the bay leaf, and shred the smoked meat (if used) before stirring it back in.
Taste and adjust seasoning as needed.
Notes
✔️ For a thicker consistency: Mash ¼ of the cooked peas before serving. ✔️ For firmer peas: Use only 3.5 cups of liquid and reduce cooking time to 14 minutes. ✔️ Storage: Refrigerate leftovers for up to 4 days or freeze for up to 3 months. ✔️ Reheating: Add a splash of broth or water when reheating on the stovetop or microwave. ✔️ Serving Suggestions: Pair with cornbread, collard greens, or rice for a complete meal.
Hi, I’m Zlata
I’m Zlata, the heart behind handrecipes.com. I share easy, delicious recipes inspired by my Italian roots and global adventures. Let’s cook something amazing together!